
Leaderboard


Popular Content
Showing content with the highest reputation on 03/16/2014 in all areas
-
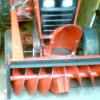
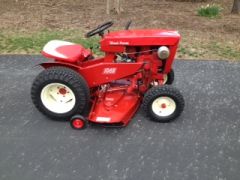
5 pointsHere is a higher resolution picture. The RM-425 deck came with the double belt idler.
-
3 pointsI was up to the family camp this weekend following a 20" dumping. The guy who plows for us said he needs a backhoe to come in and push the mounds back. Our driveway is about 1000' with a large circle by the house. When I came in my truck barely fit down the driveway. Once I got my son to bed I fired up the 314h 2-stage combo. Seat time from 10:30pm to about 12:30. By now this should be old news. But once again I'm blown away with the performance of my equipment. I probably saved a few hundred $$$ by doing it myself. Not to mention it was a good time. There was a 5' high pile in front of the garage which disappeared in no time. Plow banks up to 8' high. The road coming in was 6'-8' wide and is now 10'-12'. The Magnum 14 did plenty of grunting but got it done. Dollar for dollar you just cant beat a Wheel Horse!
-
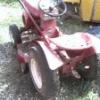
3 pointsDespite the colder than normal winter weather, I have finally finished the freshen-up of the 1045 I bought last December. It still has a small leak where the two transmission halves meet at the hitch pin. Does anyone have the part number of this seal and/or know where I can get one? Thanks!
-
3 pointsEd, In re-reading your original post I noticed you had mentioned "surging" at lower RPM and felt led to respond further. I have had considerable experience with these Onan engines and have found surging to be created by one of or a combo of three things. Onan carbs have a small expansion plug on the face side (same side as adjustment screw) that has tendancy to loosen up or worse to come clear out, and although this can happen it generally creates extreme surging. Second, is as mentioned in an earlier response a dirty carb. This can generally be taken care of by removing the top of the carb and servicing it from there. One particulaer area to look for in doing this is to remove the Idle Jet that is screwed into the lower body and be sure all of the side holes and the bottom hole in it are clear. I use a set of gas welding tip cleaning wires to do this task. Third and lastly, the carb manifolds are cast in two (2) pieces and glued together with a sealant from the factory. With age and continual heating up of the engine this sealant deteriorates resulting in the manifold sucking air. Since you are taking this manifold off anyway to adjust the valves I would pry the manifold apart and reseal it. This isn't that hard to do. One half of the manifold has guide pins cast into it and if you are careful these can be maintained. However I have had them break off separating the two halves. This isn't a big deal as they can be drilled out and replaced by some small #10-24 screws and nuts. Carefully clean the old gasket material off, trying to be very careful not to mar the gasket sealing surface. After cleaning it and washing it down with brake cleaner, laquer thinner or some similar type cleaning agent, apply an ample but conservative application of "Permatex MotoSeal 1 Ultimate Gasket Maker Gray" . This material is impervious to gasolene and ethonal infested gasolene and will hold up. You can use bolts through the end holes used to mount the manifold to hold location and to aid in clamping until the new sealant dries. Let it dry 24 hours before the manifold is bolted back into place.......................Hope all this helps in youe endeavors......................Gary
-
2 pointsA member PM'd me and asked for a pic of my rear winch mount. Couldn't see how to PM a picture, so here they are. I built on to the hitch mount the PO made. His has Unistrut (I think. It's open on one side) bolted on top of rear axle, using longer bolts, that also attach the rear axle plow mounts. If redoing that part, I would use 1 1/2" sq. tubing. I've been using the GT and she sure needs a wash! 2 pins attach the winch. Only 1 is being used in pic, which is why it isn't vertical. I have the same mount on the front of the tractor. Also have a attachment for front or rear, which has a 1' barbell bar, sticking out to add weights to. The 2, taps on the rear are for attaching my back blade, lifting boom, etc Not sure if pics will work. .
-
2 pointsGotchya..... made Ya look.
-
2 pointsPutting St Vince and the picture of a Bear on the same page?????? BLASPHEME!!!!!!!!!!!
-
2 pointsI'm packing up stuff to bring as we speak- maybe I should come in disguise...just so you know- this is what I will look like- You know- just another Illini ***** cat!...Al
-
2 pointsI found this old picture of my original collection.This picture was taken just before the 2002 WHCC show. Since this picture was taken I have figured out I have bought and sold 23 WH tractors ....but Im happy to report these original six are still in the garage plus two more ...a RJ59 and a 633. These kids are little "bigger" too .... Bob T
-
2 pointsI will make a prediction........ A Team from Michigan will win the tournament!
-
2 pointsHello Everyone It's been a while since I've been on the forum I thought I'd get back into things with this post, As most of you know I've been waiting for the nicer weather to be here to allow me to crack on with the restoration of my cub cadet, there's not really a lot more that needs doing, only for me to add a few more coats to the wheels then add the decals, and all should look grand again! Here's some pictures for you, Here's the cub whilst removing the engine, The cub once engine was removed and had a petrol wipe, Prepping the rims Getting everything ready Wheels now with new tri rib tyres on, still need a few coats Half grey or half yellow? Spraying the bonnet, I don't know how good quality these pictures will load, but such a good paint job you can even see my reflection Spraying the tractor!
-
2 pointsScouting new prospects for team ...are you?
-
2 points
 Wheel Horse 1045 that was bough in northern Indiana in December 2013 and freshened up.
 -
2 pointsNow your just showing off Martin! That is an amazing job you did on that wiring harness. Thats probably one of the most overlooked parts of my refurbs. I don't know why, as it really shouldn't be. You've inspired me to try a little harder next time. By the quality of work going into this amazing restoration, you'd think it was a Rolls Royce. Love it!!!!! Matt
-
2 pointsAnother issue is locality in which the tractor is...Here in PA horses are pretty plentiful in the surrounding areas. A C-160 I'm comfortable paying $200 for may fetch a grand in Florida or Georgia where horses seem to be more rare. I also think its personal thing. I paid $600 for a non running, clapped out, abused 18 Automatic that cost me close to $2000, after the purchase price, before all was said and done with the restoration and I didn't even touch the engine or put a professional base coat clear coat paint job on it. Someone else would probably have sent it to the junker, but since I was 6 and read my Dad's 1973 Wheel Horse tractor brochure...I swore I would have one someday...now I do
-
2 pointsEd, like has been mentioned before, take care of the valves and decarbon while its apart. the intake has to come off to do the valve clearances. bit of a pain, but these engines are worth looking after. a little maintenance goes a long way and who doesn't like caring for our wheel horses? Before the Onans started appearing in my garage i didn't have much good to say about them, ignorant i guess, i thought nothing could draw my attention away from the simplicity of the k series Kohlers. Well times have changed, and while the Kohlers still impress me with their simple, uncomplicated makeup, the Onan has impressed me with how well made an engine they really are. they are a bit of a pain to work on, spare parts are more expensive, but there is something about them that has got me hooked on them......
-
2 pointsUpdated with pictures. In the for what its worth department the secondary belt pulley is 6" in diameter. Oops that last one just slipped in!!!!!!!!!
-
1 pointYep, time to take down the Red Valentine Hearts and put up the Green Shamrock. happy St Patricks Day
-
1 pointHello, I'm a new member here and I haven't yet got my own wheel horse but me and my boyfriend are currently looking out for one for me. My boyfriends knocking around here somewhere (Charlie Smith) I love these machines and think they are great. I can't wait to get one of my own I thought I'd join up now and muck in and see all the projects you guys get up too.
-
1 pointMy personnel opinion...the Big Ten got snubbed...6 teams and Iowa has to play for a spot in the field of 64...Minnesota has never got any respect...No number 1 seeds. We will see...we are set up for some good wins that work for us...if we show up and the refs let us play. The tournament committee has put a chip on our shoulder...they have poked the shark.
-
1 pointWell I hate being right all the time! Steve I dunno about that but, I did stay at a Holiday Inn Express Last Night!
-
1 pointOnly tip I can give you is.... Sounds interesting and dangerous at the same time be careful... Oh sod it go for it! ..... Where did you see the video? I'd quite like to see it,
-
1 pointIts great to be aboard:)
-
1 pointAl, here is hoping that you can make the Mentone swap meet. You start talking to Duke and I will sneak up behind him...sandwich!!! Finally, the Illini will get the best of Michigan.
-
1 pointI agree Steve-they couldn't even make a lay up to win!= Maybe they forgot+ VINCE LOMBARDI= If winning isn't everything, why do they keep score?-Al
-
1 pointBoo, You are welcome.............Just trying to be of help as I too love these Onans and try my best to keep them alive. No engine sounds like them with that "throaty" growl they have while under load and I love that sound at idle...............Gary
-
1 pointThanks for answering him, Gary!
-
1 pointPretty sharp guy that Duke...I know Kelly didn't tell him after the picnic table burning incident last year.
-
1 pointI installed the rear tires and rims on the rear 520. Both machines lined up just waiting for the hoods and fenders to come home from being painted to finish assembly. Cleat
-
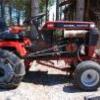
1 pointNice looking 1045 for sure! One of my personal favorite machines! Those factory front tires are hard to find. I got one set off of Joe's Outdoor Power once, they were remounted on a set of Cub Cadet rims and listed as Cub Cadet tires. I knew right away that they came from a rare 1045 and bought them fast! Nobody else figured it out. So really there is no where to get them unless they are old and used. Keep your eyes peeled and you might get lucky on Ebay. I bought every pair that showed up on Ebay over the years except one pair recently that a Redsquare member got because they got over my $100 budget. I have a few sets hoarded up since I have always wanted a few 1045's around. I put one set on my recently acquired 1045 and another set on my Army Horse. Other than that, they are rare as hens teeth!
-
1 pointwhlpny -- Thanks for the link to your steering build. Your fabrication skills far exceed mine. I really like your "all from the garage parts" restriction. Very impressive. I will be studying your build. And there is one tractor salvage yard guy in southern NH that I am going to check out for a suitable JD donor. The environmental and safety laws in MA make it near impossible for such a yard to operate here. Thanks. B/R John
-
1 pointFor some reason the later model 520 did not have these belt guides installed. The tractor had the holes punched but never tapped for bolt threads. I tapped the holes and bought a set of guides from ebay. Guides are now installed and belt guard is reinstalled. Cleat
-
1 pointIf I had that sitting in the room next to me, I wouldn't be able to sleep either! The endine looks great on there, and its getting closer all the time. Who needs sleep, when you could be assembling a restored !! Matt
-
1 pointMan you do awesome work. I just sat here and read through all 11 pages. What a nice job your doing. I'm really liking the front tires too! Keep up the good work.
-
1 pointThe new coil arrived and I installed it, seems to start quicker and run smoother now. I changed the hydro oil to synthetic 10w30 and screwed on a new filter. I am now working on the deck support system and have found some wear on the mid tach-a-matic, I will have to deal with that quickly - spring is almost here and the 3 acre yard is about to start growing fresh grass.
-
1 pointnice looking, Craig the front tires are very hard to find orig. 1045 tires only !!
-
1 pointIt IS red and looks like factory paint. Has a Tillotson updraft carb #E2A. Also has a 5 1/2" dip stick tube. Pull start only.
-
1 pointGlen, If you come on Friday, hope you can stay late enough for the cruise. It's the best part! If you come on Sat, be aware that it ends around 3:00 and some of us start packing up about noon.
-
1 pointStarting to think RS should have a topic heading for what's It Worth Wheel Horse Values. Maybe put some pinned pictures in for comparisons for People that just joine RS for trying to get an idea what there tractor is worth. This topic is almost as popular as Onan exhaust valve issue.
-
1 pointYou were apparently using the wrong Wix filter on your hydro. All I use is Wix #51410 and NAPA #1410 (which Wix makes for NAPA) on my hydro. It is a true hydraulic filter not and oil filter. The Wix and NAPA filters are twice as good as Toro....Whatever you used was an oil filter for a car.
-
1 pointYes the air filter. I run K&N HP-8030 on the engine and a regular Toro filter on the tranny. All the regular oil filters have anti flow back valves. The Toro brands do not have this. I ran a wix filter on the tranny once and it overheated. Apparently the anti flow back valves slow fluid flow. I got that from John Deere tech and have done no looking into it on my own. On a second note for the oil filters if anyone is interested, K&N makes 2 filters that fit the 520. HP-8030 and HP-8031. Both have the 1" nuts on the end, I run the HP-8030 because if is a taller filter, 5.25" vs 3.75" for the HP-8031.
-
1 pointOld monster movies have better endings than Illinois sports!
-
1 pointOk so I called my Pal stevasaurus Yesterday to congratulate him on a well fought game. It went kinda like this...... Note: some of this may be highly exaggerated. Chris: answered the phone... Hello Duke: Hi Chris is steve there? Chris: Hi Duke no he went Ice Fishin Duke: I guess I don't blame him he wouldn't of wanted to see the end anyways! Chris: Why what happeded? Duke: His ORANGES got crushed! Chris: Oh great...... Looks like he will be drowning his sorrows again in a case of rOcK -n- rYe Duke: well at least you'll have fish tonight! Chris: Duke he never catches anything except a cold! So here is the remaining bracket.
-
1 pointThat is a fine collection. I can appreciate all the travel time that went into putting those round hoods in your horse barn.I've yet to cross a state line to purchase one but have been from the mountains to within 50 miles of the atlantic ocean. Thats one end of my state to the other.
-
1 point
-
1 pointAfter lifting the plow 40 to 80 times the old arm was sore. This is what i came up with and the things i had to work with.Note to self keep 65# of lead in front and have it hope you guy's like it works great wish i'd done this years ago!!
-
1 pointIm going to let it Go.
-
1 pointThe hitch you can find on ebay, The wheels you can get from Midwest super cub. you have to understand what off set is. to make sure they clear.
-
1 pointHello Guys, I haven't been making any post because I haven't been doing anything with my machines for a while now! However I thought I'd come back with some fabulous news! I'm now an uncle. However it wasn't expected so soon, the little man is 5 weeks early, my sister had to have an emergency C- Section due to pre eclampsia and the baby's heart beat dropping! He was born yesterday (11/2/14) at 3:28AM weighing only 3lbs 8oz, he is making a full recovery, both my sister and him are fine! He is breathing on his own, and only needs a tube every other feed and they say at this rate it won't be long before they are both home! His name is Tyler. Let's hope he finds a place in his heart for wheel horses when he's older Shortly after he was born Later on in the day!
-
1 pointHello Gazza, it's Charlie from Facebook, glad you finally made it onto RedSquare. I told you this lot where a jolly good bunch! Welcome and have fun!


This leaderboard is set to New York/GMT-04:00