
Leaderboard


Popular Content
Showing content with the highest reputation on 02/15/2014 in all areas
-
10 pointsOk that'll be it for tonight . We'll see if we can get some more if not a video. We have Bob's son Robert doing our test driving. Have a good one
-
8 pointsWhats up everybody, alot of you guys kind of already know a little bit about this project. There comes a time of when you can do things and finally its has come to life as we know it. It moves, runs fantastic. Kind of like excited if you know what I mean. Anyways I am not computer oriented so if I don't succeed at this I am pretty sure that Bob will get it straightened out. Well here goes.
-
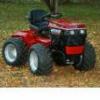
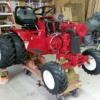
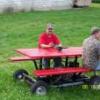
6 pointsI am going to start this post then let John post up the pictures. For quite some time John has had the idea of building a Articulated Gt-16, and last fall we started to make his idea a reality. We have spent most of the winter getting it into a working tractor and are currently at the point of testing before we go to paint. We won't be showing step by step build pics - just jumping through it. This tractor is using a new design than all previous builds on the center joint and I wish to keep it under wraps until a latter date. So please just enjoy what we do show you and hopefully in a few weeks we can show the finished project. Also we are hoping we can successfully upload the test drive video I shot today. Hang tight and lets see if John can follow me up with the pics..... https://www.facebook.com/media/set/?set=a.1396517100609436.1073741839.1393219404272539&type=1&l=2c8f30be21 Alternative album to view-at my FB Page Totally Articulated Garden Tractors by Rock and Son Fabrication. Heres the videos!!!! https://drive.google.com/file/d/0B4nVSDnhrsGoOWFVZ09ONmZyam8/edit?usp=sharing https://drive.google.com/file/d/0B4nVSDnhrsGoMHBtYmV0MFdpMWM/edit?usp=sharing
-
4 pointsI always get a bunch of icicles hanging off my house each winter, kinda cool but they are all the same and not picture worthy. But today I went into my portable shed to look around and saw this one. Its small but different so I deemed it picture worthy . Water must be dripping thru the tarp on my portable shed and landing right on the front tire of my C-105. Mike................
-
4 pointsive had a lot of guys on the forum today asking about the plating of hardware and the cost involved. what you see in the pic below cost me $39.90 out the door. this was about 1/3 to 1/2 a 5 gallon bucket full of parts. they told me its a flat rate for up to roughly 3/4 of a 5 gallon bucket. now i don't just unbolt the parts, throw them in a bucket and take them in. they told me that anything that has paint on it will take longer in the acid bath, so much so that the cost would be more. most of their business is local industrial, all new stuff, bare metal, never been plated or painted before. so thats what they like. so to keep them happy and in the end myself too by getting a better looking result, i degrease and glass bead blast everything first. they do clear zinc or yellow and black chromate finish. hope that has answered any questions. right now I'm starting to get another batch ready to get plated. when its all ready to take in i will post another pic to show how i take the parts in.....
-
3 pointsso I had to revert back to my old standby.... I gotta walk a little bow-legged to use the angle feature though...
-
3 pointsAll my tractors to date are built on Case Ingersol transaxles. I hear the subject of duals a lot- I had a buyer talk me into putting a set onto a 4x4 tractor before he took it home. Yes they look neat and gnarly- BUT- I will tell you that to start with- these tractors lay down quite a foot print overall and you have to be paying attention when your driving them. This is particularly worse at a tractor show. The duals make them very unenjoyable to drive when in a show setting especially. They also increase the turning radius as the tires will touch each other when turning. That makes putting in steering stops necessary when they are added after the fact. Now- on Chevelletowns 520 4x4 this isn't as bad as he put some thought into it and used some common sense and went with a narrower tire. Running tires the size of Burlys would be in the uncomfortable area for me -John also planned the build on what he is using with no intention of duals. I have played with just a couple of the tractors and have a pretty good feel for whats realistic and whats not. And No- I'm not knocking anyones opinions - just adding some insight!
-
3 pointsGetting out of the cab. Way too much time in the basement Mike. Do they put you down there, or do you just go by yourself???
-
3 pointsfired up #2 this morning and took it for a run. figured id give it one last run all together before starting to strip it for the rest of #3s build. took some pics of both of them together. easy to see the wide stance of the jd front axle/wheel and tire combination.
-
2 pointsI’m posting this in the hope it may be useful to somebody somewhere, if not to RS members who seem to be generally able to turn their hand to pretty much anything, perhaps for the many out there that trawl the net looking for basic information to give them the confidence to do a job. After all, it’s from the ‘guests’ that a forum’s membership often grows. Having just finished overhauling my 216-5 ready for the new season which included fixing the brake it was time to overhaul the 227-5. The 200 series rarely seem to feature on RS, possibly because they are vertical shaft and considered to be ‘lawn’ rather than ‘garden’ tractors. Anyway, on with the job in hand – sorting out the brake which was poor in that it just about operated with the pedal fully down and the parking brake lever ratchet wouldn’t stay locked in the ‘on’ position. The 200 series are fitted with the ubiquitous Peerless transaxle found on many makes of garden tractor from the 80s era and which have with a transmission disc brake. The rod from the brake pedal applies force to the calliper operating lever via the larger strong spring with the result that you can control the degree of braking action by the amount the pedal is depressed. Adjustment to compensate for the brake pads wearing down is made by tightening locking nut securing the lever to the calliper. If this adjustment is not maintained then eventually the brake only just works at full pedal depression and there isn’t enough tension in the big spring to hold the parking brake ratchet engaged. So it’s simple, just adjust the nut eh? Well, having just overhauled the brake on my 216-5, I would say that having got this far always take the whole assembly apart unless you are certain it’s in good order as you’ve done it in fairly recent years. Removing the lever revealed the first sign that dismantling was indeed required. The disc must be able to move on the shaft and those splines looked ominously rusty to me so continue on. The two ‘plungers’ (for want of a better word) that transfer force through to the pad can be removed at this point. These were clean and still shiny; those on the 216 were a bit rusty but still came out and cleaned up ok. On removing the housing, the brake pad it retains dropped out in two pieces! Be careful to locate and put aside the metal plate that sits between the pad and housing to take the force of the ‘plungers’. So now to the brake disc which when new would have simply slid off the splined shaft. A bit of wiggling and it came off (just) by hand. The problem here is that the disc sits very close to the transaxle casing making the use of a proprietary puller difficult if not impossible. With the 216 it was stuck firm and even penetrating fluid left overnight didn’t help so I had to resort to some tapping. There’s a bit of end float in the shaft so I made wedges from scrap steel sheet of various thicknesses that would just fit either side of the shaft between the disc and casing. A few taps with a copper mallet and it moved a bit allowing a couple more thin ‘wedges’ to be inserted and so on. The idea was to bring it far enough forward to use a puller but by the time it had moved that far I managed to pull it by hand. The second brake pad sits in a recess in the transaxle casing and was part worn but intact. There appears to be a thin fibre shim between the casing and the pad, possibly it was used to hold the pad in place during assembly or possibly it provides a smooth surface. On the 216 it had pretty much disintegrated so I cleaned what remained of it out. It was time now to remove the grass debris, and clean the splines on the shaft and the disc. When the splines on each are clean of the rust and solidified grease mix the disc should move easily on the shaft – almost a tad loose in fact. The disc on the 216 cleaned up well and was pretty much perfect but this one was pitted. Looking at the pad surfaces they seem to have broken up a bit and developed pockets that held moisture causing the pits during winter storage year on year but hey, ho – it’s a tractor not an automobile so it’s going back for now and I’ll keep my eye open for a better one. The pads however, needed replacing. Re-assembly, as they so often say, is pretty much the reverse of disassembly but here are a few points: Grease the splines and wipe off any excess. Remember to install the rear pad before putting on the disc. Remember the metal plate that sits behind the outer pad in the calliper housing. Remember also that the bolts securing the calliper casting go into ally – don’t over tighten! Some Peerless diagrams show a coil spring that sits on the adjuster thread before the lever is installed but I didn’t find one of these on either tractor. I think it must have been an anti-rattle device so I’ve added one to each tractor but I guess it’s not that important. I greased the surface of the lever that actuates the plungers and the reverse face that moves against the washer. Now it’s time to adjust the brake calliper by tightening the lock nut. I’m not sure what the OEM guide for this is but I tightened it till there was just a little forwards / backwards movement left i.e. in the ‘off’ position the lever isn’t touching the ‘plungers’ but starts exerting pressure through to the pads as soon as it is pulled forward slightly. Having reconnected the brake rod to the lever and also attached the return spring to it one can check the operation of the brake and the parking brake ratchet – they both worked well. I’m sure someone will chip in and correct me if I’ve done something drastically wrong here but it seems to have worked ok on both tractors now. I've used tags for this post and images uploaded to the forum gallery! As I said, hope this is useful to someone out there. Andy
-
2 pointsI think it's official. I have had the C-175 hooked to or alternating with my snowblower for the better part of 7 years. I have used the blower more this year than I have in all the previous years combined. I believe I have moved snow with it 8 times so far this year. There were two years since 2008 that I never fired it up during a winter. Made me begin to wonder why I took it off and put it on each year and it's why it stays on that tractor now. Looks like it may be back out again on Tuesday morning before we get an inch of rain and mid-50's later in the week. (Followed by frogs and locusts).
-
2 pointsBeen there, done that with the thought of duals. Sounds great, would look cool but not sure if I could see the functionality behind that. Tires weren't cheap if somebody wants to I'll buy the wheels. Like I say it would be awesome.
-
2 pointsI could see you with a cab. You would have to sit on the tractor and have some one lower the cab over you and bolt it on !!
-
2 pointsI'll throw my guess in..... 1968 Commando 6. (1-4631) @Steve - the right foot pedal is the PTO. edited to add: It could also be a '68 500 Special. (1-3631) The reasons behind my "guess": It has the wider rear fender, headlight opening in the hood, three spoke steering wheel, and the drive belt guard has a Tecumseh tab configuration and no decal indentation.
-
2 pointsWill you be putting her carcass on ice for a reanimation in the future?
-
2 pointsNo socks...
-
2 pointsVan...would that tool box hold a bottle of Rock & Rye???
-
2 pointsI want a video of guys getting in and out of the CABS!!!!!!!!!!!!!!!!!!
-
2 pointsBURGER KING !!!!!! BURGER KING!!!!!! Did someone say BURGER KING ???? Grab me a Double dollar cheese burger, onion rings( don't forget the sauce) & a Hersey Pie. I have Oh yea I know it's , we got snow too, But it's BURGER KING ????
-
2 points'88...first year for the model 520-H. http://www.youtube.com/watch?v=PX4qUILtQ1Y&feature=youtu.be
-
2 pointsInvite him on down. He can ride shotgun for ballast!!
-
2 pointsAwesome work Bob... And John! Looks like great fun, you are making me want to runout to the workshop... Expect updates on my 4x4 Raider 16 anytime soon
-
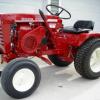
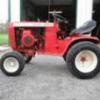
2 pointsYes, guys it will be at the show. It will also have a New coat if Red paint along with the New Decals that Yes, (wait for it) Terry Dennis has already produced for us. I'm hoping to bring the newly painted GT16 tricycle along with it.
-
2 pointsI love all of Bobs creations, but I gotta say that that one (with the big wheels) gets me all hot and bothered,,,
-
2 pointsScrew the furnace... tractors occupy that space now.
-
2 pointsHey Bill, I enjoyed your story. For me here in Orange County NC, we got about 7-8 inches of mostly snow mixed with a little ice that really caught most folks here off guard. There were more cars and trucks and buses (both school and city) stranded and stuck and down embankments than I could count. Out in the county where I live it was more of the same. There were three cars stuck at the 3-way intersection right in front of my house, another SUV nose first in the ditch just within sight of my driveway, and a full size school bus off in the ditch no more than a half mile from the end of my driveway. Right away this morning I made the decision that clearing my driveway and my daughters driveway and my son's driveway, and the intersection, and pulling two of the cars back on the road was more than I wanted to hit head on with a Wheel Horse. The logical choice was the Mahindra 4025 diesel with a 6foot scrape blade on the rear of the 3point hitch. It took about three hours to clean up most of this mess, then I stopped and went to Burger King with my Son (who had helped me pull the two vehicles back up on the road). After getting back from Burger King I loaded up the Mahindra tool box with BK chicken strips (no need for tools in the tool box as red tractors don't break down) and resumed moving more snow. About two hours later all the snow was moved and it was time to call it a day. It was fun, but now I'm ready for Spring. Happy Valentines Day Everybody! I'll add in some pics next week.
-
2 pointsThey are pretty good cheap tires, are they Duro brand ?? going by the colored strips on them, these tires were about like yours when I got them. they turned out ok.
-
2 pointsGuess I should add the two youtube videos I made with my new snow blower here also... Part 1 Part 2 RJMcEachern
-
1 pointA hobby I took up about 15 years ago, is Redline collecting. Redlines are the old Hot Wheels made from 1968-1977. I stay in the 68-72 years, we call them the Spectra-flame era. Spectra flame was the candy colored paint jobs they used to use then. After that they went with enamel paints, which are nice also, but I stay with the Spectra flames. Here's some 1968s, these were made in Hong Kong. Here's the same 1968 models that were made in US. Camaros are one of my favorites. Here's some 1969s. These are a mix of HK and US cars. 70s. 71s. I don't have a group shot of 71s, so these are the Olds 442s. Very desireable casting. 72s. Plus some of us like to go for what we call Rainbows. Collect all the colors of one casting. These are my Chargers. I also recently got into what are called unspun cars. These are basically cars that were not put together at the factory. So they are very hard to find. These are actually unpainted,and unspun. A little blurry in front..sorry bout that. Just a taste of what I have here. Also have the Rumblers,and Sizzlers,and Chopcycles that were Hot wheel related, and were released in the same era. My Photobucket album is public, you can look around if you like. http://smg.photobucket.com/user/rdln%2A66/library/ There are several message boards around to chat redlines. One I'm involved in is called Chickluu's fabulous redlines. Membership by application. I'm a mod there. Not sure if the guidelines allow me to post another message board here. If so, I can add it later. Appreciate any questions, or comments. If you have any old redlines you want to share, then by all means..post away! Thanks. Frank
-
1 pointMy other passion is 4 wheelers & sleds : And some things we've found while riding :
-
1 pointSorry Jim....but you got Way too much time on your hands.... along with cabin fever
-
1 pointI think 2 sets of duals would make it look unstoppable!! ;-)
-
1 pointSocks....or no socks?? Mike.........
-
1 pointHow about for some REAL wind and snow?? I guess a snowcab is not an option!
-
1 pointLooks like that horse is in great shape. Nice pictures.
-
1 pointLooking good Bob and John. I'd love to have a 4 wheel drive articulated tractor to blow snow with. Can't wait to see it in June.
-
1 pointI think I'd better stop looking at the pictures now, I'm dribbling too much on the keyboard Fantastic build, love it
-
1 pointThe tall chute was first used on the 1991 snowthrower model 06-42ST07 for the long frame tractors and on 1991 model 06-42SS01 for the 200-Series tractors. Found an interesting detail about the parts. Toro used them on their walking 826 and 1132 snowthrowers prior to 1991 and was available in a kit to update those models that did not have it. Did not check to see when they changed but the manual has a 1977 date and revised in 1987. Garry
-
1 pointLike the title says, I played in the snow for the first time today. There was not really a need to plow as the snow is melting as quickly as it showed up, but I didn't want to miss the opportunity to use the dozer blade. I put it on the tractor, but I am questioning whether I connected it to the lift correctly. I also noticed a problem with turning the blade which I will get to in a little bit. I figured out after making one pass that there is a learning curve with this whole plowing thing. Here is what I learned. 1. I know this isn't brain surgery, but I'm sure there has to be a perfect height to set the plow lift, instead of just letting it sit on the ground. 2. After running the first pass down the side of the driveway, it may have been a better idea to go down the middle so I don't have to push the snow back over what I have already plowed. 3. Being a 260lb guy helps, but I do think wheel weights or filling the tires with fluid would help. 4. Turf tires with out chains does not work very well. I did find some old tire chains under the seat of my dads pickup (the kind you have to strap on through the wheel). Even though I only had enough chains to put 3 pairs of chains per wheel, I could tell when they contacted the ground, they gripped really well, and I think having a full set of chains would give me plenty of traction. These little strap on chains were all I had. 5. I need to read more threads on chains vs ag tires, and wheel weights vs fluid filling Here are the pictures Driveway finished Had so much fun doing the driveway, I decided to do some of the neighborhood Project C100 in the snow Project 876 in the snow Thought it looked cooler with the lights on.
-
1 pointSafety trim sounds great. I used some fuel line which I split on the center line.
-
1 pointHad to check the Gallery to ensure yours is similar to my 74 layout. I also Flange Bushed my Hinges and enlarged the Hinge Pin receiver holes in the Tach a Matic. Used a section of thin wall brass tube to make bushes (3/8" id x 13/32" od) and pressed them in. Gives great ground connection for lights and just replace the bushes when worn. Although I'm in UK, the Brass tube I used is produced in US for Modellers. Should find it in Craft, Model Suppliers or Hardware Stores. (ignore the colour, it is red really)
-
1 pointlooks great! Did you remember to clean off the satellite dish after?!!
-
1 pointQuick update on Pax. Compare the bird bath with the second pic above at 8:30. Put down about 6 more inches in 2 hrs. Yep, that's 18" Still snowing, but the wind let up, so I guess it's time to take the horse out to play. I took the blower side extensions off. I need more height not width. . .
-
1 pointHere are a couple thru the window pics . I'm not going out till it stop. Still snowing horizontal out of the NE.
-
1 pointTen grand will only build you a 24x24 pole barn. Give or take a few $ Sent from my iPhone using Tapatalk
-
1 pointdid your engine start?
-
1 pointThat is why I use the truck key for my ears!
-
1 pointFound this Hot wheel ad
-
1 pointYou guys are absolutely awesome. Pulled the panel and there it was...one of the leads had come off the amp meter. Plugged it in - fired right up. I'll need to put some new connectors on this spring but, for now, it works for me. Got some snow coming tomorrow and now I'm ready. Thanks guys. You have never failed to get me through any issue!
-
1 pointI have a C 160 which I am slowly dismantling with a view to repainting, currently on hold pending warmer weather and I am trying to figure out how the brake cluth untit comes apart.


This leaderboard is set to New York/GMT-04:00