
Leaderboard


Popular Content
Showing content with the highest reputation on 01/22/2014 in all areas
-
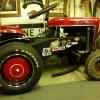
4 pointsWELL ... You Guys asked for it ... So here ya go... enjoy...
-
3 pointsI have a 56" blade that came with my 18 auto and has never really been complete for the last 3 years. After losing my job and home I have the time to mess with the tractor and with the help of my Dad its just about done. We tore all the cob jobbed stuff off of it and got it back to the way the factory intended... I got a handle off and we are at the point now where we need to fab the rod that goes from the handle to the blade to angle it. I was wondering if anyone that has this plow could measure the overall length of the 5/8 rod and also measure to where the little kick is on it that angles it up so that the rear bend matches up with the hole in the angle handle mechanism. Its #24 on the diagram and is called the blade control rod….Its close to the last thing I need to do to get her ready to plow and I sure could use that measurement rather than trial and error in -21 degree wind chills. My Dad is 74 and it seems no matter how much I yell at him to get inside, he likes to be out there with me... Thanks in advance for any info…..
-
2 pointsI use a hole saw and 1/2 drill motor to make um New orifice.The trick is to use the hole saw you want with the existing hole size inside the first one.Example-if you have a 4 1/2 hole and you need a 5 ,you twist the 5 on the arbor first then twist the 4 1/2 on and you have a pilot guide built right in.Other wise your chasing your tail tryin to get that 5 started!
-
2 points10 feet should run about $20. NAPA around here is $18. When you make up the new chain, take five more minutes to make up your "spare" chain. I take the second one and put it in a zip lock bag with a couple of extra master links. I know that the chain will never break unless its freezing cold and I have a lot of snow to move. The last thing I want to do at that time is count links and cut chain. Keeps the blood pressure a little lower when the @#%& hits the fan. It's cheap insurance. You did better than us, I only got about 6" here in CT.
-
2 pointsThanks for your visit to the confessional Mike re owning two Teckies. I have a 19" Flymo hover mower with steel blades that dates back to about 1972 (did you have these in the US?). Powered by a vertical shaft 2 cycle Tecky it still runs and mows some of my lawn starting on the second pull. Only two things destroyed those engines - no oil in the gas or hitting something big with the blades and bending the crank. Must have well over a thousand hours on it. Andy
-
2 pointsHey...that's a trick question. They're all different parts.
-
2 pointsHi James, welcome to RedSquare. You hit the nail on the head, you are going to have FUN!!!! My tractor provides me with endless fun and relaxation. I have to pretend that I'm doing work when I'm on it so the rest of the family thinks I'm working, but it is all for fun. Here is a suggestion, when you are riding around, try not to smile too much, or they will think that you are having too much fun and will look for other chores for you to do. Don't ask me how I know this, but it is a fact. I have a question that you might be able to answer. My tractor being assembled here in the states does not have any metric nuts and bolts on it. Was your tractor assembled over there, and if it was, did they convert over to metric hardware in assembly? Rick
-
2 pointsBeings you got that smart phone you need to capture some of those moments (of your Dad and son both working on, has got to be cool) so you can look back when you are your dads age. Hint, hint Always nice to have pictures
-
2 pointsBattery life can be enhanced with a trickle charger (about 2A ) but if used extensively the trickle charge itself will sulphate the battery. This happens when the H2SO4 loses a charged particle and becomes an insulator rather than a conductor. The electrolyte (liquid conductor) mixes with both conductor and insulator thus reducing the effectiveness of the charge. As the trickle charge continues the spectrum of the insulator grows and starts to take over and in time you have a dying then dead battery. Auto style batteries take on and deliver huge amounts of electrons and a lead acid battery can be considered dead at 10 V. The industry also has and uses deep cell batteries. Deep cell technology is different than auto technology but the deep cell knowledge is very helpful to the auto section. Keep your tractor or auto battery fully charged with a trickle charger, yes. But every so often charge that battery with 10A or more then trickle. Most importantly about 2x or 3x a year equalize that battery. By charging at a higher current 50A for a short time. The battery will get warm and the electrolyte will bubble as it accepts many amperes. For the first time do this for a minute, feel the battery for heat. Test the electrolyte with a temperature battery hydrometer ($10), then test the open circuit battery for terminal voltage. The VDC will go up, let sit for an hour and retest. A good battery at any temperature after a complete charge to float voltage should read at least 12.7 VDC. Readings will be at least 13 VDC and never higher than 15 VDC. Battery equalizing can be done more often, but testing the wet acid battery with a hydrometer is a must along with a DC voltmeter. It is vital to learn how these tools work and it is vital to use them. Too much over charging equalization is bad. Hydrogen gas is formed, sparks are possible, over heating is able to be done and all this can produce an explosion. Remember that the battery is an enclosed container whether the cells are open or not and the battery is a time bomb. So wear protective gear, eye glasses and when equalizing a battery remove it from the vehicle, cover with a leather blanket and never leave the equalized battery alone. Since they are small 20-50 AHr time the equalization period 1 minute, 90 seconds then stop, feel, smell, look and test. It takes time and a lot of safety precautions, no kids, no pets, no open lights, BE PRUDENT, BE SAFE. BE DILIGENT If you decide to do this PITA work it will pay off with a good battery for about 10 years. Also at the same time clean, secure, clean again the battery itself, the container, the wires, the cables, the connections, test the starter and the starter relay (contactor). The starter motor must be tested under an equivalent load to the ICE, internal combustion engine. Cold destroys the ampacity of a battery, the colder the smaller the battery. In very cold -40 FC, the battery is 50-60% less than at 21C or room temp. With electrolyte being closer to water or a specific gravity of 1 it freezes, at 1.25-1.3 the battery cell is good, won't freeze up. Keep your battery clean connection tight and electrolyte as an acid and top up your wet battery with pure water, distilled or RO filtered water. And if in the winter you top up your battery make sure you mix that pure water with the battery acid or it may freeze.
-
2 pointsChasm...now that is what I am talking about!!! OMG...those pictures are great...no bugs!!! Thanks Mate.. It's sooner then you think ...
-
2 pointsRound Two. I am very impressed how this old horse runs. 8 years ago it was all kinds of trouble, now, its like a new tractor. I'm thankful for tearing into and just starting all over with the wiring , fuel lines, carb , governor and so on. Not to mention all the great info hear. Its 10 degrees. Fired right up , left it warm up, open the throttle and it never misses a beat. Not a single hiccup.
-
2 pointsNice job. Looks like the same as the one I'm working on except sheet metal and front bumper, no power steering and a different trans. This one is painted orange, has an id tag riveted to the right fender and a tubing seat frame. Gut feeling is that it was born as a MDOT tractor for the state, but will probably never know as the po has passed. Craig, I'll get some pics tomorrow. But not close enough to show a couple runs in the primer from the rookie spray jockey! I may also get a few of the building's owners toys.
-
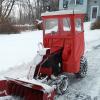
2 pointsFiring up the 1977 B-100 to get started on the 4" now, 8" to 10" total to come later. Pictures will follow. So, here's the old man all bundled up in his snow suit. The 1977 B-100 has been sitting out all winter, just covered with a tarp. As I have said before, it never fails me. I grabbed the video camera and started to take a video after I started it. Don't you just love the sound of a properly tuned Kohler singing in the snow? View from the drivers seat as I plow snow in 3rd gear.
-
1 pointHello people form this side of the pond! i currently have one wheel horse tractor a 227-5 that i got toast summer and I was planning on just doing it up and having fun with it, would like to see your projects and hope to see you in the forums James
-
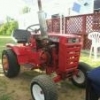
1 pointThis tractor and I have a little history together and another member did a thread in the resto forum on it a few years ago but before I say more...How many different parts can you find on this tractor ?
-
1 pointProbably a little late to this thread, but when I'm using a torch heating a stuck bolt, I dab a candle on the threads. Many times when you remove the heat, the wax gets sucked into the joint and the bolt frees up. Wax ain't flamible either which is a plus.
-
1 pointGive it a try, then report back... hey, you never know.
-
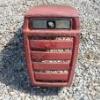
1 pointCraftsman seat!
-
1 pointI'm sure I'm guessing to low but heres my answer. 1) the tractor itself is early to mid 70's 2) the motor is of 60's vintage 3) the black tranny might be from a GT-1100 or GT-1600 4) the fender pan is 1984 or newer. 5) the deep dish front rims are late 70's and up 6) steering wheel looks like a go-cart wheel and not a tractor part. So not including the steering wheel I'll say 5. Like I said, I'm sure thats a low number. Mike...........
-
1 pointStarted out as a 1977 B-60 8-speed? Garry
-
1 pointI got it…Thats exactly what I needed..Thank you. Ya know John I never really thought about it, but with him being 74 he won't be here forever. I'll need to sneak some in when he's not looking. He hates the camera but I need to keep some of these memories alive…..Thanks Burrly
-
1 pointGood deal, completely slipped my mind that the nipple could be sacrificial, I was thinking you wanted to get it out without damaging it, definitely the way to go, and you got to beat on something at the same time...... Sent from my iPhone using Tapatalk
-
1 pointI'm not familiar with the shape of the louvers, but i would make two dies, one for the outside and one for the inside and press the louvers back into shape in some way. The dies don't have to be anything special, steel pieces welded together or carve the shape out of some hardwood. I would not use pliers at all as you will end up with small creases in the part that will be almost impossible to get out. I made a simple piece of steel to straighten the grill in my 1057 hood, look in my 1057 thread for details, use the 1057 link in my signature to get you there. Sent from my iPhone using Tapatalk
-
1 pointThat is way to much for the recoil... next without experience these recoils are not for the faint of heart. They do require a little know how to take apart and put back together. Also be advised that these recoils are like the worst... they work great for a while and then give up the ghost quick. If the tractor is a runner, I personally would locate a Fairbanks or equivalent.
-
1 pointhodge71 is correct Craig, heat is about the only chance you have of getting it out, without damaging the muffler. When you get it good, and red you might try using an oil filter strap wrench on the large portion of the muffler, as metal is soft when its that hot, and if you use pliers on the nipple area it might cave it in. Matt
-
1 pointils sont tres mauvais pour les terres,ils ne mangennt pas seulement tres jeunes plantes,,ils arrachent et mangent meme la racines. en plus les excrements de ces oies ne sont pas bonnes pour l`enrichissement du sol
-
1 pointJudging by what had happened, I would bet you sucked up some debris into the carb and or into both the carb and the fuel pump. A dribble of gas from even an electric fuel pump may not be sufficient to feed the carb. If you poured gasoline into the top of the carb then fired it, does it run? Try to refrain from firing the tractor on the either! It is really bad on the top end of the motor. The electric pumps I have used would spurt gasoline out similar to a diaphragm pump. If you have a small gas tank, run a line to it and gravity fuel directly to your carb and try to start it.
-
1 pointOMG,,, did you say Snakes thats it im not comming now in the summer , Lets have the Winter snow party
-
1 pointIt has been a very long time since I have updated this thread. I apologize for that. We are dead in the water right now due to the fact of not having a place to work. That will be changing soon I hope. As I have mentioned previously, our building is under way. I wish I had some good photos to share, but not yet. I do know that the walls are up and the trusses have been set. We are getting oh so close. The updates I have been receiving have been very exciting. I have learned that a hoist will be placed in the ceiling to help with removal of engines and for other various tasks. They are truly thinking of everything to make this a great place to work! Since time is going to be our enemy I made the executive decision to get this machine powder coated. After telling the story to our friend that powder coats our machines he agreed to give us a deal. On top of that he invited the club to come out and he will show them how to apply the powder and do it themselves! We will then push the rack in to the oven and in a short amount of time we will get to see the finished product. How cool is that?!?!?!? I am chomping at the bit to get cranking on this again! Hoping to update you all again soon!
-
1 pointI'm with ya pal! Id be out in the snow on my horse if I had the chance!
-
1 pointLooking Good!!!!! I am also impressed with my WH. With almost 800hrs she pushes snow like a bulldozer Darn, I think it actually stopped snowing Semper Fi
-
1 pointJake ... She's L00King good....
-
1 pointJim...we would not have to pull the snow chucker...and count me in on the ice cream... didn't we pull that all the way back to Michigan that year??
-
1 pointHi Swemill, I looked at your loader setup on your profile. You do incredibly nice work! Glad you posted it on this thread! I know Diesel Cowboy and I would like to get all our members who have or had an FEL on their "horse' to post them if they got em'. Especially home-made setups and conversions from other manufacturers.
-
1 pointI'll be heading back down this year Terry. Thanks so much for doing this for us.
-
1 pointOk it would have to have a heated barn to socialize in and watch Steve show us his off season Rock-n-rye making skills.
-
1 pointOne of my pet peeves is when a question is asked and answered, and the OP never responds again. Another is when the same poster keeps opening a new thread on the same subject. Glad you brought up the subject. .
-
1 pointI imagine... he's the one not wearing socks in the snow.
-
1 pointHere's a banana walking back and forth carrying parts!
-
1 pointNot like the "regular" loaders you have here but it's a kind of loader and it works real good!
-
1 pointI know what you mean Post this in site suggestions
-
1 pointVery nice restoration.
-
1 pointShe plows like a champ!!!! Driveway has already been plowed 2x! Patience Stormin, I am sure you will get your share Now I need one of them "fancy" plastic cab covers...man it is cold out there Semper Fi
-
1 pointWe got about 6" of powder yesterday, I went with the blade. Rick
-
1 pointI use this one.
-
1 pointOk, no fair. You already posted the first video blowing snow... Now another one.... You are banned from the group... You are having WAY TO MUCH FUN!!!
-
1 pointThat is great! Really nice work Terry! Stick that on a shirt or a hat! I'd be proud to wear it and support the great thing Scott is doing with this club.
-
1 pointWell operation Harrison Elementary School Tractor club has begun! I took an early morning drive yesterday to meet David Rice (RCTruckdaddy) I believe that is his RS name. He was nice enough to meet me half way. We swapped the tractor over on to my trailer and then had a great conversation. Headed back home and let her sit. She is a great candidate for the kids to get dirty with. Most of the parts it needs I believe I have on the shelf, but there are few things I don't think I have so I may ask if anyone has those items available for a small fee. Many folks that follow along on my Facebook page "Wheel Horse Junkies" have jumped in to lend a hand. Terry Dennis (Vinylguy) has willingly offered up a new set of decals for the machine. Bud Andrews is going to get me squared away with a new battery when the time comes. Daniel Aungst is sending a gift card to TSC to help me with costs of materials. I am trying to work with some local groups that would be willing to chip in as well so I don't have to cover the entire project out of my own pocket. Our first meeting is this Wednesday after school. We will be focused completely on safety as I continue to round up the much needed parts for this. The kids will get a chance to see the tractor for the first time and we will talk about how we are going to tackle the project. It should be a lot of fun!!!! Here it is after David so proudly presented it to me. Thank you again everyone that has given encouragement!
-
1 pointThat is a great idea, we might want to see if it could be a webcast to members who can't make the big show also.
-
1 pointYour school system and administrators are outstanding to let this idea take root. We need to come up with some sort of recognition for them and you for taking on such a project, students in most schools are only learning to pass tests, not to meet challenges.


This leaderboard is set to New York/GMT-04:00