
Leaderboard


Popular Content
Showing content with the highest reputation on 08/02/2013 in all areas
-
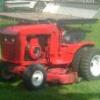
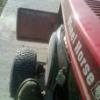
4 pointsSome of you may have seen the thread where I made some wheels to take 26 12 12 ags. Well I finally fitted them to my C101, and there are mixed feelings in our household. Personally I think they are great, what do you guys think? Mark
-
3 pointsI'll start by nominating my 145 "Marvin" A friend offered me this tractor for $150. It was a good runner but had a weak Hydro. I was looking for a tractor with hyd. lift to mount a tall shoot blower on and said to send me pics. What I saw was a pretty clapped out flat top. I never cared for the look of the black hoods but I figured the motor was worth the price. Here's how it looked when I got it and mounted the blower: RF of the hood was bashed in: Once I drove it I thought what a great tractor. Sweetest running Kohler I ever had. A littile birdie on the forum inspired me to fix it up and do something different. It would need a hood, fender and another hydro unit which I picked up at the big show. It's been a tough slog getting it all done in one month working late at work for 2 weeks but here it is. NOTE: I AM NOT A PAINTER! Looks like Marvin the Martian here: I don't like to blow my own horn but this was given to me by a very special forum member so It had to go on:
-
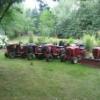
2 pointsThought I'd share my latest yard project. We visited the ol' family homestead in IL a couple weekends ago. One of the purposes was to get some splits of the large quantities and varieties of Iris that were around the farm. Grandma said I could have all I wanted, so armed with a spade and a wheelbarrow, we traipsed around the farm and I dug/labeled what she told me! Now of course, I wasn't smart enough to plan ahead to have someplace to put them, so they sat for a few weeks in the nice cool garage before I got them in the ground. It doesn't hurt them, the tubers just go dormant when they're dry. So after surveying, measuring, estimating and deliberation, I concluded the perfect place to put them.... right where my wife wants them! :duh: I bought a tiller at the LeSueur spring swap this year. Rusty outside, but nearly brand new underneath!! These tines have barely ever seen dirt. I'm guessing it got used one year, set behind the shed and never used again. But....(as usual it seems) it didn't have the idler setup. After some searching and bitching about ebay prices for them, I managed to get a reproduction from a very reputable collector/fabricator whom I trusted would make it correctly. You just never know what you're going to get with a reproduction from an unknown maker. Funny part was it didn't fit! The centering bushings that were welded on didn't allow it to fit and close the midmount hitch!?! So after a few emails, we figured out why. He had copied his original correctly and nothing was wrong with his part. I was just using it differently than intended. The midmount on the Raider that I was putting it on was an earlier style and made to only accommodate a 3/4" shaft, whereas the later midmount hitches allowed the hitch to close around the larger bushings. (like this) We both learned something. The original setup for the Raider was one of the earlier tillers that used the two belt system with an idler assembly mounted at the rear of the frame, and I was trying to run a single belt system. OK... cut the bushings, make it fit and its A-OK. Got the belt mounted, tested it to see if the belt was running true and now, ready to till. I know I should be running the belt in the inner pto groove. I had it on there, but it was guitar string tight, so I moved it back to the outside. Seemed to work alright for me though. Maybe if the belt stretches a little bit over time I can get it to the inner one. It would be nice to get the additional few RPMs on the tines. I got out the Gravely zero turn, dropped the deck to the ground and scalped out a bed outline to 1/4". The Gravely deck really does get down that far... the ground polishes the blade bolt heads. (Should have taken a picture of that but didn't think of it.) Parked that in the shade and commenced tilling. Never used a tractor mounted tiller before, but man... was that nice!! My Raider 9 has a transplanted K-181 in it, and it had no problem running that tiller in Low 1st gear. The 8HP Kohler is easy on the gas, and the longer frame of the Raider keeps it balanced pretty nicely so I didn't even need additional weight anywhere. Ideally though, I'd like to run some front wheel weights, or hang a weight bracket out front with about 40-50 lbs on it. I could feel the front get a tinge light when I let off the clutch. I can't wait to actually get to use it in the garden this fall. So I finished up with this. We got it all planted (I think there were about 80-100 tubers) now just waiting to get mulch delivered/spread and figure out edging. I'll post a finished picture when we get that done.
-
2 pointsI found another 520H for parts which had nicer sheet metal and a few other parts I needed plus the muffler from redbovine and here is how it looks now.
-
2 pointsI converted 2 of my starter gens to solenoid. Takes the amperage load off ignition switch. Don't have time right now to find the threads but if you search on rs I documented an install in a dedicated thread on my 1277 and there's mention of it in my 1057 build as well...... Most would recommend doing it I would think....... Sent from my iPhone using Tapatalk
-
1 pointHey everybody, Just bought my first tractor, at first I was looking at the green ones and then a few friends suggested I check out a wheel horse and after looking at a couple I bought one! It's a 1998 312-8 with approx ~700 hours on it. The guy I bought it off was real knowledgeable about these tractors and was actually the one who pointed me to these forums. I'm glad I made the choice to get a wheel horse after looking it over I know it's going to be a long lasting machine. Anyways here's a couple pics of the tractor and my 1 and a 1/2 year old getting some seat time!
-
1 pointWell I just had to have this, I didn't built it but I may do some changes...
-
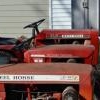
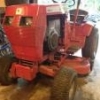
1 pointSeen this c-160 on craigs list, but the add said 12 hp motor, looked at it for a couple of weeks then decided to go look at it anyway, so me and jackson bros decided to go take a look, got there and the owner had it list wrong, had the 16hp kohler, runs good, everything works including the cig lighter. I think its a nice c-160 auto. Had to take the Ford in the background with it before he would make the deal, o well has a great running 12hp kohler
-
1 point
-
1 pointI have seen that before! But it will turn out OK with some work, SEE!
-
1 pointIt's a tractor. Tear it down, clean it up, fix the broken/worn stuff, paint it and put it back to work. That's what it was built for.
-
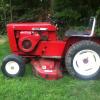
1 pointIf my 175 looked that good, I don't think I would work it either! This is mine which I've been 'tending to' since '92. Just keeping up with maintenance and out of the rain. I've thought about restoring, but she don't look too bad as-is all original.
-
1 pointwhy not do a restore on it AND use it. you dont have to make it perfect, just fix all the loose/worn out stuff, give it some basic paint, alot of guys do the rattle cans, i like powdercoat myself (but that will add to the cost-unless you know somebody ). get a nice seat and tires, decals from Terry (vinylguy) to finish it off and enjoy it for what it was meant for. depending on what sort of condition tractor you start with, you could have some decent sort of worker for $500-$1000.
-
1 pointNot much. If the piston don't move, there's likely a broken rod and an engine rebuild is in order. Good luck, Bill
-
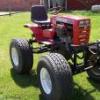
1 pointGo Big or Go Home they say, course you could do this! 33x12.5x15's all the way around.
-
1 pointThanks much guys! Congrats to you to Jake! I didn't notice you snuck by me...
-
1 pointTankman, Thanks for the ideas and info. I'll bet that stainless deck outlasts us all. I want to try the drilling a hole in the deck to the other plate and welding method. Probably will try it after I do a little more welding. Thanks also to everyone who posted ideas. I like the forum and probably will participate. I'm not a Wheel Horse collector (yet). I wanted a reliable tractor/mower, was reading up on the brand and found a local 308 fairly cheap. I only have 1.5 acres to mow, so can't really use a large tractor or justify a new machine. I've mostly used a self propelled (walking) Toro mulcher up til now; it just takes a little long. Just to wrap up this thread for now, I'm going to put up a few more pictures. I'm a little behind on mowing, so I'm planning to add the front roller bracket sometime this fall. I finished up with filling and painting last night. I didn't use fill on the front hole but it is patched pretty well with metal. I wanted to leave the fill off because I want to mount a roller bracket metal to metal sometime later. Here are the pictures. The first one shows the fiberglass filler patches and areas where I added POR15 (a good product to prevent rust), the second and third show a primer coat; the next is the GM bright red paint. I'm not the best sander in the world - not enough patience. The next is the bottom with metal patches and POR15. The large patch has POR15 on all sides, the smaller patch is galvanized metal with POR15 on the bottom. The blades are new. The last picture is the deck installed. I adjusted the front to sit about 3/4" higher than the rear to compensate for not having the front roller. I tried it out today and it works pretty well with not a lot of scarfing. Any questions, please post.
-
1 pointSteve...you can't catch crappie or walleye on cheap gas!!!.....try DY-NO-MITE....that chemical will literally make em' "jump in yer boat"!! Sorry to hijack your thread SOI....but I have read all comments with interest...looking forward to your final report!
-
1 pointDenny the arch ones are great for loading into a truck bed or equivalent. The arch is almost a must if the tractor has a deck on it. People have been hurt and decks messed up when they catch that sharp change in elevation using straight ramps. The arch helps to prevent all that. One thing that has deterred me away from Aluminum loading ramps is the scum bags that decided to steel them out of the bed of my truck when I went in to pay for gas. The second set was on my trailer locked and chained with heavy logging chains. They took a saws all and just cut the ramp and stole them. Just looking for scrap metal. Now my third set is plain ol wood I use on my trailer. Tired of feeding scum scrappers. Catch them again maybe give them some lead to scrap. Anyway the arch ones work great just don't let them out of your sight or within view of others.
-
1 pointAnother note when loading in a truck, you should remove the tail gate, the little cables are not made to hold the weight of a tractor.
-
1 pointI have a set I bought at Walmart a few years ago they were on clearance, $18 a set, reg. price was over $100 I bought a few sets and sold them, the boxes were shot from setting on a pallet outside but I was not buying a box, they are I think 7' long fold in the middle with holes punched in them like stars, they have steel flat stock on one end sticking out about 8" to place on a truck box or trailer, they are light weight, and have a 1700lb rating each, they are the arched style, I love them.
-
1 pointthanks for your help and I am only 13 and this would be my 2 restoration and I am hitting some road blocks but is slowly coming along
-
1 pointThe 312-A's use the 700 Eaton and a manual attachment lift. The 312-H's use the 1100 Eaton with hydraulic lift. Garry
-
1 pointif that was me, I'd be ok with more chores. More chores= more seat time. www.perfecttrimlawnandgardencare.com
-
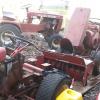
1 pointThe Onan 16 hp in my 316 has 1750 hours on the engine clock. I got the tractor last season as a runner though in poor cosmetic condition. No complaints - it did run and I instantly fell in love with the sound of an Onan. The one issue that reared its head that was that when it heated up working hard the engine would start to hunt. Annoying at first then it got to be so bad it was like riding a kangaroo. Weak mixture I hear you say, well I checked the carb and found it clean like new inside but used liberal amounts of carb cleaner anyway. You have to dismantle a lot of stuff including taking the inlet manifold off to get the carb off and having read in a thread that the manifold can cause the problem gave it a close inspection. It consists of two diecastings sealed together. There were no visible signs but I spread some sealant along the seal line anyway. Reassembled everything, fingers crossed, seemed better but the hunting when hot didn't go away in fact it seemed to get worse. Discovered that a PO has fitted the wrong plugs i.e. ones with the sealing gasket rather than chamfered fit but that made no difference to the hunting. Job for the winter I thought and finally got round to it this week. There's been many comments about the importance of valve clearances on these engines so thought I'd do the full works but stopped short of head decarbonising on this tour. There was a request for photos in one thread so I've taken a few. This is not a quick job but it's not particularly difficult, just time consuming which tends to be the case with twins. To get to where you want to be means first removing the air box. Two bolts + three thin ones that secure it to the carb. There's a couple of small engine tins to remove, then the muffler burn guard. The muffler is secured not only by the exhaust manifold bolts but also a plate that sits behing the top pto bracket so the two bolts securing it have to be removed also. With all this out of the way, disconnect the throttle linkage from the cab, choke cable and fuel line. Now finally the inlet manifold can be removed complete with carb - two bolts at each end. I've started to clean things up round the rear cylinder block - the front area shows what it was like, years of dust build up. Both ends cleaned up and both valve cover plates exposed. There are three cover plate gaskets and as there was a chance they might not be reusable I'd ordered in a new set just in case. The rear cover plate popped off without splitting the gasket. As far as I could tell there's a good chance this had not been removed since fitted at the factory 1750 hours, or if the clearances were checked at 1000 hours then it's been another 750 hours since. The inlet was spot on, the exhaust was wide by about three thou. Easy to adjust with two wrenches. The front cylinder top cover plate popped off cleanly, again without splitting the gasket but this reveals the crank case vent valve plate. I've put the bolt and spring back without the top cover plate in the photo to show how the breather valve works. The little spring steel valve was inspected and showed no signs of damage to the critical surface. The lower valve plate came off cleanly by getting my finger nails under it. This time the inlet was a thou too close and the exhaust valve clearance perhaps three thou too small, The plates with gaskets still attached were degreased and reassembled with some gasket sealant - I use Hylomar Blue but each to their own. Didn't need the new gaskets after all but I wasn't going to risk it. The carb was detatched from the manifold but before opening it up I tried tapping my way round the edge to see if a change of sound might indicate where the seal was broken. It was inconclusive but if there was an issue it sounded as though it might be at each end. The two diecast halves were factory bonded together by silicone sealant, exact locaction achieved by tiny roll pins visible in the photo above. Couldn't find a way of pulling them out so drilling them appears to be the only solution unless you know different. Trouble is that they're hard and the slit in them causes the drill to go off course. Tried drilling from the blind side which seemed better though not perfect. The drill size was 1/8th in prep for using bind rivets for reassembly. Actually splitting the halves wasn't easy. I used a stanley knife to begin at each port end and a spare blade to act as a wedge to keep the slit open. It was easy at each end possibly confirming that this was where the issue was. Got much harder as I worked towards the centre from each end. The silicone separated from one side only, the reason is that there is a grooved cast into the other side giving it more surface to bond to. Removing the old silicone took an hour or so of patient work. The next step (above) was a dry run assembly to ensure that all the rivets would go in - didn't want to discover any probs after silicone RTV was applied. It was at this stage that it became apparent that some warping had taken place. With the two halves pinched together in the middle there was a small but visible gap at each end - reason for the seal failure perhaps. Bolts were added at each end to ensure a proper seal once the silicone was applied and the halves reassembled. I also bolted the carb back onto the manifold with a new gasket and a smear of silcone sealent at this stage before leaving it to cure overnight. Manifold back in place next day with new manifold to block gaskets again with a thin smear of silicone - a belt and braces job! If you're wondering about the zip ties in the photo, these were insurance that the warping didn't strain the silicone bond once the temporary bolts were removed before final instalation and tightening down. They were then removed. Reassembly was then the reverse of disassembly, I didn't clean the carb as I'd done this last year. And........... she started so took for a run round to get it nice and hot - there wasn't a hint of hunting wher it had reached a point last year when it would start misbehaving after only a few yards so fingers crossed. Hope I haven't bored you and that this is of use to someone else. Sorry about not going for the full monty i.e. decarb as well, perhaps someone else will photograph that process. Andy


This leaderboard is set to New York/GMT-04:00