
Leaderboard


Popular Content
Showing content with the highest reputation on 04/23/2013 in all areas
-
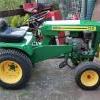
6 pointsJust finish my Wheel Horse pallet racking storage for my tractors. It wasn't easy but its final done.....
-
2 pointsMy dad, Clifton Ralph, grading gravel in his driveway with a 1979 Wheel Horse C-121 hydro and a 44 inch grader blade made by Ken Stephens (Fabricator on Red Square) on Sunday April 21st. The C-121 preformed well with Ken's grader blade design and dad had never used a hydro before. Once he got into it he was off like lightening. He used his 1964 Wheel Horse 1054 with a lighter garden plow we have to break up the gravel and soil with the garden plow point. You raise and lower the garden plow with the hydraulic pump on the lift and make "rows" to loosen up the gravel you need to grade and contour the land. He also used another Wheel Horse 1054 to haul the excess stone to other low spots. He spent four hours doing this on Sunday.
-
2 pointsLooking super, JimD Steve should love this! Did you also pick up some ball bearings and some 3-in-1 oil and some gauze pads and a Fetzer valve (Fletch)?
-
2 pointsMartin, Smokin'Joe and I are going.
-
2 pointsIve learned from experience. It seems as if nothing transfers power or lasts longer than geunuine Wheel Horse belt. Money well spent as far as I'm concerned
-
1 pointJust wondering who is going to this one this year? Thinking of making it, ive heard its a good show, but as yet havent been able to. would like to make more of an effort this year, seeing its so close to home...... Saturday May 18th. 2013 http://hinrichscustomwoodworking.com
-
1 pointFirst, thank you all for the kind thoughts and wishes. I am alive but have a long road to recover. Today I saw the plastic surgeon who will very soon be operating on my facial fractures. This will allow me to fully utilize my mouth which I am sure some don't want me to regain. I am beginning to hear out of my left ear, but still not great. My face is still paralyzed and I will hopefully see some specialists in the next couple of days. That's all for now, as I have an eye doctor appointment.
-
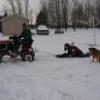
1 point2 of my Grandson's came over last weekend and they were wanting to go tractor riding out in the woods. We haven't done it in a long time so I was pumped! It quickly turned into a mud run and my wife had her restored 653 muddy pretty fast! I had my 753 dually and it got a mud bath too. I hadn't got these tractors THAT dirty since, well never! Oh well, they both got a bath afterwards so no harm done, plus it was a blast! My 15 year old Grandson Dylan, took his 1962 Bolens Model 600 through some deep mud right down the middle of the creek! He was all smiles! He had it sliding sideways a few times and he was gunning the engine! He has been doing that since he was 4 years old so he is used to it. I kinda spoiled him and the other 2 also, hehe! Now I have a Granddaughter who is only 2 and has never been on a tractor yet. Papaw can fix that!
-
1 pointLeft hand drill bits often work well, and if they dont then you have your hole for the easy-out.
-
1 pointCool set-up. Looks like that motor eats up all the under hood space! Mike.......
-
1 pointI've got one it runs and drives but needs a belt for the mower deck. Kinda cool little machines, I don't see very many I assume they were pretty much throw aways and didn't survive once the engine failed. before clean up after
-
1 pointStevasaurus and Rock Farmer Joe, thanks for your replies. I followed your advice and was able to get the case apart. Once I removed the differential/axle assembly and the pinion shaft/bull gear assembly, I immediately saw the problem. It looks like the high/low shifter fork broke off. I assume that is what it is. It is thinner than the two shifter forks that I can plainly see. When I remove the remaining gear assemblies, I will have a good look at the high/low gear mechanism. All the gears look to be in good shape, as do all the needle bearings that I can see, as well as the two 1533 ball bearings. So I think that all I need to do is get a new high/low fork and new seals for the axles, the input shaft, and the brake shaft; and a new shifter boot. From the photographs that I will attempt to attach, it looks to me that some water got into the case and mixed with the gear oil. I do want to say what a comfort it is having access to this site and its very helpful members. It's a huge help to this newbie. Here is a SHOUTOUT to Stevasaurus! Without your videos on re-assembling an 8-speed tranny I may not have attempted to do this by myself. The schematics in the repair manual are enough to scare anyone but a very experienced mechanic. So thank you, big time. I will keep you posted on my progress.
-
1 pointsome more pics...... t260 in front and onan performer 16 behind showing difference in size, ive started to get the majority of the scum, dirt, fur etc off the t260.... and side, performer 16 has 9 bolts holding the head whereas the t260 uses 10 studs. differences in heads, starter differences, performer 16 ( with the attached solenoid) has different mounting. performer mounts on the bottom of the cylinder and the t260 mounts on the oil pan/sump. differences in intakes looks like the timing case/side cover is the same though, all governor/timing gear parts same. minor difference in camshaft, but could still interchange, upper valve train is larger. looks like all the parts damaged on the t260 are obtainable from the junk engine though, so at the moment i think the dollar out lay will be a minimum, which is good because my aim is to do this one on the real cheap. i dont want to redo bores and replace pistons/rings etc which they probably should be looked at. bores dont look too bad, but the ring end gaps are on the large side of good, pistons have some scuffing on the top land as well. ive seen worse and put worse back together that i use on some of my own stuff and they run just fine, just not quite as 'crisp' as a nice engine.... its amazing with just a little work that an out of spec engine can indeed run just fine without smoking like a train and banging itself to bits. im sure there are many out of spec engines out there that are still running just fine and until they get bad enough to justify rebuilding, they will keep getting used and used with the owners being none the wiser....... after all, the main purpose of this exercise is to get the thing running half decent for not much outlay. so the engine police can reserve their judgement until this thing doesnt work out well and im eating crow....... ive started cleaning up some of the bigger parts of the engine, as soon as my crank gear puller arrives, hopefully the crank gear will come off in one piece, crank can be removed and the block will be ready to go in the tank at work to clean up as well. then it will be time to get some of it back together. i wont be doing rings, everything will get cleaned up though, bores will get deglazed, replacement bearings for the cam and seeing how proud onan is of their gaskets, the majority of them will be made from gasket material. i will need to purchase head gaskets though, along with crank seals, valve stem seals and some other misc stuff..... hopefully the rest will come out this clean...
-
1 pointThe closest thing to a garden tractor jamboree around here is when the guys at Lowes open up in the morning and push the inventory outside.
-
1 pointYou all have to remember that the wheel was invented back when I was just a little tyke. See what I mean Jim... Don, really looking forward to the show...coming up really quick.
-
1 pointNah, you gotta be a McGyver-saurus to use a Fetzer valve.
-
1 pointI just got back from the hardware store with my new pry bar and bicycle chain, strap wrench, 4 foot pipe wrench, a pair of tweezers and some rubber bands, only to find that my muffler was welded on by some lunkhead. Just kiddin', finally, everything is right with the World again...
-
1 pointLooks very nice! WE have the same setup in our barn and get 3 rj's in one section and we have the bottom open and then two more rows kind of like you have. We put them up there with our forklift. We have 4 sections set up at the moment and plan to put up another one sometime this summer. It has given us a lot of room and we are a lot more organized in the barn now!
-
1 pointI apologize to Trouty and Jim. I am usually not very sensitive about things, but for some reason, I was a few nights ago...sorry. Maybe I should have explained better what I was showing in the pictures. I was sitting around trying to figure out what it would take to get this muffler off with the tools that I had. I have an assortment of pipe wrenches, strap wrenches, etc...but everything was just a little too small. The nipple was solid, and I did not really want to get into cutting it off and beating it in with a chisel to get it out. I looked in the end of the new muffler and saw that only about 3/8 to 1/2" of threads were involved. This had to come off if I could find a way to grab it. I saw a piece of bicycle chain hanging on an "S" hook and I thought if I could go around twice and grab it with a pry bar I might get the muffler to loosen. It worked great. I know to turn the new one on hand tight, and I staged the pictures to show what I did on the new muffler. You may not have seen the chain on the old muffler...same color. Anyway, I am sorry Trouty,. Here are the pictures...the dent in the muffler happened on the way home...the marks that look like scratches are oil from the chain...the picture is set up to take the muffler off. I take a lot of kidding on this site, and I like that, I give it out also...sometimes it may seem like crossing the line. I felt like that the other day...please, if I ever cross the line...send me a PM...I did not mean to. Again to Trouty and JimD...sorry.
-
1 pointLooks like Dad was making it happen...awesome picts Lane.
-
1 pointNot bad for a old hillbilly, He was the highlight of my day in mentone.Old codger.
-
1 pointLooks like he did a fine job. I wish I had one of them for my B-100.
-
1 pointI think its a personal preference thing honestly. I just happen to agree with Charles. I have been in the landscaping industry for about the last 10 to 15 years. The rule as it was taught to me is sharpen them like a knife edge and sharpen them every 8 hours of cutting time. Maybe I was taught wrong by the old timer I learned from but it has served me very well. Thick grass mows much better and sharp blades definitely make grass blades happier because of the clean cut. Frayed grass blades promote disease as was steated earlier. Like I said personal preference. I know people that have never sharpened their mower blades. They say it makes no difference to them and it takes too much time to pull the deck off their Simplicity. Their mower still cuts but if you get close to the grass you can see the rips in the ends
-
1 pointHope all goes well Jim...pinch a nurse for me.
-
1 pointTwo things i do when engaging any clutch on my tractors , especially electric , i engage them with the throttle a small amount above idle and not WOT. I do the same when disengaging the clutch , backing off the throttle and disengage the clutch. Not sure if it matters doing that , but it seems like it couldn't hurt ??? I was reading about it on the net somewhere and thought it was a good idea.
-
1 pointWOW! Beautiful display job.
-
1 pointNice job organizing! Plenty of flood space now!
-
1 pointWOW!!!!!!!!!!!!!!!!!!!! But when do you ever use those on the top and do you have a forklift? You sure do have the floor space now though.
-
1 pointYep-thats the one-get a genuine WH belt-they pull better and last much longer-Thanks-Al
-
1 pointJustin, the original 1N1084 were rated for 400 volts but only 1/2 amp - yes, 0.5amp. I'm not sure why the design used a 400 rating but the diodes would not see a reverse voltage higher then the battery voltage plus the peak value of the negative sine wave coming from the stator windings. In other words, when the diode is blocking half the AC wave from the stator, it blocks that peak voltage PLUS the voltage from the battery. Let's guesstimate the peak voltage from the stator is 17 RMS AC which translates into about 50 volts peak which the diode must block from the stator alone. Add to that peak value the DC value of the battery (15 ish). The total voltage the diode must block is 50 + 15 or 65 volts total. If you calculate a safety margin by doubling the 65 volt requirement, a 200 PIV or (P)eak (I)nverse (V)oltage diode should be fine. Correction. I guess I'm showing my age saying PIV, modern term appears to be Vdc or maximum DC blocking voltage. A 3 amp rating should be more than sufficient. So we need a 200 PIV 3 amp diode. That would be the 1N5402 To your question if additional diodes can be mounted to the HH board. Yes, you could solder a few diodes in series and place them into the holders on the existing pc board. The arrangement may be a little messy, but electrically it is no problem. I might start with 3 diodes in series in each leg of the HH board. The 2 additional diodes would knock off about 1.3 volts of charge voltage. You could easily monitor the battery voltage after a long session with the tractor. Target about 14.5 volts on the battery while the engine is running at full speed. If you run the engine at lower than full speed, 2 diodes may be more appropriate. If you do a bit of work with the tractor in colder weather, one diode in each leg would be good. Remember, colder weather requires a higher charge voltage to maintain good battery health and promote longer battery life. Higher charge voltage which could overcharge a battery in the summer is just about right in the winter.
-
1 pointYes...run a razor knife around the seam cutting the paint. Find an edge that sticks out a little...usually around where the slot hitch is. Take a sharp chisel and nail it fairly good. If you get an opening, stick something in there and work the chisel around. The case is pinned on opposite corners and you are actually lifting up about 1/4 to 3/8" to clear them. Make sure you have the shifter out and the shallow side of the transmission down. do not be afraid to hit the chisel and also do not be afraid to run the seam with that knife. I use a wood chisel that I am not going to use anymore for wood. If you have rebuilt engines, this is an easy job with the help here...if you need any parts, we can set you up also.
-
1 pointYour '82 to '85 model C-125 (#01-12K801) Tractor would have a 42" RD deck, (#05-42MR01) and uses a Mower Drive Belt #108834 (HA 98" long), the Tractor Drive Belt is #7473 (HB 82" long). Best to always buy TORO/Wheel Horse belts, they have the correct side wall angles, ='s longer life, $26.50 on eBay, free shipping.
-
1 pointHi there George. Welcome aboard. You will be able to pick most items up.we buy tyres off E..y Bearings seals Etc from local bearing dealer.Weve not been stuck yet. We have got several wheel horses on the mend.Painting.Welding.Electrics.Tyres.Etc Taking Ten wheel horses to our Local Vintage rally in a fortnight. Any body interested its the Bronte Vintage Gathering.Cullingworth,Near Bradford.
-
1 pointwell camera died and didnt want to wait for it to charge. only took 3.5 hrs to do and only needed a clutch pulley and and a clutch spring its really straight forward swap so here is my puller now form hydro to 8speed ladder bars to strengthen the back plate
-
1 pointMy newly arrived '59 Ride-Away Jr. resto project.
-
1 pointJustin, another very simple way of solving the overcharging with both HH diodes connected is to to put a third diode in series with the B+ output of the rectifier board . Diodes have a nearly constant .6 to .7 voltage drop across the diode thru the current range you would encounter in a tractor charging system. Simply inserting a 1N5401 diode in series between the battery and the HH rectifier board will knock down a 15 volt overcharge to 14.3 volts. Two diodes in series would drop 1.2 to 1.4 volts off the charge voltage. A 15 volt overcharge would be knocked down to around 13.8 volts. Not nearly as sexy as a custom designed regulator, but very effective in resolving overcharge conditions. You would benefit by getting a faster charge using both diodes on the HH rectifier board but you would limit the output voltage seen by the battery to a more tolerable level. A win on both accounts. I certainly do not want to stifle your effort on the regulator board concept but given the modest charge currents we are dealing with, simple 1N diodes can be used. I thought about doing the exact same experiment with my 3 amp charge system on my 212-5. I ended up placing two 1N5401's in series with the stator output and the maximum charge voltage dropped from 16 down to 14.6. Just a thought.
-
1 pointGot the frame degreased and blasted today. Got to weld up the crack of doom and then some epoxy primer and then some red paint. It cleaned up real good with very little pitting.
-
1 pointi went a dug this out of a pine needele grave today. not to bad for free. no belt guard no motor but the rest isnt to bad free


This leaderboard is set to New York/GMT-04:00