
Leaderboard


Popular Content
Showing content with the highest reputation on 04/17/2013 in all areas
-
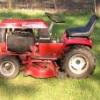
3 pointsHey guys I couldnt resist this little gem thought I was done buying but I am a sucker for the one yr models! they are kinds unique same tractor different badge sorta. well its the last of the short frames. HH60 fires right up no smoke and hasnt been short blocked!
-
2 pointsA lot of folks with 953/1054 and 1054-A Wheel Horse tractors have original seat frames and would like to preserve the original look but need new seat covers. The covers are often sold on EBAY and a few members have been selling them. I thought I would post a tutorial on how to make an original seat bottom. The cover I have is a remake of an original that was placed on an original seat bottom. The bottom piece was made of layered Luan Birch plywood from what I could tell. We kept the original seat bottom and had a new cover made for it when we bought the 1054 several years ago. With age , rain, setting outside etc the water finally destroyed the integrity of the glued layers in the seat bottom paneling. What I did was make up four seat bottom panels recently (and four backs and repainted frames which I will do another posting on later) with new and better quality materials than originally sued by Wheel Horse. First, I bought a half inch good quality plywood (not pressboard, or thinner materials in my opinion-they won't last). I cut the plywood with a pattern taken from the original seat that had curved corners but was 17 1/2 wide by 13 inches. I used a handheld sander to smooth all the edges (for the vinyl cover to go over easy and not tear, etc). Second, the "sides" of the bottom plywood seat are 2 x 4's cut or split at a 45 degree angle to form the valley for your bottom to sit on the foam/cover. I used Hardwood purchased from a local hardwood supplier and had a neighbor split, sand and round the edges of the side pieces. The side pieces are 12 1/2 inches long and 1 1/2 inches high on the high side. I attached them to the bottom with # 8 1 1/4 inch Star Drive all purpose wood screws using an electric drill. This made it easy to install these angled pieces (especially eight of them on the four seat bottoms I made). Thirdly, I than cut a 5 and 1 1/2 inch Luan Plywood ( 1/4 inch) support piece that I glued to the bottom with Monkey Glue (although I think Elmer's Wood Glue would work fine). This support piece was on the original seat and helped keep the bottom in place and ride between the two steel frame arms that are attached to the 953/1054 fenders. I used a polyurethane on all the wood pieces and coated them three or four times to assist in repelling water and to seal the wood good. This is especially important on the plywood seat bottom and the 1/4 inch support piece. The cover was placed top down on a flat surface with padding underneath to prevent damage. I placed a soft foam piece cut to size of the cover in the inside of the cover. I then cut a hard foam (a special dense foam that a friend gave me from an airplane seat project) in the inside of the two side pieces. Just between the beginning edges of the side pieces. I slowly pulled up the edges and corners of the cover over the frame and foam pieces to see how it all fit -making sure not to tear or overly stretch the vinyl cover. The fit was fine and I then began to slowly staple ( take the time and money to get STAINLESS STEEL STAPLES) the seat cover on the edges and then the corners. I think the job ended up nice and pretty close to original. Here are some more photos with some measurements placed on the wood with black magic marker FYI:
-
2 pointsThere should be a hairpin right behind the part that the bolts thread into that has to be removed so that part can slide towards the center of the lift bar.
-
2 pointsThere is a sleeve on the inside that is keyed to the shaft with a square key and is held in place with a pin some show a hair pin some may have a roll pin. Not sure about yours as the drawing I found is not clear on what is holding it.
-
2 pointsI sharpen my blades every eight cuttings. Now I cut at 4 different angles vertical, horizontal, right 90 degrees and then left 90 degrees. This way I know when my eighth cut has been completed and then it's time to sharpen the blades. I also have 2 sets so I can continue weekly mowings and sharpen the other set at my leisure. The neighbors think I am nuts and too particular but they also think my lawn is one of the best in the "hood".
-
1 pointJust got my hands on this Triplett Multi-Meter...model #666-R. New batteries and it works great. I was wondering if any of you electricians have ever seen one of these and how old it might be. I'm guessing 1950's, but I can't seem to find any information. Title should read "NEW MULTI-METER".
-
1 pointBefore the Wheel Horse show back in June, I was looking for an original seat for my Commando 8. Although I didn't find what I was looking for, I was sent various pieces of seats, which included several seat pans. Among the pans that I received was this one, sent to me by bowtiebutler956. When I went to the show, I looked around various vendors for seat parts that I could make a correct seat for the Commando. But while looking, I found that parts for the 3-piece seat were more available than parts for the Commando seat. So I purchased a pretty beat bottom cushion, several ripped covers for the top cushions, a foam insert to use for a pattern, an adjusting knob, and so on. I took the seat pan to my powder coater, and just picked it up today. Here's the result. After working on the cushions and upholstery for the last couple of weeks, I finally have my coveted 3-piece seat. Now I have a dilemma. The seat looks so good that I don't want to use it. Maybe I will just sell it and buy another seat from Northern Tools. :hide:
-
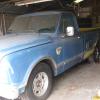
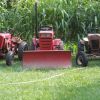
1 pointIf it would ever stop raining here , I am ready for some major field work. Just a couple pics I wanted to share. And one sad image of when it came here not running with a broken piston and flat tires.
-
1 pointTERRY DO YOU HAVE ANYTHING THAT WOULD WORK ON THIS TRACTOR? NOTHING FANCY JUST SOMETHING TO HELP THE LOOKS . ALSO NEED SOME HOOD& SEATPAN DECALS STANDARD DECALS. I WILL BE THERE SAT. THANKS KARL
-
1 pointThis has come up before. I think I have some Polish in me (and I mean that in a good way). I would look at cutting off the stud and put a glob of JB Weld in there and set a 1/8" bolt in the weld so I could nut it on the other side. What do ya think??
-
1 pointIt was on a Sunday night about 9:00 pm. I was coming home from my brothers and when I got home there on the upward bank of the ditch was a sled. First I thought someone had broken down and left it there to get a trailer. The owner was on his way home from a trip up north and was trying to beat a big snowstorm home. He had a 4 place trailer and one of the straps he had on the sled broke and off it came. Luckily, it was close enough to the ditch when it came off that it went right over the bank and coasted up the ditch bank with no damage. When I called him, they had just gotten home and realized it was gone. Needless to say he was pretty happy that it didn't cause an accident or get wrecked. They had just gotten it as his wifes' Christmas present and they were on their first trip with it. He offered to pay me something for my time. But, I turned him down and told him to make sure he ties them down better next time. Funny, because he said they had just talked about putting ski locks on the trailer before they left on the trip. I'll bet he has them on there now. Jason, its funny that you mentioned the surprise factor. 2 weeks ago after our last big storm, I was on my way to work at 5:30 am and on down the road about a mile from my house, I saw taillights sitting in the middle of the road. When I got up to the car, it had hit a round bale of hay that had fallen off a trailer. The driver said she didn't see it until it was too late. She tried to stop but with the snow she couldn't. The damage was pretty bad but, she didn't get hurt. The young lady driving said. " How am I going to tell my dad that I hit hay on the road, and my car is wrecked"? Sounds funnier now than it did at the time.
-
1 pointAbout all I ever find is my neighbor's empty beer cans and cigarette packs. Don't worry, I make sure he gets them back.
-
1 pointNot sure, but is there a bolt or pin in the bar going across under the hood? I seem to remember that is a 2 piece bar fitting inside the other.
-
1 pointWe live on a gravel road that is fairly heavily traveled. In the 7 years I have been here I have found. 3 pliers, 7 screw drivers, a Makita 12 volt drill (in the case), a Dewalt circular saw (in the case), 1 cell phone, a seed hopper from a JD corn planter,( I found the farmer that it belonged to, he was very happy to get it back as I guess they are worth about $600.00 bucks), And an engagement ring that was lost while jogging (also returned). Also, several mufflers, gas caps, a few tires and an old washing machine. The funniest thing though was a Polaris snowmobile that had apparently fallen off the trailer. The key was in it so I just rode it up to my shed and called the Sheriff. They ran the sticker number and got the owners name. I called him and as it was around 10:30 pm, he asked if he could pick it up the next day (also returned). I just wish someone would claim all the garbage that ends up in my ditch as well.
-
1 pointHood is finished up now, I just have to fix the tank straps for it and then it can be painted. I also picked up a set of fenders for it I need to blast and repaint, I am not going to worry about making them nice like the hood. After that, I just have to finish the gas tank, mount the tires, and finish the motor tins and it is pretty much good to go, I might end up buying a repro belt guard and heat shield for it too.
-
1 pointJust a few other observations on the Cub vs Deere as I look at my tractors - IHCC models from 1975 and earlier: PTO - Wheelhorse is much easier and simpler to service/rebuild Subframes - Wheelhorse doesn't have them. You need specific subframes for the IHCC's depending on the year make of the tractor and deck type. IHCC's had wide and narrow frame tractors and this subframe would be different between them. So I've got several deck sizes and both WF and NF tractors and front blades - so I have to have various subframes to keep around to attach these implements. Wheelhorse - no subframes, the attachment mechanism is integral to the implement, i.e. deck and front blade. I've bought decks from 1975 to 2005, front blades, grader blades, etc. They all fit every Wheelhorse regardless of year from at least 1975 to the end of production. The only advantage I can see of the subframes for Cub is that they divide the weight of the attachment - so a 48 inch Cub deck is easier for me to handle as it is two assemblies, where the Wheelhorse is one assembly. Once the subframe is in place, IMHO, the Cub deck is easier to attach. Quality of cut - Without a doubt, the ground supported Wheelhorse decks are better. My Cubs give a great cut, but my yard is lumpy and has some slope. The Cub deck hangs from the tractor and can't react to the ground profile and sometimes will not give a good cut from side to side or will scalp rather than ride over the hump like a Wheelhorse deck. This ground support is what made Simplicity known for their quality of cut and really the only difference between the WH and Simplicity is the Simplicity has rollers vs two wheels across the back of the deck - so with the Simplicity deck, you get striping out of the box. Clevis/Sleeve hitch: I can't say one is stronger than the other, but I think the IHCC gives greater ground clearance when a moldboard plow is lifted. Implement lift: Wheelhorse has a lift that uses a chain between the lift rocker arm and the deck or a cable between the rear sleeve/clevis hitch. On the Cub, this is a solid linkage. Cubs have a button on the lift handle to allow for floating, but it is a pain to use IMHO. Not sure how the hydro's float an implement - yet. Belt vs shaft - even the IHCC's have the famed "shaft" drive and we hear all kinds of "won't slip like a belt" all day long, fact is, I have never known the belt on my Wheehorse slipping - ever! At each end of the mighty IHCC's drive shaft is a small roll pin. If they shear, they can be a pain to fix - but not like working on a modern day car. Without a doubt, servicing or replacing a belt on the Wheelhorse is many times simpler than a drive shaft on a Cub. Gear drive tranny - IHCC's gear drive tranny might be stronger, but you'd never be able to find out as in normal (and most extreme) cases, the wheels would spin on either a Cub or Wheelhorse before you'd do any damage. Engine removal - very easy with both. Not required on the Wheelhorse to replace the clutch or replace the drive belt. On a Cub, you have to at least (IMHO) unbolt the engine and move it forward to get the clutch out for repair. I'll think of more later as I've been up to my ears in IHCC's over the past few years. I enjoy ALL of these old iron tractors and wouldn't discourage anyone from owning or not owning either Wheelhorse or IHCC's based on my comments. Sometimes though, various brands owners/loyalists can get wrapped around the axle on their tractor brand/model and assert it is the "best" or more "heavy duty" or whatever else. Doesn't really matter to me - what I enjoy is tinkering with the tractors. For my go to tractors - I want simple and heavy duty. Wheelhorse fits that bill - as do my earlier model IHCC's. But if I had to thin the herd, it's likely the Wheelhorse's would be the last to go. Thanks! Bill
-
1 pointLock the shed!!!!!!!!!!!!!
-
1 pointI have a 1.5 horsepower mower blade grinder. It has a 12 inch wheel. I sharpen my blades to a knife edge, but I sharpen them very often. I believe sharp blades make a huge difference when it comes to cut quality.
-
1 pointI own several cubs in addition to quite a few wheel horses. For me, the wheel horse attachments are easier to put on and take off and they seem to be more common in my area. I don't think there is one thing a cub can do that a horse can't. Between my 10 hp cub 104 and my 10 hp wheel horse 1054 I'll take the horse. That is my favorite work tractor and seems to out perform the cub in plowing duties.
-
1 pointWhen you get into Cub Cadet Versus Wheelhorse, you are talking about two of the top-brands of Garden Tractors ever.. (if you take modern MTD Cubs out of the equation..most of which are but a shadow of their former selves..) But for the "classic" years..1960's, 70's and 80's, IMO the two brands are pretty much equal in quality.. there are no specific things that makes one brand overall "better" than the other.. Its basically a "Ford vs.Chevy" thing..some people prefer one over the other, but a 1960's Mustang is the equal of a 1960's Camaro, generally speaking.. when comparing similar models and specs..same with Cub Cadet and Wheel Horse I would say.. Scot
-
1 pointThere real easy to work on. An early 80's Cadet 12 horse would be a 1282 or a 1210 and I can do a complete service including points, condenser, oil, air filter and hydro filter plus pull the deck to clean and sharpen the blades in about 40 min. The last time I serviced a Horse it took me almost 2 hours as I had a hard time getting at the points to change them and the drain tube for the oil was plugged with crud. Its been my experience with both that the Cadets seem to do better with the attachments that I have used. I've used mowers, snow plows, and snowblowers for both. I can switch attachments on the Cadet from mower to blower or plow in about 5-6 min. The 2 Horses I have are just a nightmare to change over taking me about 15-20 each and that doesnt include putting on the weights or chains on anything either. I dont really care for the decks riding on the ground as it seems to scalp more in some places and the plow likes to ride up over the snow if its wet, and the snow blower I used for 10 min in one storm and then got the shovel out to finnish as it just didnt seem to work at all. The horses have the advantage of being lighter so I can get into some places at home that stay wet most of the year and not sink in like a Cadet will but for all the work I do up and down hills and pulling heavy loads I prefer the Cadet because it has no belt to slip or break causing a runaway down the hill. Stewart
-
1 pointI saw that one, not a bad price for one. Maybe we'll get lucky and it will of gone to someone on here.
-
1 pointKerry all the above is true, only thing is I am suprised nobody thought to have you think over some of the things you did at that age. If you are completely innocent of such things at that age. Ill kiss your a33 on main street and give you 30 minutes to draw a crowd.
-
1 pointI was having real problems with my small equip - press washer, string trimmer, blower, chain saw.... A friend tells me about one local station that was carrying ethanol free premium fuel, next day I'm there and fill all my cans. I am absolutely blown away with the difference in my tools - I can crank them without straining a gut, they idle and just generally run much better. Had intended to just use in small equip, but I now have it in my D-18 --- ethanol sucks!!
-
1 pointI too have a Triplett 666 although mine is the HH model. Not sure of the dating, but the the registration card required a 1 cent stamp. Along with my Wheel Horse tractors I also enjoy building some 50s and 60s tube type guitar amps occasionally. I mostly use digital multimeters, but every now and then I pull out the Triplett to check something and to admire its design and function. I was very surprised to see your post!
-
1 pointThe only thing I ever found...was my way home after cruising around the block.
-
1 pointOOPs! I guess three pictures are better than one. Once you ge to the website go to the second diagram headed clutch, brakd and speed control and scroll down and find part #18.Thanks to JimD and puddlejumper for there input.
-
1 pointI agree with Mike, I just got off the local trout stream and catch/released 3 nice Brown trout. Please keep our streams and waterways clean! Trout Unlimited!
-
1 pointHere's a small update on the rj. I spent my spring break working on bondoing the hood. This was the first thing I did bondo on myself and this was a great thing to learn on as it does not matter to me if it is absolutely perfect. It was primed friday and I finally got a chance to sand it tonight with 220. Hopefully it can get primed again tomorrow so I can finish it up this tomorrow or friday. I have been working on the painting the wheels painting really thing coats and letting them dry good so I do not get runs like I did the first time than made me spend a couple hrs blasting them back down to bare metal again. I will get pictures when they are done. Also, here are some pictures of the motor after it was painted, I still need a shroud for it. Hoping I can find something at the mentone swapmeet in about a week and a half. Thanks, Jake
-
1 pointlooks really nice bob. i can understand you not wanting to use it. for me an original seat on any of mine would be nice, but i dont ever want to not use a tractor because of 'too nice to use' parts. thats why i buy the northern tools ones. i like to use all of my tractors. even got the 1057 plenty dirty this past weekend at the charlotte show.........
-
1 pointwhat is a moderator? that's the guy out there throwing cold patch in the potholes and tamping it down to keep the road we're traveling smoothed out. i personally have no idea what a moderator does until i read what they have to say when things go awry. they're the ones who try to use intelligence, and reason to diffuse conflict. what they do behind the scenes to help run a forum the size of this one, i can only imagine. not everyone is willing to take on the responsibility they have. not everyone can handle the responsibility they have. we only see the tip of the iceberg of what a moderator does here. if this doesn't answer what a moderator is to your satisfaction, then this might.... T-MO.... is a moderator. thanks for what you do T-Mo. jim


This leaderboard is set to New York/GMT-04:00