
Leaderboard


Popular Content
Showing content with the highest reputation on 04/13/2013 in all areas
-
10 pointsHi, all! My father wanted me to update all of you on what's going on. On Monday, he was trying to do some work on his truck, which involved removing the drive shaft. He neglected to chock the tires and set the parking brake, which he knows very well should've been done. When he removed the drive shaft, the truck began to roll forward. He tried frantically to get out from under the truck, but unfortunately, the rear tire rolled directly over his head. He was able to get to a phone, call 911, and was rushed to Danbury Hospital Trauma Centre in critical condition. After extensive CT scans, X-rays, and analysis, it was determined that he had a cracked skull, blood and air on his brain, multiple facial fractures, and paralysis on the left side of his face. The doctors worked on him in the ICU until Tuesday, when he continued to make remarkable strides. He was moved to a private room and discharged on Wednesday. While the blood and air on the brain has mostly subsided, his face is still partially paralyzed and will require one or more surgeries to repair the bones in his face. Thankfully, he suffered no brain damage. The doctors are telling us there will be several weeks to several months to recover, and still don't know if there will be any permanent damage. He very much appreciates all of the support and remains grateful to have such a caring group of friends behind him. Starting on Monday, he will be meeting with specialists to discuss his recovery, and he will try to keep you up to date through me. My father continuously surprises the doctors and nurses who, through their combined experience, have never seen anything like my dad. They were surprised he wasn't at LEAST seriously brained damaged, even dead. But no: knowing my father, he can even face being run over by a truck and have more improvement in two days than the time he accidentally opened a cut on his chin, and was spurting blood for weeks. Yeah, this is a lot more serious, but still...... My father isn't brain damaged, and he's walking, talking, eating, and behaving exactly like he used to. While he won't be outside working on the tractors or truck any time soon, much to his disappointment, he refuses to sell anything and even says that he still wants to fix the drive shaft himself, as the mechanics 'won't do it right'. Just to prove his strength, and the patience of our family, our dryer broke. Dad constructed a piece to fix the problem and showed my mother and I how to remedy the machine the day he came home from the hospital. So, just to appease your minds, my father is doing well and improving drastically, although he has a long way to go. Thank you for the continued support and prayers. I will try to update you all as soon as anything happens, per request of my father. Megan Lyon
-
2 pointsThe Onan 16 hp in my 316 has 1750 hours on the engine clock. I got the tractor last season as a runner though in poor cosmetic condition. No complaints - it did run and I instantly fell in love with the sound of an Onan. The one issue that reared its head that was that when it heated up working hard the engine would start to hunt. Annoying at first then it got to be so bad it was like riding a kangaroo. Weak mixture I hear you say, well I checked the carb and found it clean like new inside but used liberal amounts of carb cleaner anyway. You have to dismantle a lot of stuff including taking the inlet manifold off to get the carb off and having read in a thread that the manifold can cause the problem gave it a close inspection. It consists of two diecastings sealed together. There were no visible signs but I spread some sealant along the seal line anyway. Reassembled everything, fingers crossed, seemed better but the hunting when hot didn't go away in fact it seemed to get worse. Discovered that a PO has fitted the wrong plugs i.e. ones with the sealing gasket rather than chamfered fit but that made no difference to the hunting. Job for the winter I thought and finally got round to it this week. There's been many comments about the importance of valve clearances on these engines so thought I'd do the full works but stopped short of head decarbonising on this tour. There was a request for photos in one thread so I've taken a few. This is not a quick job but it's not particularly difficult, just time consuming which tends to be the case with twins. To get to where you want to be means first removing the air box. Two bolts + three thin ones that secure it to the carb. There's a couple of small engine tins to remove, then the muffler burn guard. The muffler is secured not only by the exhaust manifold bolts but also a plate that sits behing the top pto bracket so the two bolts securing it have to be removed also. With all this out of the way, disconnect the throttle linkage from the cab, choke cable and fuel line. Now finally the inlet manifold can be removed complete with carb - two bolts at each end. I've started to clean things up round the rear cylinder block - the front area shows what it was like, years of dust build up. Both ends cleaned up and both valve cover plates exposed. There are three cover plate gaskets and as there was a chance they might not be reusable I'd ordered in a new set just in case. The rear cover plate popped off without splitting the gasket. As far as I could tell there's a good chance this had not been removed since fitted at the factory 1750 hours, or if the clearances were checked at 1000 hours then it's been another 750 hours since. The inlet was spot on, the exhaust was wide by about three thou. Easy to adjust with two wrenches. The front cylinder top cover plate popped off cleanly, again without splitting the gasket but this reveals the crank case vent valve plate. I've put the bolt and spring back without the top cover plate in the photo to show how the breather valve works. The little spring steel valve was inspected and showed no signs of damage to the critical surface. The lower valve plate came off cleanly by getting my finger nails under it. This time the inlet was a thou too close and the exhaust valve clearance perhaps three thou too small, The plates with gaskets still attached were degreased and reassembled with some gasket sealant - I use Hylomar Blue but each to their own. Didn't need the new gaskets after all but I wasn't going to risk it. The carb was detatched from the manifold but before opening it up I tried tapping my way round the edge to see if a change of sound might indicate where the seal was broken. It was inconclusive but if there was an issue it sounded as though it might be at each end. The two diecast halves were factory bonded together by silicone sealant, exact locaction achieved by tiny roll pins visible in the photo above. Couldn't find a way of pulling them out so drilling them appears to be the only solution unless you know different. Trouble is that they're hard and the slit in them causes the drill to go off course. Tried drilling from the blind side which seemed better though not perfect. The drill size was 1/8th in prep for using bind rivets for reassembly. Actually splitting the halves wasn't easy. I used a stanley knife to begin at each port end and a spare blade to act as a wedge to keep the slit open. It was easy at each end possibly confirming that this was where the issue was. Got much harder as I worked towards the centre from each end. The silicone separated from one side only, the reason is that there is a grooved cast into the other side giving it more surface to bond to. Removing the old silicone took an hour or so of patient work. The next step (above) was a dry run assembly to ensure that all the rivets would go in - didn't want to discover any probs after silicone RTV was applied. It was at this stage that it became apparent that some warping had taken place. With the two halves pinched together in the middle there was a small but visible gap at each end - reason for the seal failure perhaps. Bolts were added at each end to ensure a proper seal once the silicone was applied and the halves reassembled. I also bolted the carb back onto the manifold with a new gasket and a smear of silcone sealent at this stage before leaving it to cure overnight. Manifold back in place next day with new manifold to block gaskets again with a thin smear of silicone - a belt and braces job! If you're wondering about the zip ties in the photo, these were insurance that the warping didn't strain the silicone bond once the temporary bolts were removed before final instalation and tightening down. They were then removed. Reassembly was then the reverse of disassembly, I didn't clean the carb as I'd done this last year. And........... she started so took for a run round to get it nice and hot - there wasn't a hint of hunting wher it had reached a point last year when it would start misbehaving after only a few yards so fingers crossed. Hope I haven't bored you and that this is of use to someone else. Sorry about not going for the full monty i.e. decarb as well, perhaps someone else will photograph that process. Andy
-
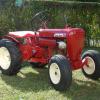
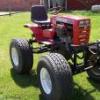
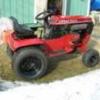
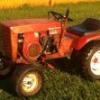
2 pointsI've been visiting the site daily for a couple years now and haven't had much to say. I've learned a ton and I really enjoy reading all your stories and seeing your projects so I thought it was about time I started to share some of my own. I've been wanting a GT14 ever since I first saw a picture of one and it just so happened that there was a pretty good looking machine for sale only and hour away. Overall it's in pretty good shape. I purchased it from the 3rd owner (really nice guy, had a beautiful restored 1965 International 500 crawler). I was told that the 2nd owner had painted it a couple years back. 'm not sure what the plan was for the white hood, but it does appear to be the same as the wheels. I'll be correcting that soon. It's missing the hood latch and the dash and shift plate plastics are in rough shape so they'll be taken care of as well. Also the wiring could use some reworking,looks like there was some cutting and splicing when the front lights were added. Here's a few pics. Hope you all enjoy. Rich
-
2 pointsThe idler pulley is three inches in diameter and is for a 1/2 wide belt. There will also be a short spacer behind it to space away from the arm it mounts to. The clutch return spring looks to be the correct one and yes it sits on top of the brake band. The lift cable looks correct also and none of the three that I have are clamped anywhere either. Your question about a return spring for the lift cylinder is no return spring needed because the cylinder is a double acting so you get pressure both in and out , Now the only issue that i see is that your belt guides. The rod that comes down from the fender you have it at the front of the drive pulley and it needs to be moved towards the rear of the drive pulley so that it almost contacts the belt but not . That way when you depress the clutch pedal it keeps the belt from riding out of the pulley. Also there is a piece of angle that goes on the bottom of the frame in the hole just below the drive pulley and runs up to the engine it mounts on the same bolt that the pto rod does. Guess i need to type faster lol
-
2 pointsMegan, I am not very good at expressing my feelings in the digital world, but I need you to know that I along with countless other RedSquare members consider your father to be a close friend and Wheel Horse family member. I hope someday to be able to make the trip east and meet many of my digital friends. Maybe next summer. Your Dad means so much to so many and I thank God that he is going to recover. Please let us know if there is anything we can do.
-
2 points1 week away!
-
1 pointHere she is! I'll start assembling as soon as the POR15 dries.
-
1 pointWell this comet sat in the barn for YEARS. I always thought it would be cooler then something other than a lawnmower. SO...........I hacked her up and made this. This will be my "compound cruiser". Got a small trailer for it so I can run debris and leaves out the pile in the back 40. I Will strip her down in a few weeks and give her a fresh paint job. Still have to get some brakes in her.
-
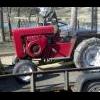
1 pointSo my neighbor Tony (Docwheelhorse) has been using a Wheel Horse Trailblazer 7 to clear his driveway for many years now. But depending on a 1960's era machine can sometimes be tricky right? So Tony would buy a Trailblazer when he saw one up for sale for spare parts or even as a backup if his main machine didn't start or broke. Well we had some pretty good storms this year and the Trailblazers weren't really cutting it, and he saw my Gilson walk behind just whipping that snow outa my driveway so he decided to break down and buy a newer bigger machine. Ended up with an Ariens Pro series with an 11hp motor, headlight, heated grips etc...kinda like the Cadillac of blowers. Now what to do with the Trailblazers???? He has started talking to a local small engine place about trading them all for a ride on tractor that he will probably sell to someone where he works. The small engine place asked for pics to be sent of the Trailblazers so I gave him a hand getting then out of the sheds and on the lawn for the pictures. I didn't know how many he had....boy was I surprised!! He has managed to accumulate 16 Wheel HorseTrailblazers and one Ariens 5hp!! Here's a pic of the machines minus one Trailblazer that is at a rental property that his dad owns. Mike............
-
1 point16 Tecumsehs and One Briggs..... None are blown up.... (2) 5 Hp Tecumsehs (14) 7 hp Tecumsehs and (1) 5 hp Briggs..... Any 656 guys looking for a motor?? LMAO! Tony
-
1 pointMegan, the only thing I can offer is the knowledge of other people who have a cant get me down attitude about them, He will continue to amaze the doctors and probably heal up in half the time or less than it takes for some or most. He is GOING to do more than he should and that is part of the healing process, Just hold him back the best you can without upsetting him to much, His body will tell him if and when he is pushing it,You just need to remind him that he is still hurt in another week or so when the restlessness gets bad. He will be like a wild animal in a cage pacing around wanting to do something. (So break something he can work on setting at the kitchen table) You get the idea. Best of wishes to you and your family, Mitch.
-
1 pointHere are a couple links to some more information on it.... http://www.radiomuseum.org/r/triplett_666_r666_vom.html and the manual... http://www.scribd.com/doc/50771794/Triplett-Model-666-R-Manual and another with more on the device and others made by Triplett. Nice find, looks like it was made in 1951, a very good year if I do say so myself.
-
1 pointNice looking unit, not all beat up. I got into the trade in the mid 80's and the digital stuff was coming on strong. Mike............ PS...fixed the title for ya...
-
1 pointDon't own a cell phone and yes I do think that seller is a rare person with honor. I have had sellers who sold tractors out from under me knowing I was coming to get it. Yes I have been selling off some of my herd but I have to have something to do. I've never been a couch potato.
-
1 pointYou've got to give that seller credit. All too often the seller would go back on his word to the first buyer and go for the extra money.
-
1 pointYou need to use a app on your smart phone that will notifiy you every time your search criteria are met. That's how you can get to them quick. I use CraigsNotifica
-
1 pointBelieve me; he's tried....... Thank you very much! He appreciates all you have been saying and acknowledges the fact that he has a thick skull to begin with........ Kidding, dad........ kinda.
-
1 point
-
1 pointKarl, All of Red Square wishes you good health and a speedy recovery!
-
1 point1st coat of POR15
-
1 pointKEVIN. Put a 1 1/8" deep well on the blade side of shaft and hit it with the impact. Put a piece of hose over the lower threads to protect them. Go forward and reverse repeat as needed. Hold the pulley with a belt. It has always worked for me over a dozen times. THE PULLEY IS NOT KEYED RIGHT? BOWTIE
-
1 pointGod was with you on that day and he is with you now. As you can tell there are a lot of prayers heading his way in your name. Wishing you all the best, get well soon.
-
1 pointI used 1/2 Heim joints and bushed them down to 3/8" and used 3/8" NF bolts.
-
1 pointI get mine from Motion Ind. ,less than 10.00 each.
-
1 pointtry # 4444t812 and some boots http://www.midwestcontrol.com/series.php?id=190
-
1 pointAll parts from McMaster-Carr, and not that expensive! ~Duff
-
1 pointCopied from another post on RS Make your own out of steel rod and a couple of threaded ball joints. Get smooth rod and cut threads at the ends, and then you can get these nice heim style joints from McMaster Carr, they really do a nice job. (You could also use standard universal ball joint ends, but at the same price, why?) I haven't made any for a WH yet, but I use them on my Cub 100, and they work well.
-
1 pointWhere you located, if your around me I can hook you up with just about anything for a GT14
-
1 pointsorry i already got the sign lol
-
1 pointbetter than nothing I guess lol. Just figured id post this while im waiting on my wheels to dry. I got me some ag rears and tri rib fronts yay. Figured I would need them to pull my newest disc attachment. thanks for looking.
-
1 pointI've owned all of the D-auto models at one time or another but only kept the 1973 18-Auto as my "collectable." So I'll toss my 2 cents in the fountain... I've never been overly impressed with the abilities of the D-autos compared to the C-series, but they certainly have their following. I always felt that they wanted for traction, especially when equipped with the floatation turf tires on the rear. I tried plowing snow with a 56" blade on my D160-K and didn't find it very satisfactory. On my D180 the snowthrower was so heavy on the front that even with wheel weights and extra ballast hanging on the hitch I couldn't get back up my driveway when the blower was lifted. Both tractors had weights and chains. They're also not particularly manueverable. They have a wide turning radius and slow steering that made them uncomfortable (for me) to use for mowing. I'm not sure if the available turning brakes improve this much. The engines used seem to put out obscene amounts of power, so you'll seldom overwork the engine on a D. The tractors were decent machines, but they did have some problems that years of (mis)use can highlight. For example, the early D's and all of the 18-Autos had 3/4" diameter front spindles. These were prone to breaking even without the added stress of front implements. Retrofits to 1" spindles and axles cured that. The steering boxes seem to get very loosy-goosey over time. The transmission itself seems to be a bit undersized for the tractor. The hydro used was also used on much smaller C-series tractors and seems more vulnerable to overheating and premature wear in the D-autos. Transmission temperature gauges were fitted after the 1974 revision and later a transmission cooling fan was added to help alleviate the heat. I think the size of the tractor and its big implements (like the 56" blade or the loader) set these things up for abuse. At some point, 1975 or 1976 I think, Wheel Horse added a pressure relief valve to the transmission bolted to the frame behind the left rear tire to help absorb spikes (and damage) from hard use. These improvements, I think, indicated that the hydro unit was a bit marginal for some applications. The divorced hydro pump and motor was actually, in my opinion, a brilliant idea. Why run a long shaft or belt from the engine to the transmission when a couple of pipes could do the same thing? Simple and effective. The differential bolts have already been mentioned. It's not terribly uncommon to find a tractor with a welded transaxle casing from one of these errant bolts getting pushed through the cast iron. Speaking of transaxles; in/around 1976 Wheel Horse relocated the parking brake control from a separate control on the dashboard to the Direction Control Lever (DCL). The DCL, then, had the obvious positions of Fwd-N-Reverse but also added a Park position accessed by pulling the DCL rearward into a separate slot near the Reverse position. The Park position engaged the parking pawl inside the transaxle (another weak spot). Anyway, apparently this reconfiguration caused problems with operators shifting into Park while still on the move which, of course, introduced the possibility of causing internal transaxle damage. One guy I talked to who has scrapped probably a couple hundred D-autos over the years said it could even cause the transaxle to drop out of the tractor if the loads were high enough and the traction was good enough. The Parking brake control was later moved back to the dashboard and the extra slot was filled with a bolt-on plate. Eventually, a contracting band on an external drum replaced the internal pawl on all Wheel Horse hydros including the D. But they did offer some big attachments and a lot of guys really like them. Strangely, the biggest belly deck ever offered was a 48" unit. But 60" and even a 72" rear mower (from Woods) was offered. The 72-incher is exceedingly rare and I've only ever known of one of them that Jim M had. 54" and 56" front blades, 50" mid blades, Ark 550 loaders, 48" thrower, and - of course - the backhoe attachments were offered. You can see that the dreams and plans for the D-autos were big. The 50" tiller is a brute. Early versions were actually 38" in width with optional extensions for the total 50" width. But be advised that the input gear tends to be a bit weak and the tiller should NEVER be used with the 3pt hitch set up to provide down pressure. It can overload the tiller and can lift the rear of the tractor enough to propel it forward with considerable and uncontrollable eagerness. The market was for "estate" owners and pretty much whomever now would be buying a Sub Compact Utility Tractor. They remained in the lineup a long time and must have acheived pretty good sales considering how expensive they were. 1973 marked the introduction of the series with the 18-Automatic. In 1974, the tractor was mildly changed (the dashboard changed to include more gauges, the parking brake lever moved from the "hump" to the dash, and the space under the hood grew taller by about an inch) and the D160 with a Kohler k341 single cylinder joined the lineup, the D180 with a Kohler k482 replaced the 18-Auto, and the D200 with a k532 was added. The D160K was a stripper tractor with no headlights, a simple seat, and smaller engine. The top line D200 was fully dressed with PTO/3pt/and turning brakes. D180's and D200's had a "suspension seat" mounted on a big spring and easily adjusted forward and aft. I think the seats themselves were different. And the D200 had a 5-gallon gas tank whereas the others were smaller. In 1978 (I think) the 16-kohler was dumped for the Onan 16 horse twin BF-something. The D180 was dropped. And the D200 soldiered on. I think eventually the 3pt was added as standard to all D's. Probably to use up parts or something. The C195 and D250 experiments and the end of the run for the D-autos put the nail in the coffin for WH dipping a toe in the larger tractor market. I too found implements hard to find, but 3pt/PTO attachments can be had if you look outside the WH family. The 2000 rpm rear PTO and the cat 0 hitch really became the standard for many garden tractors up through the 1980's or 1990's. Deere and Cub Cadet (probably others) offered 2000 rpm bush hogs, tillers, and finish mowers. The location of the PTO shaft itself was a bit goofy on some Cubs that might make their implements hard to interchange, but there is more out there than I first realized. The D250, on the other hand, is really wacky with a 1000 RPM PTO that spins in the opposite direction (CCW). The D-autos were GOOD tractors. But not great. The C-series were GREAT tractors. Wow, that's a lot of typing for 2 cents. Not necessarily much value though. Steve
-
1 pointI have this very talented friend of mine who hand drawn one of my Wheel Horse tractors. It came out awesome he spent over 15 hours drawing it out of color pencils!! He's making me 4 Wheel horse tractors in one picture next. I told i might sell this one for him. Let me know what you guys think!!


This leaderboard is set to New York/GMT-04:00