
Leaderboard


Popular Content
Showing content with the highest reputation on 04/12/2013 in all areas
-
6 pointsThe Onan 16 hp in my 316 has 1750 hours on the engine clock. I got the tractor last season as a runner though in poor cosmetic condition. No complaints - it did run and I instantly fell in love with the sound of an Onan. The one issue that reared its head that was that when it heated up working hard the engine would start to hunt. Annoying at first then it got to be so bad it was like riding a kangaroo. Weak mixture I hear you say, well I checked the carb and found it clean like new inside but used liberal amounts of carb cleaner anyway. You have to dismantle a lot of stuff including taking the inlet manifold off to get the carb off and having read in a thread that the manifold can cause the problem gave it a close inspection. It consists of two diecastings sealed together. There were no visible signs but I spread some sealant along the seal line anyway. Reassembled everything, fingers crossed, seemed better but the hunting when hot didn't go away in fact it seemed to get worse. Discovered that a PO has fitted the wrong plugs i.e. ones with the sealing gasket rather than chamfered fit but that made no difference to the hunting. Job for the winter I thought and finally got round to it this week. There's been many comments about the importance of valve clearances on these engines so thought I'd do the full works but stopped short of head decarbonising on this tour. There was a request for photos in one thread so I've taken a few. This is not a quick job but it's not particularly difficult, just time consuming which tends to be the case with twins. To get to where you want to be means first removing the air box. Two bolts + three thin ones that secure it to the carb. There's a couple of small engine tins to remove, then the muffler burn guard. The muffler is secured not only by the exhaust manifold bolts but also a plate that sits behing the top pto bracket so the two bolts securing it have to be removed also. With all this out of the way, disconnect the throttle linkage from the cab, choke cable and fuel line. Now finally the inlet manifold can be removed complete with carb - two bolts at each end. I've started to clean things up round the rear cylinder block - the front area shows what it was like, years of dust build up. Both ends cleaned up and both valve cover plates exposed. There are three cover plate gaskets and as there was a chance they might not be reusable I'd ordered in a new set just in case. The rear cover plate popped off without splitting the gasket. As far as I could tell there's a good chance this had not been removed since fitted at the factory 1750 hours, or if the clearances were checked at 1000 hours then it's been another 750 hours since. The inlet was spot on, the exhaust was wide by about three thou. Easy to adjust with two wrenches. The front cylinder top cover plate popped off cleanly, again without splitting the gasket but this reveals the crank case vent valve plate. I've put the bolt and spring back without the top cover plate in the photo to show how the breather valve works. The little spring steel valve was inspected and showed no signs of damage to the critical surface. The lower valve plate came off cleanly by getting my finger nails under it. This time the inlet was a thou too close and the exhaust valve clearance perhaps three thou too small, The plates with gaskets still attached were degreased and reassembled with some gasket sealant - I use Hylomar Blue but each to their own. Didn't need the new gaskets after all but I wasn't going to risk it. The carb was detatched from the manifold but before opening it up I tried tapping my way round the edge to see if a change of sound might indicate where the seal was broken. It was inconclusive but if there was an issue it sounded as though it might be at each end. The two diecast halves were factory bonded together by silicone sealant, exact locaction achieved by tiny roll pins visible in the photo above. Couldn't find a way of pulling them out so drilling them appears to be the only solution unless you know different. Trouble is that they're hard and the slit in them causes the drill to go off course. Tried drilling from the blind side which seemed better though not perfect. The drill size was 1/8th in prep for using bind rivets for reassembly. Actually splitting the halves wasn't easy. I used a stanley knife to begin at each port end and a spare blade to act as a wedge to keep the slit open. It was easy at each end possibly confirming that this was where the issue was. Got much harder as I worked towards the centre from each end. The silicone separated from one side only, the reason is that there is a grooved cast into the other side giving it more surface to bond to. Removing the old silicone took an hour or so of patient work. The next step (above) was a dry run assembly to ensure that all the rivets would go in - didn't want to discover any probs after silicone RTV was applied. It was at this stage that it became apparent that some warping had taken place. With the two halves pinched together in the middle there was a small but visible gap at each end - reason for the seal failure perhaps. Bolts were added at each end to ensure a proper seal once the silicone was applied and the halves reassembled. I also bolted the carb back onto the manifold with a new gasket and a smear of silcone sealent at this stage before leaving it to cure overnight. Manifold back in place next day with new manifold to block gaskets again with a thin smear of silicone - a belt and braces job! If you're wondering about the zip ties in the photo, these were insurance that the warping didn't strain the silicone bond once the temporary bolts were removed before final instalation and tightening down. They were then removed. Reassembly was then the reverse of disassembly, I didn't clean the carb as I'd done this last year. And........... she started so took for a run round to get it nice and hot - there wasn't a hint of hunting wher it had reached a point last year when it would start misbehaving after only a few yards so fingers crossed. Hope I haven't bored you and that this is of use to someone else. Sorry about not going for the full monty i.e. decarb as well, perhaps someone else will photograph that process. Andy
-
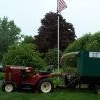
2 pointsFound someone listing Wheelhorse dealer sign on craigslist. Picked it up today and it looks really cool in the garage. I have a customer that makes neon signs for businesses and I have been kicking around having him make me an "old school" Wheel Horse logo in neon. Thad (With a glow coming from the garage, in Ohio)
-
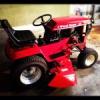
1 pointI LISTED MY 2006 315-8 LAST NIGHT ON CRAIGSLIST AND JUST SOLD IT. IT HAD 313 HOURS AND WAS LIKE NEW. I GUESS THE WHEEL HORSE IS STRONG. IT SOLD FOR $2200. HERE SOME PICTURES. BOWTIE IN OHIO
-
1 pointHello all Redsquare guys and gals. The good news first....Karl is still with us and has contacted the Admin/Mod team. The bad.....he will be on the mend for a long time after an accident at his home Monday. He gave us the "ok" to let you guys know what happened and the best way will be to quote what he told us. I cant type too long and please no phone calls I was admitted in critical condition Monday morning and into intensive care until Tuesday evening My current condition. I have several facial bones broken and will require surgery. I have lost (hopefully temporary) complete hearing on my left ear, and my left eye, wile is working, is not tracking with the right eye. I have also lost much of the muscle movement on the left side of my face as though I had a stroke. My truck weighs 8,300 empty with a 300lb cap on the back. The right rear tire rolled directly over my head. Every single doctor, nurse and the entiry hospital staff has NEVER seen anyone who didn't either die or have permanent neurological damage. I alive and go for my 6th and final ct scan on Monday. The last scan showed the the blood and air has greatly diminished and I will not require brain surgery. I am actually home at the moment and aside from the issues above I am so freaking lucky to be typing this to you. Tomorrow is my Sons birthday and I am so thankful that I will be here for him. According to the doctors, my recovery will be based on months, not days BUT they also thought that I would be in the hospital for 3 days. I am on complete bed rest and am restricted from lifting anything more than 1/2 gallon of milk. It's killing me as I am not a seditaty kind of guy. I will not check here very often as it's difficult to see the computer screen. I will however update you all when I know more, but please now I am alive, and for the most part okay and I am a very very lucky man. I will tell you with 100% honesty, I thought I was going to die on Monday! Love you guys! -- Karl Karl is not some guy on a forum I have never met face to face, we have met, at my house and at his house. We even went on a tractor rustlin mission together. We are friends, no doubt about it. So keep up your spirits and do what the doc's tell you Karl. If you need something you know you can call me. Mike................
-
1 point1st coat of POR15
-
1 pointYou could always make one with a couple of these .... http://www.amazon.com/Blue-Neon-Glowing-Strobing-Electroluminescent/dp/B003J99JW4/ref=pd_bxgy_hg_img_y by covering the area you wanted to black out with electrical tape. The price is very reasonable too.
-
1 pointI had a '99 Volvo which needed the EGR valve cleaned. As it got clogged at around 100K miles, the oil consumption would increase dramatically and the next thing would be blown seals. Great cars and one of the safest on the road during that era. BUT definitely over-engineered sometimes. The EGR valve was under the intake manifold and the only way to access for cleaning it was five hours R & R of labor. I found on a Volvo forum that I could remove the hose to the valve and then using a baby bottle ( to prevent cylinder hydro lock) I could dribble Seafoam in to clean the valve. At the same time I also added about eight ounces to the oil and drove about 30 miles before doing an oil change. It worked and I was able to get another 10K before I traded it on my truck. The trick is moderation and not be the neighborhood insect smoke bomb as shown on Youtube.
-
1 pointThanks to all the replys and encouragment. Well, its the day after my colonoscopy, feeling much better. Went this morning and picked up all the parts that were sandplasted and primed. Wed. I made a list of all, new hardware I need, since I couldn't go far the crapper. So I'll see what i have and p/u what I need next week. If it warms up next week We will start painting her. Zipper Here's some more pic's.
-
1 pointwell i bought it to sell but tell you the truth im kinda getting attached to it
-
1 pointA little Cold Chisel...
-
1 pointLooks likes you guys had a great time! Glad to see the Wheel Horse fervor is strong in Ohio! Some of the best things about Wheel Horses are meeting their owners and listening to their Horse Stories!
-
1 pointUh Ohh! Next thing you know, someone will come on here and say; "You can Tune a Wheel Horse, but you can't Tuna Fish" Waa Waa Waahhhhh
-
1 pointhttp://www.stupidvideos.com/video/just_plain_stupid/One_Man_Dueling_Banjos/
-
1 pointSomewhere Over The Rainbow:
-
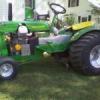
1 pointAlthough not red. I though you guys would like it. 45cid Kohler Command. Roller motor. VM11 rear tires. Cub drive train. My ole mans ride. I build his engines.


This leaderboard is set to New York/GMT-04:00