
Leaderboard


Popular Content
Showing content with the highest reputation on 04/10/2013 in all areas
-
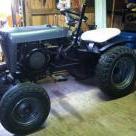
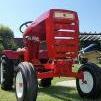
2 pointsOk it looks like we have another 1974 B-80 Wheel Horse with a 36 inch mower deck, mule drive and rear slot hitch! $35 at auction a few days ago that my friend bought for me -unbeknownst to unnudged! I did not know anyhting about it and am still discovering more about it. I thought it was pretty neat that a friend would do that without having too many second thoughts! He did admit to a few! Mule drive needs a handle but seems to be a good one.
-
2 pointsMark (meadowfield) called in at the barn today and delivered the decals for the A-800, C-100, and some for the decks I've been restoring over the winter. A little excessive / compulsive perhaps but having completely dismantled them for a full restore it just seemed right to put the decals back. The SD deck was basically in sound shape and just needed getting back to bright metal before painting. OMG aren't there a lot of parts to a deck as I discovered. Came out well though and the decals just make it look right to my mind. The RD deck was also in sound shape and even still had some of the original paint left underneath though the top had begun to rust badly where it had been left in the rain for a number of years like the 316 it came on. The only real issue was metal fatigue round the hanger mounting points. On one side one pass with the stick did most of the work leaving a couple of hairline fractures to deal with. The other side presented more of a challenge! ... and had to be welded a bit at a time working inwards alowing the raised part to be hammered down ready for the next bit and so on. This type of fatigue obviously became a known issue and on a NOS deck I got for the D-200 a reinforcing plate underneath had become factory so I added the same. Came out pretty well and should see rather more seasons now than it would have done otherwise. The decals have really finished off these decks a treat Mark so thanks for your efforts in creating the ones not already on file, especially the ID tag for the RD - better on the deck than writing the id info down somewhere for future reference and then losing it. Andy
-
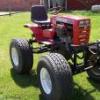
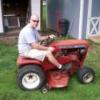
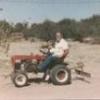
1 pointTrying to find out what year and model this is. My dad bout this in the 60' s sold it in 1983 and I just bought it back. Plan on restoring back close to original. But need to get more info. Are there numbers somewhere to tell me the year? I'm 99% sure it had a kouler 8 hp and I'm thinking from looking at pics a 1964/654 ??? Any help would be great.
-
1 pointHello all. I just wanted to post a little about my candidate for the longest rebuild ever on a WH I bought my Grandparents farm back in 2010 when Grandpa died and Grandma moved to town. Along with the farm I grew up on, I inherited this old Horse. When I was a kid it was the first thing I ever drove. It mowed 3 acres for a lot of years before Grandpa got something bigger and parked it outside under this lean to. So I moved in and started tearing it down back in winter of '10. The body was really straight. However, at some point someone had swapped out the 6hp Tech for a K181 Kohler. They also had done some work updating the decals. Notice the original script underneath the more recent decal. I then started in on the epic task of removing both rear hubs and the rear pin in order to split the tranny case to see what needed done. I figured since it sat outside, it had water in it. I was right, but it really wasn't all that bad. Also, I managed to break both hubs (no good puller) and had to drill out the rear pin. When I got it apart, it was a little gunky and dirty, but everything was in good shape, no missing teeth or anything, just some needle bearings that I had probably killed with my sad attempt at hub removal. I also pulled apart, cleaned and reassembled the differential: After some time in the e-tank the halves came out looking pretty good: I am having trouble with getting that last bearing in but otherwise, a few seals and a reassemble and the transmission is done. I have had a ton of fun with this even though it has taken me forever and I am not even into the motor portion of this yet. The body parts have all been e-tanked or stripped to bare metal, primed and repainted. It's a rattle can job, but I have tried to do a nice job on it. This will be a worker when done for garden duty and some log hauling for firewood. Id also like to say, "Thanks" to all the great members on here who have inspired me to keep going with their excellent builds, restos and just a great sharing of information. Especially stevasauras with that uni drive trans rebuild post. I'd have never attempted that without seeing that on here. Thanks to all. Will keep this going as I slowly proceed. I also have removed the old tires and redone the rims with the e-tank. They turned out great in my opinion. I will post more pics as soon as I can.
-
1 pointHey Fellas.. i was bored here for a few days a go so ill went out to my shop.. to see if there was anything i could do LOL.. Hmm found some stuff.. then ill got the to make me a wheel horse sign. since i prolly never will find one here in norway. . so here are a few pict of what i did.. used as back side same stuff as they use in light sign (opalwhite cast acrylic) a board I cut slots in to acrylic stickers I had lying around that I put on then it was time to make a frame for it ... mounting the led light is about 240 of them Then it was time to try it and se how it worked.. wow it worked but the horse seems to be black.... well time to try it on the wall.. much better can se the horse head is RED but ill think it is a bit to bright.. well this was a test!! the bottom of the frame is bad so i have to make a new pice to put in there..but it light's up the shop really good..
-
1 pointFor some time I have wanted to biuld a clone of the 1954 RJ Prototype tractor on the cover of Mike Martino's 2nd Edition and also feachered in the very early 1955 RJ ad (my avatar). I looked for about a year before finding what I felt was the perfect RJ in order to base the project on. What I started out with was a ruff condition 1955 Cable Steer RJ35. It was missing the hood, engine, seat, original front rims and most of the cable steer parts. It did although have the veri drive, belt guard and rear drive intact. Some of the parts which I had to make in order to clone the Prototype correctly was the fiberglass RJ hood, pilot steering wheel, most, if not all of cable steer parts and speed selector items. Posted below is a pic of what I started with and the biuld of the fiberglass RJ hood. If you click the below link you will be forwarded to my YouTube Channel (VinsGN) documenting the project. There are 11 parts so far starting with the basic overview of the tractor to the biuld of the hood and the fabrication of the pilot steering wheel. http://www.youtube.com/user/VinsGN/videos?view=0 Subscribe to my Channel and follow the biuld. Thanks Vince
-
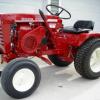
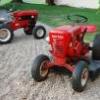
1 pointWell I finally got around to this tractor. It turned out pretty good. I had this for sale on my website before I did anything to it and didn't get any takers. I did one of these last year and sold it. I had to rewire this and I haven't painted the front wheels yet. I have repainted the engine since I took these pictures. I need to get some updated pictures yet after I paint the wheels. New paint, new decals,new battery and wiring.
-
1 pointI worked on the seat a little last week during spring break, and finished it up yesterday. It was full of pits when I got it, now it is really nice and ready for paint. I did not do the underside of it but that will never be seen. Thanks, Jake
-
1 pointHere's a small update on the rj. I spent my spring break working on bondoing the hood. This was the first thing I did bondo on myself and this was a great thing to learn on as it does not matter to me if it is absolutely perfect. It was primed friday and I finally got a chance to sand it tonight with 220. Hopefully it can get primed again tomorrow so I can finish it up this tomorrow or friday. I have been working on the painting the wheels painting really thing coats and letting them dry good so I do not get runs like I did the first time than made me spend a couple hrs blasting them back down to bare metal again. I will get pictures when they are done. Also, here are some pictures of the motor after it was painted, I still need a shroud for it. Hoping I can find something at the mentone swapmeet in about a week and a half. Thanks, Jake
-
1 pointYou can tune a Wheel Horse but you can 't Tuna Helper
-
1 pointUh Ohh! Next thing you know, someone will come on here and say; "You can Tune a Wheel Horse, but you can't Tuna Fish" Waa Waa Waahhhhh
-
1 pointYou may have faulty seat safety switch. Check that out first.
-
1 pointGreat story about your Dad's Tractor and that it has come full circle back to you. I also have to say that the Paint Scheme look's professionally done, really cool and suits it. Having said that, a Wheel Horse should really be wearing the clothes it was born with. I'm sure whatever you do, it will be treasured
-
1 pointOne of the hardest things to fine on one of these is the trottle control.Had to repair a few cracks, replate the arm and replace cable. Check out the red knob.Its the same one used by wheel horse for hood.
-
1 pointSuper nice tractor, I'm sure you will enjoy memories every time you ride it. I have my dads 855 and wouldn't consider selling it for anything less than $1,000,000, and I would still miss it.
-
1 pointRTM, best way to secure the trans is "dipstick" half down. Folks use various methods from stacked 2x4 cutoff pieces to milk crates to workmate benches to custom built jigs designed specifically for the purpose. Once you split the trans case, you will find a similar arrangement to what you see below (maybe more rusty and certainly covered in putrid smelling oil / water emulsion). Depending on which shifter fork you are intent on replacing, the speed forks and the HI / LO fork all are operated on the same principal of a captured ball bearing riding in a detented shifter shaft. The speed shifters are captured by a spring / bar / ball arrangement as seen below. Part numbers you may need are http://i1228.photobucket.com/albums/ee458/SOI_University/speedshifterdetentsptnum_zps4234ad24.gif The HI / LO fork is a similar arrangement with the fork retained on a detented bolt ( part numbers the same as for the speed shifters) http://i1228.photobucket.com/albums/ee458/SOI_University/HILOshifterdetentptnum_tn_zpsacd24e11.jpg Note - when removing the speed shifter forks, the spring loaded ball bearing detents are under considerable compression. The easiest way I have found of not having the ball bearing and spring fly out of the access hole (blue arrow in the lower left corner of the image below) is to cover the access hole with a strong magnet or place a magnetic retriever in the access hole. When you have removed the main-shaft gearing (red arrow), raising the shifter fork (blue arrow) will allow the compressed spring / rod / ball bearing combo to expand out into the magnet and be retained within the trans housing. If the magnet or some form of barrier is omitted, the ball bearing and spring will most likely fly across your bench and possibly be lost or damaged in the flight.
-
1 pointThat is a STEAL!!!!!!!!!!!!!!
-
1 pointman that is cool as hell that it was your dads tractor... I agree with some of the others, restore it or keep it as is..what ever reminds you most of your old man
-
1 pointBoy I'm glad you forgot to mention those were for sale I think we all would have been in trouble if we brought any more horses home! (for now anyway) sure had a great time... thanks again!
-
1 pointGreat looking tractor. Wecome to Red Square. I have my parents Commando 8 and wouldn't sell or trade it for anything. Like you, I had tracked it down after my mother sold it in 1984 and I purchased it from its 3rd owner, used it until last year and gave it a complete restoration. Good luck with your plans. Dave
-
1 pointhere's my 400
-
1 pointI've had that issue with my 854. I actually made a front "mast" that hangs off the tractor to keep weight out front. i would hang 50lbs about 12" in front of the front axle. I know that doesn't help with roots per say, but it does keep the front end down when plowing and makes it less susceptible to pull up. I did that with my 1054 once, had it way up high, that was pretty scary! Justin
-
1 pointThe best of luck to you as you restore this great memory! Great story to have your Dad's original tractor back in your ownership!!
-
1 pointI know what its like to have your dads tractor. I have both my dads horses. his 1970 Raider 12 he give me in 2005 & I restored in 2006. & his 1963 753 that I grew up on. he sold when he bought the raider about 25 years ago. the hood that is on your tractor was used on the 604 654 & 704 for the year of 1964. The 604 & 654 used 6hp teckys the 704 used a 7hp kohler. the 8hp kohler was used on the 854 but would have a different hood. check the tag on the flywheel shroud a k161 would be a 7hp kohler & a k181 would be a 8hp kohler. if its a k161 & this is the original engine it would be a 704
-
1 pointI love the fact that it was your Dads and you were able to get it back after all these years ! Restoring it will be a labor of love that's for sure,talk about a worthy and super fun endeavor ! Thanks for posting the pic, please keep us all posted on the whole thing! John
-
1 pointCopied from another post on RS Make your own out of steel rod and a couple of threaded ball joints. Get smooth rod and cut threads at the ends, and then you can get these nice heim style joints from McMaster Carr, they really do a nice job. (You could also use standard universal ball joint ends, but at the same price, why?) I haven't made any for a WH yet, but I use them on my Cub 100, and they work well.
-
1 pointI have an 854 and a 633 that I am thinking about bringing to the swap. Both are good runners. If there is any interest i will make sure i bring them.
-
1 pointI think the blue painters tape is suppose to give it more horsepower!
-
1 pointthe best way i found is take a peice of 2x4 drill a 1.5 inch hole in it then cut the board of in middle of the hole then put the flat end of the board againts a wall or tree and the cut end around the wheel were the pin is hold tight againt the board and use a punch with a little hammer will make them come out easy cuase it takes all the deflection out of it and makes it a solid blow on the pin and the pin will punch right in to the wood
-
1 pointThanks!... The Model 8 motor is almost all back togerther. The plan is to sand blast the frame this weekend.
-
1 pointI'm quite good at remembering how parts bolt back on... It's working out where I have stored those parts that causes me problems
-
1 pointThank you Terry, Made up a new box for the rear, The old one was so rotted out from being outside filling with water. Made this one just like the one panzer made.
-
1 pointThe weakest ink is stronger than the sharpest mind. Something like that anyway. Take pictures and notes.
-
1 pointThese guys all missed the best way. Go out and buy another tractor just like whatever your restoring so you'll have a tractor to refer to ! Its a perfect excuse to buy another tractor right?? Mike...........
-
1 pointThanks a lot guys... I appreciate all of the comments. Its my hope to have the tractor completed for the 2013 WH Show. 99% of the fab work is completed, I just need to repair the rear hubs and then start the sand blasting nightmare, LOL! Its my plan to continue updating my YouTube Channel as meaningful progress is completed. Everything about the tractor will be 100%, all new bushings, bearings and basicly a NOS Briggs Model 8 motor. As you can see from the attached pics I used a RJ hood as the buck for the fiberglass hood. I made the top and nose in two parts and them married them together. What a mess it made.


.JPG.9f2ecb26065c66527b0730084ab7fc7a.thumb.jpg.7dc8a04d9a53d44ee2b23f26ee94496f.jpg)


This leaderboard is set to New York/GMT-04:00