
Leaderboard


Popular Content
Showing content with the highest reputation on 03/11/2013 in all areas
-
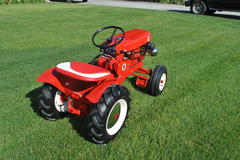
4 pointsI got a call from a friend who said his buddy had a old Wheel Horse that was junk and wanted rid of it for cheap, I love these calls! I went to look at it about 20 miles away and the guy said it was in rough shape. I checked it out and it had some issues but over all it was in pretty good shape. The 12 hp Kohler had a cam shaft that had some teeth missing and that was the worst thing. The head was missing but the head bolts were scattered around the machine. The left front spindle was broke off too. He kept saying how rough it was and may be a parts machine. I saw the hydrualic lift on the side and figured that was worth a few bucks! The seat is in great shape and seems to be a rare style of WH seat! I've seen similar seats on Ebay for $300 or more! So I asked him how much he wanted for it and he said to make him an offer. I said well is $50 enough for you? He replied rather quickly, that is was plenty! So it's a early 1970's Electro 12 with hydrostat drive, nice back tires, rims and hubs, dash is intact with all the goodies, lighter, pto switch, head light switch and a good pair of choke and throttle cables, hydraulic lift set up, nice steering wheel with center cap and a nice intact decal even! It also has the mower deck on it but it has some rust holes but not too bad. Good deal for the money! KJ
-
3 pointsOddly enough, I never made a video of this tractor "in motion". It was nice today, so I asked Mrs. R. to follow me around with the camera.
-
2 pointsA bit ahead of schedule but hey, wanna be ready for spring mowin'! Like the Boy Scouts of America, "Be Prepared." I just mounted a 48" SD deck on my current project, '90 520-8 (nice!). I took it for a ride 'round the property. The deck will cut fine, I had reworked it a year ago for a 416-8. Here's the difficulty. While the deck is level, runs fine off the PTO but, doesn't like to ride in the raised position (manual lift). Seems too heavy. And, a "Real Confession" something which I apologize to all for doin'. Sorry. TSC didn't have a generic fuel filter, darn me, sorry again, installed a Deere thingy. Now, I'm starting to cry a little bit. Any ideas?
-
2 pointsThere are indeed two quite separate circuits here. The fuse that had blown and that you replaced relates to the charging system and the two coils at the bottom of your photo. The fact that it had blown tends to indicate that one or other, perhaps both, of the diodes on the same panel are short circuit. If they were good and installed the correct way round then there's no way the fuse could blow. The fact that it had blown only affects the charge circuit, not the ignition. Although you saw smoke rise from the black ignition coil I suspect it may have risen from the charging coil below which may or may not have been permanently cooked as a result. If it did originate from the ignition coil then the diodes must be short circuit and a wiring fault under the flywheel (possible but unlikely). The lack of, or weak, spark is in theory at least unrelated to the fuse and hopefully the smoke. I have had an ignition issue with a VM-80 with pretty similar arrangement under the flywheel. In my case the reluctant to start / run was partly points but also a fault that had developed in the ignition switch. When you turn the ignition switch to the off postion a contact is made which effectively shorts out the points to kill the ignition and stop the engine. This is standard on a magneto ignition. This part of the ignition switch was grounding inside the switch somewhere preventing the engine from running. To test this possibility it is a matter of disconnecting the stop wire from the ignition switch to the points. On the VM-80 the wire from the ignition switch is connected to the wire from the points at a terminal post between the two alternator connections on the diode / fuse board. Removing the wire from the ignition switch made the engine run again but be warned, to stop it you have to pull the lead off the spark plug or ground it. Whatever you do, dont be tempted to loosen and adjust the coil assembly at this point or has been mentioned you will put the timing out and it won't run until the timing's right again. Sorry about the long reply - hope it makes some sense. Worth checking out the above before investing in a replacement ignition coil. (please don't assume the diodes are the correct way round in the above photo as PO played about with them and I haven't got round to checking them yet) Andy
-
2 pointsYou can never have enough ...unless you're name is Kelly...or Jake. Turn that truck around.
-
1 pointSEEN THIS TYPE OF LOADER ON YOUTUBE. I SEE THEM ONLY ON JOHN DEERE SO I MADE ONE. WORK IT A DAY OR TWO THEN PAINT
-
1 pointIt occurred to me today that as I unloaded the transaxle from the back of my Ford Ranger form my Lawn Ranger at work today, that also contained a new rear end for my Ford Ranger that I pulled from the junk yard this weekend.... Somehow I had 3(counting the one under the truck) Ranger rear ends in my Ranger??? If I were a park ranger I could have had 4 Ranger Rear ends in my Ranger.
-
1 pointWhen you unload the three Ranger rear ends, your truck will be a Lone Ranger.
-
1 pointI'll give back your fifty bucks for the seat alone...is that enough for you?
-
1 pointI'm Back ! Was out of town all last week and when I returned home, I spent this past weekend scouring through all the notes from SOI and others and traced, retraced, checked and rechecked every wire, connection, ground and switch. I practically rebuilt the entire wiring harness. It's amazing how 24 years of flawless running can cease instantly due to bad connections, grounds, and switches. I found some bad wires, connections and weak grounds. So, I replaced the original ignition switch, original seat switch, original solenoid and safety relay. Rewired the iginition switch connection and replaced every ground connection from the battery through to the ignition switch. I used heavier 14 guage copper wire to run all of the grounds and grounded directly to the frame or engine wherever I could. Sealed all the connections with Plasti Dip to prevent moisture and corrosion. Put it all back together and VOILA !!! the old girl cranked right over better than new and she purrs like a kitten!! After 1627 hours, she's ready for another 20 years of service, at least !! Thanks to all who contributed ideas and tips and a big "hats off" to SOI for all of the detailed illustrations and instructions. They made my investigation and ultimate solution a whole lot easier to get through. You guys rock !! Thanks, Chuck
-
1 pointVery nice new truck Craig, you are going to really enjoy the extra power and comfort over your S-10. (May she R.I.P.) I would have loved to have been able to have bought that J-20 off of you! I worked at a shop many yrs. ago that had one as their plow truck. I was the guy that cleared the lot when it snowed because all the other guys always managed to damage something in the process. (customers cars etc.) I loved that truck! It was a little loud (even for me) with the 4 speed and worn out glass paks! It was an animal!
-
1 pointWelcom Adam to Redsquare! Several months ago I had a similiar problem. One of the members here, Save Old Iron, helped me out. Here was his post: Good Luck!
-
1 pointWelcome to Red Square Adam. I have the 4 post Ford solenoids on several of my tractors. Without going back out in the cold to check how they are wired, I am guessing that your wire from the switch is going to the wrong small terminal on the solenoid. A picture I have here shows the small switch wire going to the left hand small terminal (This is a starter.generator engine, but the wiring of the solenoid should be the same for your tractor)
-
1 pointLooking good State Farm.
-
1 pointA couple nuts, bolts and brush paints... she'll shine right up!
-
1 pointFunny thing about auctions, You dont have any idea what something is worth until the bidding is over,and next weekend it may quit at half that or twice that, And that seems to be directly affected by whether I am there and interested in the item or not.
-
1 pointThe drive belt guard comes off first. I have circled the belt guard fasteners in yellow (remove completely) and the footrest clamps (loosen) in orange: The tractor pictured above is a 1990 312-8 with a manual PTO clutch on a Magnum 12. That should be the only major difference between it and your 315-8. Once those two pieces are out of the way, the idler pulley will be visible. Remove the bolt securing the idler pulley to the clutch arm and remove the pulley. Do not bend the tab above the pulley to get the belt off. The lower belt guide on the engine can be loosened and dropped enough for the belt to clear. I believe the top bracket (bolted to the engine just above the drive pulley) for the rod that holds the PTO clutch may interfere with belt removal/installation. (sorry - can't remember) If you can't get the belt past the guide on the bracket, remove the bracket from the engine. Remove the belt from the tranz pulley first, then the engine pulley. Install new belt on engine pulley first, then tranz pulley, and reinstall idler pulley last. Depress clutch pedal to make installing the idler pulley easier. Once belt is installed and under tension, adjust the lower guide at the engine pulley so it is 1/8" away from the belt.
-
1 pointHere's my puller. It was a special tool for GM when the x body front wheel drives came out. We never used them The wheel bearings about fell out when you removed the bolts. Picked it up for a buck when the dealership moved into a new bldg and they were cleaning out. Fits the WH hubs perfect and run the impact on it.
-
1 pointWell I have been replacing alot of axle seals. Have been lucky using a 3-jaw puller and have not broken a hub. I figured my luck might run out one of these days. So I thought it was time to make a puller. Went to the local machine shop to get the stuff I needed. Well I ended you just having them make it for me. For the price and me not really having the time. Here is some pics of it. Got to use it yesterday and it worked great. I don't know why I waited so long to get this done. Here are some more pics.
-
1 pointSo I looked at some pictures here and on Partstree, and this is what I came up with for about $6.00 in materials and a couple hours of my time. It may be a bit overbuilt, and not quite as pretty as the factory edition, but I can use the money I saved to buy more Wheel Horse stuff. Win-Win! I will weld the brace to the two axle bracket pieces when I can put it on the tractor and make sure I don't have any interference issues.
-
1 pointThe jack of all trades, master of none, is always an intriguing idea. But think about how many of us on this forum don't even swap attachments any more. Got a tractor for mowing, one for plowing, one for tilling, one for. . . Just think if the tractor breaks (engine, steering), so goes the generator. Or you have a generator tied to an 700 lb anchor. Jeff
-
1 pointMMMMMMM...... NOODLES
-
1 pointMoving open end jumper from bat to relay trigger does not sound quite like SOI's picture.. you want to leave the battery and the starter connected to their respective posts, and apply voltage to the trigger terminal. so you want a jumper between battery and trigger. If you apply voltage to the trigger without being able to draw from the battery, the starter will not go, as the trigger post just moves the plate and closes the connection between the two main studs. Dunno if this is the same, but I get starting gremlins with my 414, and they are nearly always related to ground issues. Check the ground on the solenoid.. I also get weirdness because the ground strap from the battery is run to a bolt on the tower that is secured through a clip, and can sometimes vibrate loose and give poor contact. There is only one time I did have a bad solenoid, and SOI told me how to fix it (although I was too lazy and just bought another.)
-
1 pointWOW "Save Old Iron" you have given me all the ammo I think I need to drill down into this problem!! What a great post !! Thanks a million and I'll post up the results of my diagnosis when I'm done. I'm so glad I joined Red Square, this place rocks!!
-
1 pointI probably should not start off thinking this engine has 15 amp stator because every time I do - It doesn't - I have bad luck making assumptions on 300 series stuff. but I will make a few assumptions and later tailor some of the troubleshooting if we find this engine has an engine skin mounted 15 amp regulator / rectifier unit. 1/ You have a 3 amp stator charge system (I'm looking at that 25 amp fuse and thinking maybe not?). 2/ The 25 amp fuse does NOT blow when you have the ignition switch in the OFF position. 3/ The 25 amp fuse blows BEFORE you go to the START position on the ignition switch. First thought is the wiring thru the 25 amp fuse to the ignition switch is OK - because the fuse does NOT blow with the ignition switch in the OFF position. The second item to discuss is the 15 amp fused circuit. Since the 15 amp fuse is NOT blowing, the problem cannot be the circuitry protected by the 15 amp fuse (the 15 amp fuse would blow before the 25 amp fuse - right?). The diagram below highlites those circuits and eliminates then from view in the 2nd image. We are trying to visually eliminate the circuits that could not possibly be involved in the 25 amp fuse blowing. The second round of eliminations can be the ground wires. Since they are already grounded, becoming grounded thru abrasion anywhere along their length will not change their function. Next we can eliminate all the circuits needed by the starter - because the assumption here is the 25a fuse blows BEFORE you turn the ignition key to the START position. Remember, the ignition switch does not apply 12 volts to any part of the start circuity until the operator flips the ignition switch to the START position. See where we are going ? If we make certain the PTO lever is in the off position, the PTO microswitch opens up and therefore eliminates any issues with wiring issues AFTER the switch. Now we are down to just these few circuits. The following advice is based on a 3 amp stator charge circuit - if you have the 15 amp charge circuit, I'll post alternative troubleshooting later today. Either the wiring to the stator is grounded or the diode in the charge coil of the stator is shorted allowing battery voltage to run thru the stator windings and blow the 25A fuse. If the stator wiring can be unplugged (usually a 2 prong plug somewhere near the engine tins) a shorted charge diode can be eliminated. If the fuse does not blow with the stator detached, the stator diode or stator windings / wiring are compromised. If the fuse still blows with the stator detached, wiring harness shorts to ground should be suspected. The ignition switch COULD be shorted to ground but would require good access to the rear terminals of the switch (or removal from the dash) to do resistance checks.
-
1 pointKelly where did you find the new windlace have a seat i need to redo also. thanks


This leaderboard is set to New York/GMT-04:00