
Leaderboard


Popular Content
Showing content with the highest reputation on 02/26/2013 in all areas
-
3 pointsIMO its a very safe event.... so long as you monitor the platform and "grow a pair", "man up or woman up" and throw idiots off of it. Can you tell I'm tired being "PC"? LOL!
-
3 pointsI would lean strongly toward the K-301 / M-12 engines. 20 years from now when those china diesels are beer cans and seamless gutters, those old iron Kohler singles will still be chugging away.
-
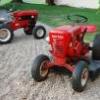
2 pointsPicked up this old 520H in Ohio. She was pretty rough. The plan was to clean up and make a mini loader to use around the yard. I have a D series loader that works pretty well but it is just too big. After a bath, tuning, some sand blast and paint, It started to look good. Installed a Matt860 Hydro pedal kit, upgraded the front axles to 1", new tries, weights, and used plans from PF engineering as the starting point for the loader. I modified the plan to have more bucket roll back when in the lower positon. (This does sacrifice the dump side at the raised position), I found a happy medium between the two without fancy linkage. I still have some fine tuning, the hydraulics are way too fast, at least on the boom lower. Looking into a flow control now. Thanks for looking, Joe
-
2 pointsI've been wanting a space to display my Wheel Horse stuff for awhile. So my son came over today and we got a good start. Most of my stuff is in the Horse Hauler and its in the barn for the winter so will have to wait till I get down there. Was disapointed theres only room for 3 tractors but it will work. Got the Pond, B 145 Elec-Trac with fork lift & RJ 58 in there for now.
-
2 pointsI quit watching I can see a line of cars going nowhere any day of the week by driving into Boston at 7am. Theres more lead changes and fender bumping too LOL
-
2 pointsGot it up and going tonight thanks everyone
-
2 pointsI would say their best was the K-181 8 horse........and the K-301 12 horse for h.p., fuel consumption, functionality, etc....
-
1 pointI've had a couple members ask about my lift that's on a couple other posts. I told them I would make a thread to show the build, so here goes. I had seen similar lifts on a snowmobile forum, but it didn't move. When you put the snowmobile on it, it was where it was until you finished. I wanted something more like a kid's wagon, that I could move around in the shop, or even roll outside to paint a tractor on. So with that in mind... I took some small 6-inch wheels and front axle from a junk mower. Here's the front axle I made up: Using 2-inch channel, I made the frame up: Like the snowmobile lift, I used two parallel racks. this was the first mock up: Then I made the "carrier", so it would fit any front-engine wheel horse. Almost all of these tractors are the same size between the foot rest bar and the tranny plate. That's where the carrier would need to attach. I wanted it to positively hold the tractor frame, so I could take a tractor down to the bare frame, or start assembly of one the same way. The carrier locks onto the frame with a modified mid hitch: All the pivots are on 3/4 hardened bolts. A little red paint, and here we are: I used a $ 20 trailer tongue lift from TSC, and used it to raise the racks. It pushes from the back and passes through the braces on the racks. I had originally planned on using an electric motor to turn the cylinder, but never found one with the torque to do it. Unloaded was fine, but with 500lbs on it, it just wasn't enough. So I made it manual, and made a "floating support" for the crank. I used a UV joint from a Honda 4-wheeler at the crank: I made a sliding brace to catch the racks at full up. It holds the racks up even if the jack breaks, and has to be pulled up to lower the tractor: And I made full up stops so I never could go past the "push" side of the jack: I also wanted to be able to steer this around, so I took the steering parts from the junk mower too: I made a "t" handle, but wanted to be able to tow this with another tractor too. Just pop the pin and the hitch is ready, or stow it for pushing by hand: So, use a set of ramps like this to drive a tractor on, and raise the tractor. Then remove the ramps and you're all set: It raises the tractor about 30 inches, which was just right. No more broken back from tedious stuff: With the frame locked in, even rocking the stand over on it's side won't let the tractor fall off. It is VERY stable. And that's it. It works great, and I wouldn't sell it for anything as long as I'm restoring tractors. Patents pending... Hehe
-
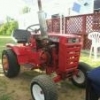
1 pointTook another drive today and look what followed me home. GT14 with a 54" dozer blade. Motor overhauled in 2001. Original manuals included, this one never had a mower deck on it only the blade with tire chains. Runs great and man was it fun pushing snow. WOW! what a beast. Tom
-
1 pointI liked it waaay back when the name Petty meant something and Earnhardt sr. was a punk with an attitude. I think they all raced for free beer and a chance to grope the trophy gal. Now THAT was racing. Now days, I would rather play with my toys outside than waste an afternoon watching a bunch of over-paid whiney brats play pocket pool and tell each other how pretty their jumpsuits are. I will take my local track on a Saturday night with the trailer and school bus races ANYTIME!!!!!!!
-
1 pointI used to be a fan until Big E died. Then the big tv contracts came in and the ex-racers who knew what they were talking about calling the race disappeared. The hollywood hotel and other stuff came in. It was no longer about the race, but the SHOW,made up drama and racing correctness. Almost scripted like a wrastling show. It got so I watched Daytona, Martinsville and Bristol. Didn't even bother with Daytona this year, may just forget NASCAR altogether. I do have old races on tape to dig out tho.
-
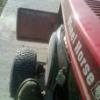
1 pointThat would depend on the tire size. The 23 x 10.5 x 12 rims are 10" wide (bead to bead); i.e.: 6" front (outside) + 4" rear (backside). Courtesy of Miller Tire: HOW TO MEASURE WHEEL OFFSET… Offset is the distance between the mounting side of the center disc and the rim centerline. Positive offset is when the disc is on the outside of the centerline. Negative offset is when the disc is on the inside of the centerline.
-
1 pointI'll tell you what I think (sorry to take this thread a bit off topic). I recently put a welder on CL. I googled going prices for it and set a middle of the road price with a bit of room for negotiating down to my rock bottom price. You wouldn't believe the e-mails I got with crazy low ball offers and some innuendo that I was some how the crook and/or in desperate need for the $$$'s. Finally a guy e-mailed and said, what's the best you'll do. I gave him a price and he said that was a reasonable price for the welder. The difference was, this buyer knew the welder and a fair market value for it and considered my price reasonable. I think the other guys were trying to flip what I was selling or were just plain stupid with their offers. Note, I can understand offering a lower price, it's part of the game. But some of these slimy jerks are simply crooks in their own right. So when I go to buy a garden tractor, be a Wheelhorse or Cub Cadet, I go in to it knowing a general fair price and I have no intention of crazy low balling the owner. I know what it's worth, the supply and demand in my area and pay accordingly. BTW, the guy came and bought the welder. He and I both felt like we came away with a fair deal - all good. OFF MY box !!!!! Thanks! Bill
-
1 pointNASCAR died IMO, from a car perspective, when the late 80's Monte SS / GM G-Body style went away. Just like any other sport.... like football (now less hitting), basketball (all individual show boating), baseball (big money/drugs/over the top owners) its evolved into something so far removed from the original that its fake.... Football = Big Hits, thats why I watch, you get hurt thats a job hazard, what did you think was going to happen? BasketBall = is supposed to be full court press with ball movement, "Team" has no "I" in it. Baseball = Heroes of a time gone by, but now we have records broken by drug addicts, and a commisioner who sleeps good at night NASCAR = Cars are supposed to look like showroom cars and crash... you don't go to your local short track to watch the cars go round and round and round,(Sorry Kelly, LOL!)
-
1 pointI agree Vin. For years the teeter-totter has been a staple of the show. Last year a couple of idiot parents allowed their kids to use it unsupervised, and there were some problems.
-
1 pointOk, before I use my infinite wisdom is any of this for sale?
-
1 pointStart by placing an oily rag down in the cylinder bore so any residue scrapped from the gasket area doesn't end up in the piston ring area. I start with a plastic razor blade to remove most of the rough material and then change over to a single edge metal razor blade to VERY LIGHTLY plane off any residue left behind. I finish with a red scotchbrite pad. This process usually achieves the desired finish. Checking the block gasket area for flatness is easy with the proper tools. Its a good question tho as I don't think I have ever had the need to check it due to repeated head gasket failures. Once the head is flattened, all my issues had disappeared. A good flat edge or granite surface block designed specifically for this purpose can be used with feeler gauges to check the block warps. I wouldn't attempt to flatten a block using the method described above.
-
1 pointIt's called NO INCENTIVE TO LEAD THE RACE!!!! Change the point system to award drivers to lead laps. The cars aren't the problem. Nascar has gone soft with big paydays and fat driver contracts. In the old days guys battled for the lead because they hated the other guy and wanted to beat him the worst way. When Waltrip passed Cale, Cale's blood boiled. Buddy Baker had two speeds. Idle in the pits or wide open. It was go or blow. When they first downsized in the early 80's they had some of the most Ill-handling cars Nascar has ever seen. But they still ran door to door and swapped the lead every other lap. When you watch a Nationwise race you see more action. Why? Because they aren't paid as much and if they want to get paid like the big boys they have to have there car in front leading to get noticed by Penske or Roush as the next newest young gun. Stewart is about the only SC driver with the balls to the wall attitude today.
-
1 pointThere are 2 types of Cub LoBoy. One is a shorter version of the offset Farmall Cub and the other is a Cub driveline in a frame and looks like the Cub Cadets, and also has a model number to go with the LoBoy name. I.E. 154, 184, and 185. If its one of the numbered type there an okay tractor if you want to do some mowing but as for heavier ground work its not the best. As its already been stated they have clutch issues as well as pto clutch issues, hydraulic issues and the steering wasnt designed for a tractor that big(its basicaly an oversized ross steering box simmilar to what the d series have). If either of the clutches has a problem and needs repair it can easily run into the $1,000 range for each one. The pto also runs backwards from a standard pto on any other farm tractor and runs at 2000 rpm like the d series do, so there limited to the attachments made for them by International and the Woods mower decks. I've had to work on several and after doing so I would never buy one to use, maybe to have one to complete a collection of the different types of Cubs or if it was cheap enough and i needed engine or transmission parts for a regular Cub. But that would be it. Hope this helps. Stewart
-
1 pointBeing a bit 'butt ugly' is, dare I say, part of the D's charm - it's a strange kind of beauty that kind of grows on you. Anyhow, thanks for the interest and comments guys - it's what I like about RS. I'm also grateful for the help and advice I received from cyber friends across the pond while I was restoring the first 'D' and there's no doubt I'll be picking your brains again and seeking help with sourcing and shipping bits with this one. I'll answer a few points raised generically. I found a bit of time today and topped up the tranny as it was off the dipstick. Fixed the headlamp, tweaked the carb as it was running way too rich and reconnected the rectifier regulator but looks like I'll have to swap it out for a spare tomorrow. I was going to give it a run about the place but noticed the front axle is very loose. Had the same with the last D - oil from the engine lubes up the bolts which loosen up, a job for tomorrow. Pleased with it so far though and yes, this one goes backwards as well as forwards (bonus!). To clarify the meaning of 'caravan' in English (UK) which clearly doesn't directly translate into English (US)....... Here trailers are pretty much anything you tow behind a vehicle e.g. horse trailers, automobile trailers, box trailers etc but not if its something for living in whilst at a show, touring on vacation etc - that's a 'caravan' (don't ask why) The bigger ones that you can live in full time but can't be towed other than into final postion on a site are 'mobile homes' but these have no suspension and are too large to tow on the highway. I'm not certain what you'd call a caravan (perhaps someone would enlighten me) travel trailer? So, people who can't store their caravns where they live tend to strore them at a secure caravan park (trailer park in US?) It's at one of these that the 'D' was used to move them about and into their storage positions. And now the muffler solution devised by the PO. These are pit bike mufflers to explain how I think they were adapted to fit here's a more detailed view (click either image to enlarge) The solution is ingenious but needs developing a little further i.e. tail pipes added so that the exhaust discharges below the grille frame. I'll give the PO a call to check that I'm right but here's how I think he did it. The elbow fittings have been changed to a smaller size. How? Well I think he cut slots into the threaded ends of the nipples from the engine then squashed the pipe to the smaller diameter and threaded on the elbows. (This is what I need to check so don't go trying it yet.) The nipples leading down to the muffler were put in a lathe and the threaded part turned down till it fitted into the end of the muffler. There's a stock securing screw on the muffler to secure it to the pipe and it's been sealed with a bit of paste. The stock muffler mounting clamps have been braced by a bit of flat bar. As far as I can see tail pipes in the style of the originals could be added. These are straight through mufflers but no too loud and give a pleasing 'bark' as the engine opens up under the governor. I'm guessing they'd be quieter with D style tail pipes with the side holes for discharge but I like the sound they make as they are and I don't think they'll attract any complaints from neighbors. Credit for this solution goes to the PO but it's an idea that some of you may wish to try and develop. Despite their size, pit bike mufflers are intended for smaller engines but they've got a large straight through bore so I doubt there's any power loss. I'm both pleased and impressed. What do you think? Andy
-
1 pointIt looks to be in great shape. Ill take 10 for $75 a piece... lol
-
1 pointi like the 12 the best, ive got one on my 312. i do enjoy the 8's fuel economy though
-
1 point12 is a hoss but a full tank of fuel in my 8s will flat ware me out before they run out, Jim in Texas
-
1 pointIf looking for a machine shop, as redidbull mentioned Center Auto in Stratford is a top notch machine shop. Don't know if they do complete rebuilds on small engines. In Orange you have Knights, Inc. on the Boston Post Road. They have been a Wheel Horse dealer going way back, and work on Kohlers all the time. Rick
-
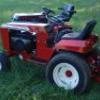
1 pointHere is my little custom. Home made front slot rims, homemade foot throttle, dual pipes, raised an inch in front, custom lights, and some other custom touches.
-
1 pointIt was hard to vote. I like them all.
-
1 pointMight as well chime in on my experience -- I have been hauling my 310-8 back and forth (350 mi round trip) from my Dad's place up to maybe 7or 8 times a year for 15 years and the last 12 or so on a trailer -- I use 4 straps (2 without rachets attached to be back axle and eye bolts thru the 2 x 12 back 'gate') (2 with rachets attached to the front axles, around front posts on the trailer and then back to the axles) -- So when I am tightening the rachets, I obviously have the brake off and out of gear -- Once everything is tightened up I always put it in gear and set the brake; never thought about damaging the transmission -- Sure doesn't seem to have hurt anything over the years -- For what it is worth I put a couple of bunge cords around the seat to the hitch to keep it from flopping aroung -- I have been intermitenant in letting the deck down, but I like the thought given above about dropping it so it is not being supported by the lift all the time you are bouncing around on the highway
-
1 pointKen What do you Think?
-
1 pointI wish now that I had started the engine just to see how it ran because I found some interesting things as I was inspecting the motor after tear down the exhaust valve guide was oversize and would need replacement but something did not look right with the intake valve face it's a little hard to see in the picture but one side of the valve face was twice the size of the other side so I diecided the too replace both valve guides ready to be pressed in both in place the intake valve also had a extra washer under the valve spring which does not belong there sizing the new guides with a reamer set up on the old trusty bridgeport mill after sizing the valve guides I ckecked the valve seats in the block for concentricy to the valve guides the exhaust side was good but the intake was off about .010 which made sence as the old intake valve looked like it was wearing off center to the old guide so I recut the intake valve seat true to the new guide also lowered the block height around the valve seat to narrow it's seat width and trued up the thru hole after lapping the intake valve in both intake and exhaust valves both fit purfect now Brian
-
1 pointI built this one a while back. Works similar, but connects to the frame so the tractor can be completely dissassembled or built up from that. It drives around like a kids wagon, or can be towed. Here's the build thread:
-
1 pointI bought a Direct Lift Pro-cycle/atv lift 2 years ago- its the best shop investment I have ever made. Its rated at 1,000lbs lift but it will do more -I've done an easy 1200lbs with it. Under no circumstances will I ever work on another tractor on the ground again. The cost is worth the bodily pain saved in the knees and back. The Pro-cycle gets the added wings to make the table 4ft wide so its perfect for my 4x4 builds. You can see the removeable ramp in the first pic- its off in the other build pics. Its easily removed so you can get up close to work on the ends. The walker hanging up in the top corner in last pic is what I will use from not buying this lift sooner !
-
1 pointI too suffer from a worn out back, so on my longer term projects I need something to lift them up a little. These small wooden stands are the ones that get used the most: Years ago I built this to work on the RJ58 I used to have. It worked great for that, but it's not so stable with a bigger tractor on it. And one day I am going to do this:
-
1 pointI love my lift. My back loves my lift. The ramps adjust side to side for width. I found this on CL in PA last summer. I have never seen another one like it. It appears to either factory made or by a true craftsman. Paid $300 and spent a weekend cleaning, sanding, and re-painting. If anyone is interested, here is a set of plans for a snowmobile lift. You can easily put a top on it and use it for a tractor. Looks very simple to build: I also have a set of plans in PDF for a motorcycle lift which will work fine for a tractor. If anyone is interested I can email you them.
-
1 pointhere is a cool idea that utilizes your floor jack to do the lifting
-
1 pointBeen using one for the past 2 years and love it. Makes working on a tractor so much easier.
-
1 pointQuestion...If those chain were on an Allis Chalmers garden tractor...would it be "Allis in Chains"??? Those are really neat...like the diamond pattern Lars.
-
1 pointBefore inserting shift lever, make sure that the forks are aligned in the neutral position as shown below:


This leaderboard is set to New York/GMT-04:00