
Leaderboard


Popular Content
Showing content with the highest reputation on 02/22/2013 in all areas
-
2 pointsImportant to plow on the right kind of day; with just the right moisture = best soil conditions. Your plow can go 8" deep or more in just one pass, IF the soil is right. The objective is completely turn the very top surface (with the grass, weeds & seeds) down, 8" deep so they can't make it up to surface this summer. If the soil is dry or not moist deep enough, you may only turn over the top 2-3", and weeds will quickly grow up. • Watch the nearby farmers when most of them plow, they know best. • Farmers will usually spray the weeds to kill them a week before plowing. A tiller is best for soil that has already been worked, turned over, or was a garden; virgin soil is hard for a tiller and may take several passes, still leaving the weeds & seeds near the surface to grow quickly. • But the tiller leaves the surface a perfect smooth soil, just exactly right for planting. • With a plow, you still need to work the surface to break it down to a fairly smooth surface (drag, disk, culipack). • A suggeston: when plowing & tilling, weight is everything; both on the front and the rear wheels, the more the better -- that's the reason those big tractors have those suitcase weights hanging on the front, for steering, and you'll need it too. Good Luck,.
-
1 pointHappy weekend everyone! I just received an email tonight from a woman who had a 400 series Wheel Horse from 1985. I asked for pictures and saw the model was a 417-8...then I saw her asking price of $100 I was stunned! I immediately called and made arrangements for pick up. It had the original manual with it when it was bought in March of 1985 for $2,749. When we got there, the horse was living in a shed at the bottom of a hill. We had made the mistake of forgetting a battery so we had to push it up the hill by hand to jump it...was worth the effort! Once we got some gas in the carb and the tank it fired right up and boy did that 17HP Twin Kohler purr!! Enjoy the pictures! I'll post more once she's cleaned up!
-
1 pointUnevenness or warp in the gasket sealing surface of a cylinder head may cause vacuum or pressure leaks in the combustion chamber. If left unchecked, cylinder head distortion may result in less than optimum engine performance and visible symptoms including oil leaks around the head area and possible blowout of the head gasket material. If hot combustion gases are allowed to continue to leak past the aluminum head, erosion of the aluminum gasket sealing surface can occur and render the cylinder head useless. The procedure below explains how to renew a flat(ter) surface on the cylinder head gasket sealing area to prevent defects in the gasket surface from destroying additional head gaskets or the cylinder head itself. Float glass is certainly not the end all argument for a perfectly flat surface but can easily provide sufficient flatness for the purpose of improving the sealing capability of a LGT tractor cylinder head. In preparation for renewing the cylinder head, a few common items will need to be obtained from local suppliers. The surface of an ordinary pane of glass makes a very suitable flat surface to perform this procedure. Several sheets of Wet/Dry 220 grit waterproof paper will be required. Water in a spray bottle will be needed to wet the abrasive paper to keep aluminum debris from collecting on the abrasive paper and clogging the grit prematurely. Wetting the glass pane slightly will allow the paper to "suction cup" itself to the glass pane when the cylinder head squeegees the water from underneath the paper. The cylinder head pictured below will be used for this process. This is a high compression head from a Cub Cadet 10HP Kohler engine. To observe the progression of material removed from the head, I apply a very light "guide coat" of black spray paint to the gasket sealing area of the cylinder head. Complete removal of the guide coat will signal the completion of the flattening process. First, establish a stable and flat surface on which to lay the glass pane. The float glass I used was 1/4" thick - pretty stout stuff. Edges of the glass were beveled for safety. Make certain the glass surface is clean. Any detectable residue such a grease, dirt or stickers on the glass will cause a dimple in the abrasive paper and prevent the cylinder head from renewing perfectly flat. I usually run a single edge razor blade across the surface of the glass pane to assure no residue is present. and onto the back of the abrasive paper. Allow the paper to soften somewhat so when flipped over, it will lay flat on the glass pane and hold the paper in place with "stiction" Flip over the abrasive sheet and wet the top side to allow aluminum particles removed from the cylinder head to float away from the abrasive and not clog the sheet prematurely Place the cylinder head gasket surface side down on the abrasive paper. I leave the spark plug in the head to allow for a better grip on the head throughout the process. Move the head in an even figure 8 motion across the abrasive paper. Apply a slight downward pressure on the head and inspect the progress every 20 or so figure 8 rotations. The downward pressure applied to the head is approximately what you would use if you were applying polishing compound to car paint. No need for excessive pressure here, let the tools do the work. After the first 20 swipes, inspect the head to check your progress. Notice the black guide coat is being abraded away on the "high spots" on the cylinder head. Another 10 to 20 swipes on the abrasive paper and inspect the progress. The blacked areas are the guide coat still present in low spots between the areas polished by the abrasive paper. Another 20 or so swipes and note how the shiny portion of the gasket area is increasing in size. Another 20 swipes And the final 20 swipes produces a gasket seal area without any evidence of guide coat left The head material removed during the process . The slurry produced from this process is also highly abrasive. You may want to keep the slurry away from any nearby hand tools or power tools. The final step is to gently wash away any silicon carbide material from the glass pane. Rinse the pane prior to wiping it down so as not to rub any abrasive into the glass surface.
-
1 pointHello All. Just wanted to show you all the good old raider holding out through the snow periods and letting us have loads of fun on her. There's also a video on youtube. http://m.youtube.com/watch?v=HjkMNaHsT_U&feature=plpp Thanks Charlie.
-
1 pointJust hit 1000 this morning probably the longest I've ever stuck with a forum, but I enjoy this one.... thanks guys!
-
1 pointElectrical welding can create damage to electronic components and there are some in the rectifier regulator on a 'D'. The warning first appeared on automobiles when alternators (with electronic control) replaced dynamos. There's only the RR to consider on a 'D' and it's the sort of thing that you can probably get away with 9 times out of ten. Having said that, my 'D' had a lot of welding done here and there by a PO and had a non-functional Rectifier Regulator. Andy
-
1 pointGo by "your gut" feeling. If the D just makes you feel good using it, so much so that you even talk to it or have named it, then keep the tiler that goes with it. I think the quality of final work with the tiller should be equal with the 520 or C-160 (if you have the weight). That is a good price, but then the D-Tillers are few-and-far-between. Good luck making the decision. We've all been there.
-
1 pointNice horse there jake. When i restored my 854 I went to the auto parts store and got the stuff and made my own gasket. I was able to get the leaky old one off in one piece. Thank god!!! But that seemed to work pretty good. Its been a year of holding gas and so far so good... The gasket paper is pretty cheap and so is the labor:) looks like a pretty nice horse to start a restoration with.
-
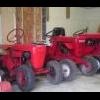
1 pointhere is one i saved from the scrap yard, restored then sold on ebay to a guy that used it for plowing it didnt have a model like c- or d- or anything like that, it had a kohler 8 horse? i think and it was 3 speed forward 1 reverse. oh yeah and decals came from redo your horse i do believe,,,,,this was a long time ago haha it was painted with ih red from tractor supply, the valspar stuff
-
1 pointKen What do you Think?
-
1 pointI wish now that I had started the engine just to see how it ran because I found some interesting things as I was inspecting the motor after tear down the exhaust valve guide was oversize and would need replacement but something did not look right with the intake valve face it's a little hard to see in the picture but one side of the valve face was twice the size of the other side so I diecided the too replace both valve guides ready to be pressed in both in place the intake valve also had a extra washer under the valve spring which does not belong there sizing the new guides with a reamer set up on the old trusty bridgeport mill after sizing the valve guides I ckecked the valve seats in the block for concentricy to the valve guides the exhaust side was good but the intake was off about .010 which made sence as the old intake valve looked like it was wearing off center to the old guide so I recut the intake valve seat true to the new guide also lowered the block height around the valve seat to narrow it's seat width and trued up the thru hole after lapping the intake valve in both intake and exhaust valves both fit purfect now Brian
-
1 pointFor an initial "Does it charge?" test get a reading directly from your battery posts. Take a reading with the engine off, and compare it to a reading with it running. If the running voltage is higher than the non-running voltage, then you are charging.
-
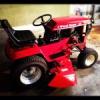
1 pointSo I have been looking for a deck to put under my c120. After about a week I stumbled across this nice deck about 10 miles from my house. Tractor attachment included! Guess the stable just grew lol. Sent from my SCH-I535 using Tapatalk 2
-
1 pointIt appears that will need to be done. Internet Explorer is doing it now too, and to further aggravate me, this new computer is shutting down and restarting every 20 or so minutes. Don't ya just love new stuff?
-
1 pointTwo of the best guitar players ever.
-
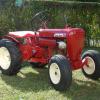
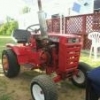
1 pointThat is Rick's tractor, it is being sold under his "new" wifes ebay name. I havve met her and Rick got himself a very nice gal. He's going green. Wish him luck
-
1 pointHeres some up dated pictures I do have the stock rear wheels and tires just looks better this way.
-
1 pointI have a 1974 D-200 but not here in the living room! I will look at it tomorrow and post the size of mine.


This leaderboard is set to New York/GMT-04:00