
Leaderboard


Popular Content
Showing content with the highest reputation on 02/03/2013 in all areas
-
5 pointsSo... What's been happening on the project since the fun and games in the mud and snow?? Well, not much really.. I made a start on the fenders by making lot's of small bit's of angle into two bigger lengths. These were the "quick tracks" that Garry and I made in a rush just before the Ardingly last year. These will go here.. And here.. They will give the inside of the fenders something to bolt onto. Pete then turned up, so after the normal couple of coffee's Pete ground down a few welds. I had a bit of grinding fun as well.. Then it was time to try and work out "a look" for the stretched fenders.. I didn't like the look at this point... What's going on ere then? Thought I'd better check I could still climb on and sit down with the fender on.. Yep I can.. Who say's I drink too much coffee???? A view from the front. We had a good think about what to do with the fender during lunch.. The fender also makes a handy table After lot's of this and this we had the look sorted.. A gentle curve at each end and a gentle slope down from the back to the front.. That looks a lot better.. The next day I started measuring up for the extra steel needed to stretch the fenders, when this chap turned up!! It's been a while since Garry last dropped in, it was good to catch up dude. Despite Garry being involved with this project from it's very start, he had never actually had a drive of the beast!! I'm sure you can guess what's coming next
-
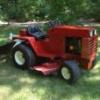
4 pointsAs some may remember I bought a1966 Lawn Ranger last year and he threw in a complete but otherwise abandoned 67 ranger parts.From all accord it was found under a tree on the property and been there for decades.I loved the 66 so much I got smitten on the 67.I really want a suburban or similar so I decided to create one.I began by changing hearts,from h60 to K181.The motor ran after tinkering and was put on a recycled ariens snowblower btw.I cut and welded the tins,added a tool box and fenders from an rj,put 6x12 rear tires on.I then had a couple 36" common decks givin to me and with all the smalls I had laying around and the wealth of knowledge learned here I continued.I fit a mid mount tach a matic.I added a front mule drive(early raider/charger upgrade)and custom made a pulley/pto assembly as the drive pulley/pto/clutch retainer sleeve doesnt exsist.I had the narrow stock front axle w/ 8" skinnys but they wouldnt clear the deck or mule drive so I had to swap for a wider electro front with 6" tires,tie rods and spindles to boot.I also incuded a pic of the relocated battery location and the best use of the other half of a tool tray!Only thing left to do is recondition the deck and wait for the grass to grow,then bring it to the big show and tell lies about how high the grass was that it mowed!
-
3 pointsLittle Snow can't hold us back!!!! Midnight Rambler was in town and boy what a good time! Got to see some old friends and make some new ones!!!
-
2 pointsA great friend of mine that only lives a couple miles away from dad's barn decided to strike up a deal with me this past week. I have had my eye on this machine since the day he picked it up, tore it down, refurbished it, etc.... He decided it was time to let go of a tractor or two and asked if I was still interested. Needless to say, I was stunned! We struck up a deal and I was able to pick it up yesterday afternoon after the chilly get together we had in Plymouth, IN. Had to help dad today move some things around in the barn and unload the enclosed trailer. Took the battery out of this little guy and rolled it out for a quick photo before it was tucked in for a long winters nap. My bucket list of tractors is getting pretty small and I am very thankful that this one is now part of the herd.
-
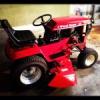
2 pointsI have purchased my first Wheel horse tractor ,after years of wanting one finally made a purchase.With Wheel horse tractors you learn there is probably the most loyal following of any brand,and deals are hard to come by ,unless you are lucky or(in the right place at the right time)wanting an early model doesn`t make things any easier.Over the last two weeks I have learned more about the RJ (through Redsquare) than I thought there was to know.Everyone here already knows these things,so onto my purchase.The tractor a 1955 RJ35 model came from a member here.I`ts mostly complete,but needs some work to be operable.Making it run is the fun part. Chuck
-
2 pointsHey guys, Just found these pictures today! these pictures were taken in november of 09 when I got my first wheel horse. This was my 401 before I restored it. Jake A couple pics of the tractor I never knew I had. The day I got it and had to use the blade for something! I spent many hrs in the garden pushing dirt and its something I'll always remember!!!! ( check out the smile of addiction! ) Wheel rusted off from all the hard work!
-
2 pointsQuestion...If those chain were on an Allis Chalmers garden tractor...would it be "Allis in Chains"??? Those are really neat...like the diamond pattern Lars.
-
2 pointsThat is a real nice start in this horse hobby. You did well. Don't put your tongue on that steering wheel in this cold weather. Welcome to Red Square.
-
2 pointsLet me know which lake you push them into. I'm a scuba diver and an electrician. Will be glad to salvage them!!!
-
2 pointsSo, the VP of the company I work for see's this little table I made and she falls in love with it. It winds up in the Presidents conference room and the President asks me to make another one. I mentioned I'd like to do something different. No problem. Apparently things like this are popular with designer's. Who knew? I did use some I.H. resto red on the rims of the second one. The company I work for is owned by the Knoll Furniture company, they have been around for a very long time. Maybe I'm onto something? Since these pics I lowered the gray table 2 inches. It was too high if it was going to be used as a coffee type table. Myself, I like my second table better, sooner or later it is going to come home to my house. I've begun making plans for a third one, I want to add glass to this one.
-
2 pointsPut a hitch on it and some "picnic table" seats and tow us around at the show in June ! :)
-
1 pointSo, I work for one of the largest leather companies in the Country. Very high end, and very expensive. This is one of the original horses that leather calf hides were kept on from waaayyyy back in the day. They are well built and have been around since the early 50's. The wood ones are slowly being replaced. The original owner of the company would die if he knew these were getting junked, (he sold the company a few yrs. ago for a cool 80 million.) I have been re-purposing some of the wood horse's when I have time and this is what I came up for this one. The tops of the horse's had a 8 inch round piece of oak (cut in half) that I removed and I'm looking for something cool to do with them, something will come to me. My wife thinks I should take the wheels off but I think they are too cool to take off.
-
1 pointJust wanted to say hi to everyone at Red Square and introduce myself.My name is Chuck ,from Ohio and have been collecting for about 15 years.I collect garden tractors two and four wheel versions,and have wanted an Wheel Horse for a while.A early 1955 RJ came up and I purchased it.The Red Square forums have been very helpful in researching the RJ`s many features and changes over the years.This site I am sure has the most knowlagable members on wheel horse anywhere,and have enjoyed the hours reading the forums for answers to my many questions.Look foreward to talking with many of you as I get this RJ back to running condition Thanks Chuck
-
1 pointI was thinking that we could get to know each other better if we knew more info about folks here. And, it may wind up helping us out if we know that someone has the same hobby. I suppose I should start since it's my idea. My name is Russell. 33 years old. I've been in the army reserves for 9 years. I am going to college to get a degree in alternative energy, specifically solar power. Married with four stepkids from my wife's first marriage. My hobbies other than wheel horses include trying to be a small time farmer, fishing, hunting, knife collecting, and gardening. Anyone.else?
-
1 point:omg: Whats this?????????? Ans: my son riding his latest project (not that we don't have enough in the workshop to be getting on with) It's a three wheeled Lister Autotruck. The concept was to replace the use of horses to move goods round factories and the design dates back to the 1920s. They proved to be a success and production continued until the early 1970s. Dating an Autotruck from its serial is difficult as no complete set of records appear to exist but based on general observations of detail we reckon this one is most likely early 1950s. The PO was selling to make space for other projects and although he'd never managed to get it to run had been assured when he bought it that it did. After 15 mins tinkering it turned out to be a duff spark plug and we had it running albeit rather rough and with a cloud of oil smoke which soon burned off and it was running well. My turn to have a go on the beast. They're quite fun but care is needed on unven surfaces as it's a bit top heavy with no load in the back (it can carry up to a ton!). The side /tailboards are removeable to leave a flat bed. My son drove it about a couple more times during the following week then it was into the workshop for dismantling. They were used in docks, factories, horticulture, by railway companies and even the Navy and Airforce had them. It has a 600cc (36.6 cubic inch) single cylinder JAP 4 stroke gasoline engine though from the mid 50s diesel engines were fitted.
-
1 pointso i had to do an oil change and some service on my wifes car today and i had to take all the horses out of the shop to do this in the warm shop,i fired up the 160 and took her for a ride to charge the battery and a joy ride,she has been semi retired latly as i like to abuse the 50 dollar specials,not that the 160 cant do anything that any of my newer horses can do,just trying to preserve a classic,well i jjust wanted to say i really LIKE the sound of that big single kohler,for me theres no small engine that sounds so sweet,and cranking her over you can just feel the thump of that big piston,just had to comment on that today as i havnt ran her in months
-
1 pointI agree...
-
1 pointwell it is not a clevis hitch. it is a weight bracket welded to the stock hitch & i changed out with the stock hitch on the c165-8 blackhood after i took the before pics.but before i decided to sell it to van. Jay
-
1 pointlooks like a nice tractor there, van... quick wash-up in the bathtub and will look real nice!
-
1 pointLooks great!
-
1 pointLooking good so far!
-
1 pointIt looks great so far, just needs a little more tlc....Wayne
-
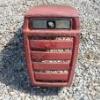
1 pointThe original nose weights for the RJ were smooth and fit in to the front of the hood. You were to drill two holes in your hood (the sides) and drill and tap the nose weight for those screwes. This is a RJ nose weight:
-
1 pointthey are very nice,you have chain on the ground at all times so it gives superior traction,they look like small skidder chains,thats the style the loggers use around here
-
1 pointWow those chains look like they will bite! Nice setup. :handgestures-thumbupright:
-
1 pointTerry.....will do when I get a chance to get back over to the barn. Yup, a new steering wheel is on the short list. Ken....wouldn't mind a 1046 or even a 420 (which I highly doubt will ever happen because of price) Thanks Lars!
-
1 pointNice chains, never saw any like them. I would bet they might tear up a blacktop driveway.
-
1 pointIf you don't get traction with those, it's time to move.
-
1 pointNow that's a custom or rat rod that i really like.A custom horse should look like a tractor.
-
1 pointBoy, This is what I call HARD CORE Wheel Horse Guys!!
-
1 pointThat's an RJ-58 / 59 (1958/59) All of the tires look to be newer replacements. Many manufacturers had that tread design available back then, and there were even some Wheel Horse branded tires in that style.
-
1 pointVery Nice Work!! Matt :flags-texas:
-
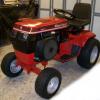
1 pointNow that is what lawn mowers should look like! Great job.
-
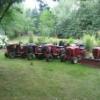
1 pointyou should've been there Jake maybe you would've beat Derek to the draw on that nice suburban he scored and Scott said he considered wearing his shorts just didn't Was a great time if only Stevasarus wouldve been there to make the weather warm or bring rockn rye so nobody cared lol
-
1 pointI think he was wearing shorts under his coveralls.
-
1 pointThose are some mean lookin chains. Looks like they will work good. And nice bunch of Horses.
-
1 pointmust be the roc-n-rye Roc-N-Rye with a splash of Wheel Horse??? Make mine a double :handgestures-thumbup:
-
1 pointThat should get the job done come Spring grass cutting time!
-
1 point
-
1 pointSounds like a fun day! Can't wait to see the pics!
-
1 pointScott didn't wear shorts? :ychain:
-
1 pointgreat time, was only chilly if you didnt dress the part. learned ya got to be fast if you want good deals if derek and the rambler are on sight ![ on second thought it must have been chilly scott didnt wear shorts and tom finally put his jacket on]thanks for the fun time derek
-
1 pointVery cool!
-
1 pointWow, those are tough lookin' chains. The "diamond" or criss cross pattern and those studs would probably allow you to climb a mountain, Very neat weight set up on plow also, Hilsen, Bare Hyggelig.
-
1 pointRX seems to be a recognized Woodruff number and Fastenal and others come up on a Goggle search. Listed as 1/4"x2-3/4" with an actual length of 2" here http://www.fastenerm...0060000000.html Garry
-
1 pointwell jake here it is!!!! have to work out some fasteners, i didnt have some of the right length and used a couple of odd bolts, but i got it together to make sure everything fits right... after having to beat on the frame to get it straight, i didnt put it back together before paint, but everything seems to be sitting ok. that thick steel sure is a workout if you have to straighten anything.....
-
1 pointGood news! All hitches that were ordered so far will be shipped in the morning! It has been a very BUSY week! I ended up buying a new horse hauler that needed some TLC, but was a great deal! its a 2000 S10 extended cab 2wd that I picked up for $1500. It needed a radiator, tune up, carrier bearing, and tires. It's going to get a trans mod next week at the trans shop to fix the normal trans issue. Should be a good little work truck and horse hauler! Its been slow at work and I was able to fit in all the repairs in during work hours and the old venture van is going to get sent to the scrap yard in the morning after the hitches are sent out. Here is a pic of my new to me truck.
-
1 pointIt's published in my B-100 manual
-
1 pointawesome vid Ian great to see the beast in action, and thoughs ags look wicked That looked abit scary when your butt came outa the seat , looks like you could do with a seat that cusions the fall, what doya reckon ?
-
1 pointNIce find, these are nice units and the briggs is a good motor. About the only thing to watch is the drive belt pully, just make sure the bolts are tight. I have seen a couple of these that it came loose and wiped the crank out and of course the steering column. Same as the 84 and up tractors. And like said before they were built to compete with the lower price units.


.JPG.9f2ecb26065c66527b0730084ab7fc7a.thumb.jpg.7dc8a04d9a53d44ee2b23f26ee94496f.jpg)


This leaderboard is set to New York/GMT-04:00