
Leaderboard


Popular Content
Showing content with the highest reputation on 07/09/2012 in all areas
-
5 pointsas some of you already new my wife is pregnant with our second child well we found out what we are having today and all i can say is i guess i have to get a pink or purple wheel horse soon
-
5 pointsThese 2 old gals have never been parked next to each other until today! I had to snap some pics of the old gals sitting next to each other and boy do they look pretty good! I love these early RJ's!
-
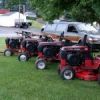
2 pointsI had a big yard sale this week and got a few of the herd out for gawkers to look at. It was HOT all week and it finally cooled off Sunday. I sold a 656 and a bunch of non WH items too.
-
1 pointBought this 1988 414-8 from a guy about 45 minutes from me.It's got a Kohler 14 horse magnum engine.Came with a kinda rusty 48 inch deck and the 2 bag vacuum system.The vacuum system will be on here for sale in a day or two.The guy called this tractor a parts machine.I don't know why.It's one of the few Horses I've got with kinda shiny paint.I guess it hasn't run in about 5 years or so.Also came with the owner book,the parts and service book,the Kohler owner book,mower deck book,and the vacuum system book.
-
1 pointcraig, it depends on what sort of quality you want, if you just want a walk in, drop the parts off, then blast the parts and paint without fixing any rough areas or damage, then i would say where i work would probably charge at least $750. probably on the low side there as well, theres a lot of parts in a tractor, as most of us know. on this c125 i probably have 10 hours in blasting and paint already and i still have the hood, engine tins, lift arm, and a few misc. things to do. im going to say i will have at least 15 in it by the time im done. our labor rate varies between $75- $90 an hour so that would run way over $1000. usually a lot charge of about the $750 would be more economical. still way too much for me for just paint........ theres probably about 5-8 lbs of powder in this one, our case red is about $6.00 lb so say roughly $50 for paint, then theres the blast media, which i have no idea what that costs, not my department...... being a big shop, we dont really have the time to mess around fixing parts, everything we process from our big customers is new material. maybe scott (whfan74) would have a better idea of what the small guys charge, he has somebody that does powder for him.... as far as area of the country, that would depend on that areas labor costs, and wages paid. big cities demand higher wages, hence higher costs....... i dont have any experience with the home 'eastwood' type kits, i would say by looking at what they charge for powder that it would become very expensive to paint a lot of stuff. the equipment is probably ok for small occasional type use, but not good enough for the demands of us guys that paint a lot of parts. you cant really compare the home type kits with the stuff that we use at work, most of our old stuff runs about $1500- $2000, (nordson versa-spray 1 and 2), we just redid a booth with a new manual gun and controller that ran $4500.(nordson encore) this stuff is built to provide consistent results day in day out, year after year. most of our old equipment is 30+ years old, some major parts on some of them have been replaced, but for the most part, i keep everything running on a very small amount of maintenance. the old saying 'you get what you pay for' rings true here......... so to answer your question about the sort of quality you would expect from the home kits, maybe you could reproduce the same results a few times, but for how long? its really not fair to compare the eastwood type stuff to what we use in an industrial setting......for either type......
-
1 point
-
1 pointjust got home, put in nearly 15 hours today, painted a whole bunch more parts, boss wanted me to work for him also, so i had to get in at least my normal 8-9 hours working as well as doing the wheelhorse stuff...... so heres the 'haul' from today, pretty happy with this lot, turned out good for the amount of time put in, it all looked like crap paint and rust this morning......... really looking forward to putting all this plus the box of stuff i did the other day together, its going to be just like christmas......
-
1 pointi stopped at a yardsale on my way home and while scouting around behind the garage and shed i spotted a rj tranny,got home and dumped out all the gunk and found perfect gears.now i can start putting together rj #5 and with the other one in the pic i can begin building rj #6.
-
1 pointLooks really good! There's just something about a front end loader on a that gets my heart pumping! Matt :flags-texas:
-
1 pointI got a set of skinny's with brandy new tires. Rims are off a 702 or 753...just need bushings/bearings...
-
1 pointIt sure looks like mine. I would say that it is WH. with a few mods
-
1 pointsounds like you need a ice cold beer or 6 and it will go away
-
1 pointThe bore looks great in the K301. I think the transaxle will look good in Black, and the tires look fantastic! That poor carburetor looks like it had a whole team of morons working on it. " Say Cletus, all you need to fix that carburetor is a bigger hammer. Well then pass one over Billy Bob." Matt :flags-texas:
-
1 pointNow go back in the house and spend some time with your wife and son before we see all your hard work in a craigslist ad. Mike
-
1 pointi did say that the next pics might be of it all apart. so here you go....... this is all that remains of the tractor from when it was pushed to this spot the night i got it. at the moment theres parts everywhere, i went in to work at 4 am friday and spent 2 hours blasting and painting the frame and most of the small stuff. im going to do a quick job on this one, not replacing every single part that isnt as nice as it could be. as long as individual parts function how they should, there just getting cleaned up and painted, no worrying about smoothing cast surfaces or filling rust pitting. the most amount of time im going to spend will be on the sheetmetal, getting the hoodstand fitting right and the hood straightened. the powdercoat is a no brainer for me, its quick and easy..... the sheetmetal is much easier to work on when its clean and not covered in oil, grease or lawn cuttings/dirt etc. so im stripping everything and blasting, then straightening and paint. i decided that rather than just paint the pieces that need fixing, and have patchy looking new/old paint, i would just paint everything. the frame was done friday as i said earlier, but the hoodstand and a few other pieces that still needed reworking were just blasted and brought home to get better for paint.... heres a few more pics..... i spent roughly 5 hours today on the hoodstand and related sheetmetal, the before pics showed how badly it was fitting, so i had to get the panel joins all sorted, and weld up some cracking, damaged ends where the fuel tank/seat bracket bolts on and the broken lower piece that holds the two sides together. the dash and belt/side covers were beaten and straightened to fit the hoodstand side pieces. the biggest problem with the hoodstand sides was the bends werent anywhere near 90 degrees, once that was taken care of, things started to fit with each other again. all nice and straight now and stronger too. added a couple extra holes to bolt up the belt guard and left cover firmer to the hoodstand, also added two lower holes in the i.d. cover plate. the holes are already in the flange on the hoodstand sides but not used on the cover plate. i thought the extra fastening might stiffen the assembly up a little more.... frame with hoodstand sides bolted on, getting them looking better..... put two extra bolt fixings here (bolt head on the left of pic, and drilled hole on right), to strengthen the whole assembly some. these and the extra two bolts in the i.d. tag plate panel should tighten things up nicely.... the ones in the pic below are a little hard to get to if you need to remove the belt guard or left cover, but with a socket extension from underneath should be easy enough. how often do you really remove these covers anyway?..... getting close now, just a bit more welding. the dash was fitting great by this pic too, not sure why i didnt get a pic of the whole assembly, brain fart maybe.... i think i assembled and disassembled the whole thing at least 10 times getting the panel joins right between the hoodstand/covers/dash/foot boards..... still needed the rear of the hoodstand where the seat bracket/gas tank bolts on repaired in this pic..... all ready for paint.... then i turned my attention to the bracket that bolts to the trans and supports the seat pan. this thing was twisted, leaned over, out of square and cracked in the bottom too. got the bends back square first, then straightened the bottom and then welded up the crack, which with all the beating getting done was getting even bigger...... this box has about 50 pounds of goodies all painted up and ready for assembly, most of the tractors smaller brackets and parts i just blasted and painted and boxed them up together ready for reassembly...... i just feel really blessed to be able to powdercoat at work, its not a 'show' quality finish, but has a nice gloss and is durable. what other paint type is there that allows you to take a freshly blasted part, paint directly to metal, and be fully cured and at almost max durability within 2 hours of painting? if i was better organized, i think i could paint every piece of this thing, if it was already blasted, and have the parts cool enough to start assembly within 3 hours of starting to paint the first piece. masking of the smaller pieces is what takes time, you dont want to have to be spending time grinding this stuff out of anywhere you dont want it. after my next batch of parts i should have only the hood and some engine parts to paint. its going to be fun just assembling one piece after another.......
-
1 pointJust throw the steering shaft and wheel back on and rig up a seat and fuel tank. Leave off the sheet metal. Go out and mow the yard and tell everyone it's an old tractor out of the 50's!! :ROTF:
-
1 point
-
1 point
-
1 pointi had a pair of 23-10.50-12 bar tread mounted on a pair of 7.5 rims and they worked ok. when i got my 520-8 i put them on the 8.5 rims and they looked better, but they did work and did not look bad. so i would say use what you got for now and when you find a set of 8.5 rims transfer them over. different makes of tires even in the same numbered size vary in actual physical size. i have 2 sets of 23-10.50-12 tires that really measure 23-9.50-12 and fir the 7.5 rims better than the 8.5. had to tube them to fit the wider rims eric
-
1 pointFirst of all, I hope he installed the correct ignition switch. Second, the 310-8 solenoid needs to be grounded or have a ground connection. I think the original solenoid used the body as ground and had a small lug on the front for +12 volts (start). Some of the newer ones have two lugs, one for +12 volts (start), and the other for ground. Also, the 310-8 has an oil safety switch that activates a relay. If that relay does not close when the key is on, then no power is applied to the solenoid coil. That could mean a bad oil switch, bad relay, or bad wiring. I have uploaded a copy of the 1989 310-8 wiring diagram to the electrical section of "FILES".
-
1 point
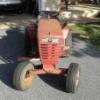
 1958 Wheel Horse RJ-58 Owned by Lane Ralph Greencastle, Indiana
 -
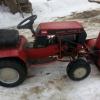
1 pointTook off some more parts today, got sprayed in the eyes with gas, and shot paint on the front rims yet again. This rim is almost done. I might go to a similar shade of Valspar spray paint for the top coat however. The camera is doing it justice. The one in the foreground has two coats on it, primer still showing. The other is up to four or five. I have used this stuff before with much better results. Maybe the white is just more difficult to get adequate coverage. I might actually sand these and use Valspar for the top coat. The Valspar red has treated me VERY well as far as spray paint goes. If ever it does not cover the gray primer, it's my own fault! Front axle painted. Gas tank off. The fuel line was being a little feisty coming off the petcock, so I got impatient and yanked it off spraying stale gas in my face. Had a fun time getting across the yard to the garden hose... Needs tacked back on. Good place for a Tecumseh: the floor of my shed. It's staying off. I'll be looking for a K series...is there an "engine guy" on this site?. 10-16HP, preferably complete. Running, rebuilt or rebuild-able is OK with me for the right price...in case anyone knows of one for sale, and if anyone wants a running HH100, let me know, otherwise it'll make a great boat anchor. Also, is it safe to wire wheel paint off the outside of the gas tank?


This leaderboard is set to New York/GMT-04:00