
Leaderboard


Popular Content
Showing content with the highest reputation since 07/23/2026 in all areas
-
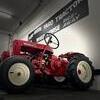
31 pointsAs we are proud grand parents and its little Franks first birthday, what better than his first Wheel Horse. Built by his clever uncle Ewan…
-
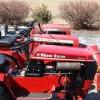
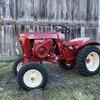
16 pointsStopped by a local Antique Engine and Tractor Show today and saw this creation!
-
13 pointsLike I said In what's in your mirror ... the holy grail ... well of round hoods anyway. And quite the full circle back story anyway. This girl popped up on MP and two members sent me texts about it since it was local. Nice I thought but I already have this one. A nice shiny resto to boot which is most likely my last resto. Just somethin about one in her original work clothes tho. This one fits the bill to a tee. So I'm not really interested it it but still it's a desirable model and pretty much all ther. So @prondzy texts me and I say sure I'll go get it just for the thrill of the score you want it. And @ineedanother says he has a problem... I says work out a deal and be morn' happy to go fetch it. So he does and I do. Not gonna say I'll double yer money Mike but wanna make a quick Franklin?!?!? Naw forget it I got my eye on a A-60. I'll let you guys stew on these pics then the back story as good as I can tell it along with the good the bad & the ugly & more pics as long as you behave. You horse men should know what it is just from the first pic.
-
13 pointsHi, my name is Dick and I am a Hose-A- Holic. It has been two years since my latest purchase and I am attempting to thin the herd. Enablers like you guys make success in doing so nearly imposable. My only solace is in knowing that when I pass away you vultures will swoop in and pick the carcass of my herd clean.
-
13 pointsLittle work on the 314H today. New front rims, bearings, tires and tie rods. Quick touch up of some of the body parts.
-
13 pointsHow do you put a value on something that you made into a "one of a kind?" Then really make it special by shipping it half way across the country so a good friend who couldn't be there can see it and ad his signature? When RS members started signing the 20th anniversary banners at the Big Show, I knew I wanted a certain name on it that wasn't at the show. So I sent this to @stevasaurus so he could actually see it in person and autograph it for me. I was leery sending a 4 ft. long box through the mail so NATURALLY it got stuck in Indiana for like 4 days! But it finally arrived and the return trip was flawless. worth all the hand-wringing on my end. If someone wanted to buy the banner from me before I sent it, I would have had a hard time putting a dollar amount on it. Now there is no amount of $$$ I would consider. Someone will get it when I'm gone. PRICELESS!
-
13 pointsHad a few out for some fresh air today.
-
13 pointsMade a couple mods to the Wheel Horse tiller. The front cover plate was missing, so I scrounger a piece of steel from an old real estate sign with the intension of sanding it and using the red primer method of creating a matching patina. When I got it installed, I just couldn't sand off the eagle. The tiller was only 22 inches wide, so I added two pairs of tines to each side to make it as wide as the rear tires.
-
12 pointsA-60 Electric for sale. (1975) Excellent condition Purchased NOS in 2023 Estimated 10 hours use Everything works as expected Left rear tire slow leak Includes NOS mower deck - never used (slight mouse damaged wires - taped up and functional) Includes custom wheel barrow tub cart Extra new drive belt and owners manual included
-
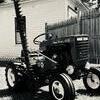
11 pointsWas looking for a decent sulky to use at tractor and engine shows or perhaps in parades. Was even considering building one, when I stumbled across this one nearby. The seat suspension caught my eye right away. With the exception of a drill hole at the rear hitch plate, it appears to be completely unmolested. Shame that one of the Goodyear tires holds air and looks great - the other one is split on the sidewall. I had intentions of getting a sulky and modifying it with some upgrades. With this one being so original, any I'll try to keep any mods as bolt-ons. A.I. keeps telling me it is David Bradley. I found another one on eBay and they're calling it a '50s era Toro. Anyone else have any idea?
-
11 pointsHi all thought I would introduce my self in cameron and here’s my 857 and I’m in Oxfordshire 👍
-
11 pointsTom knows ...
-
11 points@whtractors24 Son of gun! You got me beat Jason! Mine has 24 hrs on it. 😂
-
10 pointsHeadlight sockets were falling out of headlight bucket on C-160 and someone had evidently tried to tighten up the bulb base fitment by squeezing them with a pair of pliers . Got 2 1156 light sockets from LAPS and replaced the warped ones, added a little silver 100mph tape and some led bulbs, turned out great. Btw addded a ground wire to middle of headlight bucket so I wouldnt have to rely on hood hinge ground .
-
9 pointsJuly 29, 2015 Zion Harvey becomes the first pediatric patient to receive a double hand transplant at Children's Hospital of Philadelphia.
-
9 pointsGot quite a bit done today while it was raining which we needed. The drought here has been bad (technically exceptional which is the worst category). Swapped dash panels between the 16 Auto and 161 because I switched the electric and manual PTOs. All good to go but a bit of work on the harnesses. Also drilled and tapped the hubs for a second set screw on the 161. Surprised that hadn't been done but it's good to go now. Need to do an oil change on the 161 gear box and get the rear wheel weights on and it will be ready for the FEL
-
8 pointsI aint no sissy but I find myself reaching for a pair of gloves every once in a while, especial the older I get. To my surprise there was a shed snakeskin on top of them today and I had them laying up on a table kinda higher up. I have a pretty good size Black snake that stays around the shop (rodent patrol) but hadn't seen him in a while but now I have proof he's still around at least I hope it was a Black snake. Funny thing was I picked up gloves and shook off snakeskin which fell in front of the fan, and it took off a getting it across the floor must still smelled like a snake cause it had the dog barking which in turn scared the $^it out of me because I was still looking fer a snake. .
-
8 pointsJuly 26, 1903 Horatio Nelson Jackson, Sewall K. Crocker, and a bulldog named Bud complete the first automobile trip across the United States, traveling from San Francisco to New York in a two-cylinder Winton in 63 days, 12 hours, and 30 minutes.
-
8 pointsWell, my wonderful Granddaughters decided to pitch in!!!
-
8 pointsCool piece !! If you are going to use it as a sulky behind a tractor, may I suggest installing a "T" handle / grab handle by the foot rests ? I've ridden a sulky's similar to yours and it sure would feel a whole lot more secure if you had something to hold on to with your hands.
-
8 pointsDid some work on the 520 today which included replacing the bent/busted dash and bezel along with a new light switch from A-Z, and a new vacuum gauge, I don’t know if you can get a new one that says toro anymore but Stewart Warner still makes the style that came on the older 520s which works for me. Still need to get new bulbs for the rest of the gauges though. While I had everything out of the way I also fixed the wiring and replaced the fuse box which took care of most of the electrical issues but still need to address the 9 pin. It was also charging all over the place so I threw a new regulator on and that seems to be working good now so hopefully it’ll be a solid worker when it’s all back together
-
8 pointsPut a new hood on the Camry my uncle hit the deer with. Took about another hour or so of fussing to the the hood latch to line up right, but now we just have to find a grille for it. Not bad for a couple of amateurs with a hammer and a ratchet strap.
-
8 pointsA few pics of the finished back deck at my mom's. We also did a BUNCH of other work on/ in/ around various sorts of other things.
-
8 pointsMy wheel weights are painted almond to match the wheels
-
8 pointsMy 420-lse with only 20 hours . Trying to keep up with @c-series don . 🤠 b93e294b818ae0c0557c55d68b4eae6a.mp4 b93e294b818ae0c0557c55d68b4eae6a.mp4 IMG_0447.mov
-
7 pointsWednesday is auction day. Picked up this bike for a buck. Thought Mrs. K might be able to use it for PT after her knee replacement. bou Another buck for a USA made unique tackle box. And a like new pair of Gander Mt. Guide series neoprene chest waders for $40. Might keep my rear warm and dry while stocking trout for the kiddies.
-
7 pointsCaught a few minutes and installed led tail light on C -160 to match the new LED headlights I installed yesterday. I got these from the jungle site and like them because they have a black base and the lens closely matches the old WH lens.
-
7 pointsJuly 27, 1949, the world’s first jet-propelled airliner, the British De Havilland Comet, makes its maiden test-flight in England. The jet engine would ultimately revolutionize the airline industry, shrinking air travel time in half by enabling planes to climb faster and fly higher.
-
7 pointsYes. Management has passed down three requirements. Handlebars Drink holders Basket or wagon for the incredible bargains she finds
-
7 pointsLast night I went to see John Mellencamp at Jones Beach Theater. It’s a great place to see a concert, it’s right on the water on a barrier island between the ocean and bay. I wore my Mellencamp shirt from The Lonesome Jubilee Tour in 1987!!! People loved it! I was 17 when I got that shirt 39 years ago at the same venue. Happy to say it still fits! I’ve seen him 4-5 times and have to say John’s voice is a little raspy now but he is still rockin’ hard at 74 years old. It made me laugh though, when I looked around I realized that the average age of the audience was about 60 years old!!
-
7 pointsPut new LED bulbs in the C-160 today. Super bright
-
7 pointsScored some rear WH wheel weights and some FMC wheel weights today . The WH weights are going on the C160 if I dont change my mind. Leaning 520H for the FMC weights. They look just like some Bolens weights I have seen before. Got the xtra 7 1/2” WH wheels for free. Been a good morning these wheel weights are pretty rare around here so I’m happy to have found them.The WH weights are white but think I like um red better did certain years have red and others have white weight?
-
7 pointsJuly 25, 1965, Bob Dylan went electric at the Newport Folk Festival, performing a rock-and-roll set publicly for the very first time while a chorus of shouts and boos rained down on him from a dismayed audience. Six weeks before the 1965 festival, Bob Dylan had recorded the single that marked his move out of acoustic folk and into the idiom of electrified rock and roll. “Like A Rolling Stone” had only been released five days before his appearance at Newport, however, so most in the audience had no idea what lay in store for them. Neither did festival organizers, who were as surprised to see Dylan’s crew setting up heavy sound equipment during sound check as that evening’s audience would be to hear what came out of it.
-
7 pointsI also put the key that I got from @JCM on it.
-
7 pointsTGIF!
-
7 pointsJuly 23, 1996, at the Summer Olympics in Atlanta, Georgia, the U.S. women’s gymnastics team wins its first-ever team gold. The 1996 U.S. women’s team, nicknamed the “Mag 7″ or “magnificent seven,” was made up of seven immensely talented teenaged girls: Amanda Borden, Amy Chow, Dominique Dawes, Shannon Miller, Dominique Moceanu, Jaycie Phelps and Kerri Strug. The team entered the Summer Olympics with the expectations of an entire country heaped on their young shoulders. They were considered America’s best shot ever at an Olympic team gold, something no American women’s gymnastics team had ever won. The American women’s best finish to that point had been a silver at the 1984 Los Angeles Olympics.
-
6 pointsI found my old grinder today. Yes, I used it in this shape as a teenager. That power cord has been like that as long as I can remember.
-
6 pointsYou probably have Mahle pistons in you r magnum they are different than the older K series
-
6 pointsAppears to have been made 1965-1972
-
6 pointsToday after a Zoom meeting I had in the morning. I worked on the C-141’s loose hub, and accidental red oversprayed headlight lens. After a paint thinner wipe on the clear part of the lens, and a wipe of the bulbs it was all set. the old setscrew (left) and the new (right) After a clean off with some PB Blaster and a skim of high temp wheel bearing grease I was going to put the old hub back but it still wobbled so…. 3 hours later… I robbed one off the trailer I have. I swapped the old warped hub for the identical and in better condition good hub on the trailer. Once that was on, I put the tire back on, I was done. It seemed to be much more solid feeling.
-
6 pointsProudly displaying my "recovery" since 2008:
-
6 pointsIt would be ... just gotta figure out who I can tell her it's for
-
6 pointsToday was a day off so I enjoyed it and did some straightening up around the house in the morning. Then in the afternoon I went to a friend’s annual Summer party that he has at his house/party area. Here’s some pics. The local band Rapid Transit did 70’s -90’s well done covers of some popular songs as the party wound down. The majority of the band is friends with my friend and a significant chunk of the attendees that they had known for years. The view as my father and I left for home. This is where the party was.
-
6 pointsGuys, keep your barn doors closed!
-
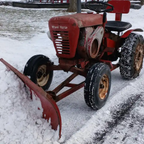
6 pointsWell....it looks like I've got my winter project lined up, just picked it up today Found this one on FB and after thinking about it for a few days I contacted the seller and we made the deal. The ad listed the tractor, 5' pto mounted finish mower and possibly a push blade (if he could find it!). While I was on the road going to pick it up he texted me and mentioned they found a few more implements and I could have them if I wanted them. Heck yeah!! Included in the package was the tractor, finish mower, snow plow, Brinly disc harrow, what appears to be a Ford 3pt plow and a homemade 3pt plow, and what might be a homemade box blade although it looks pretty decent. It has the optional 15" rear wheels with rear wheel weights. The snow plow is for the B and C series tractors and the sad part is according to the seller, his father bought the blade in new condition from someone who never used it. So basically it's a brand new blade that's been sitting outside for at least 20-30 years. Oddly enough the seat looks almost brand new. It turns out every fall his dad would take the seat off and store it inside, putting it back on in the spring. The gas tank looks solid but there is a distinct possibility it will need to be boiled and then sealed inside to make it useable. The story behind the tractor is the sellers dad bought it 30 years ago and used it for 12 years before parking it, they started using a zero turn which was faster. For 11 of those 18 years that it sat outside unused. Seven years ago he moved it into his basement with the hopes of restoring it. Unfortunately he never got around to it. In theory, it was running and driving when parked. Oh yeah almost forgot, included was the original operators manual AND an original parts list. For the past few days I tried searching for a downloadable parts list and couldn't find one. I am going to scan this one and if possible upload it to the forum. Possibly someone could explain how to do the upload. One quick question, it needs mufflers, are there suitable replacements available that don't cost $603 each as shown on the Toro site. Thanks! More to come.... Edit: it also came with a 3 pt cultivator and what i thought was the operator manual is actually a service procedure manual that describes all of the new features of the new 18 HP model with detailed descriptions and pictures. The manual was intended for the mechanics that went through their service school.
-
6 pointsDown to Massachusetts helping my mom for a day. Trina pressure washed the entire back deck. Scraped the old paint off. Repeat. Repeat. Then... Removed the chicken wire that stapled all over the inside to keep the former dog in. I added a few screws to the ballusters. We replaced a post off the back steps. Then Trina painted ALL of the vertical parts and rails and ballusters. Inside. Outside. Steps. New. Old. Completed, not like it used to be - half covered. Tomorrow morning she's intending to paint the deck surface.
-
6 points
-
6 pointsA day late but it happen on Thursday haha
-
6 points@sqrlgtr How do you get under trees with that tall flag on the 160?
-
6 pointsSunset last night. That's actually a rainbow but the camera did not catch the other colors in the fading light.


This leaderboard is set to New York/GMT-04:00