
Leaderboard


Popular Content
Showing content with the highest reputation on 06/12/2017 in all areas
-
9 pointsI know this question has been asked before"are the C-195 fenders the same size as the rest of the black hoods?" I didn't think so but comparing this fender(off a 1983 C-145) to the new reproduction fender we are making for the C-195 they appear to be identical. Of course the fuel fill hole and the hydraulic lever cutout would have to be left in. But the holes all measure the exact same. Even stacking them they look the same. They appear the same size. Anybody else played with this? Reason I'm looking at it is because if it is the same then we can make more fenders from the same mold. Thanks
-
7 pointsSo this is about the time that we all start asking, "what's the weather forecast for the show?". Weather around these parts is always a big guess this time of the year, but if the weather 15 days from now follows the pattern of the weather over the last 15 days, we may be in for a great weekend. Here's a screen shot of the 15 day outlook for Biglerville, PA.
-
6 pointsThis is what happens when Dan or Ryan forgets to gas my tractors up and it runs out on the other end of the show grounds! Recognize the delivery tractor Tom @Shynon? I did manage to pickup a wheel horse while I was there.. a little girl who was obviously fond of stuffed horses graciously let me use one for a photo op with the spare trailer tire. No I was not sick from imbibing ... the green is from the yard light we were under!
-
5 pointsIf we can have a good time with the amount of rain we had 2 yrs ago, only a blizzard would dampen our spirits.
-
5 pointsLooks awesome!! But Craig is right about this one ---> I think we're all going regardless of weather though.
-
5 pointsJUST DON'T JINX US BOB.
-
5 pointsI also attented this event it was a while sense i been to a tractor event and this show was very impressive with all the swap,venders and tractors. I had a blast meeting @Achto and his family they will being the inner kid out in you with all the toys and games they have going on! Also have to thank @WHX11 for the carb rebuild on my suburban and @Achto for help also! They also have alot going on for kids with a kids corner where they gives rides on tractors face or arm painting, which my kid loved and a splash pad to cool them off.
-
5 pointsGreat pic's Jim!! @WHX11. I will have to add some more tonight. It was great to finally meet Ryan @Rp.wh & his family, and to hang out with new & old friends. There were some great exhibits & plenty of vendors, as well as some after show GT games that we got in on. Still wish we would have thought to get a pic of the long line of GT's on our night cruise around the grounds.
-
5 pointsMy buddy has a lot with a primitive camp that he stays at while visiting his family. I was having issues with my mowers in limited capability with the Raider 10 with a broken hub and bad keyway. With a substitute transmission installed, we had at the tall orchard grass with the Raider and 42" deck. The pictures do not show it, but the grass averaged the height of the hood with some sunny spots a foot over the hood. Pictures do not do it justice. The first pass was with the lift handle all the way up--maybe 70% of the grass was cut. We felt our way along and were able to go over the top of 2" limbs booby trapped into the grass. Then we discarded the big limbs and hit it the second time shown in the over the hood picture.. The third pass and it was about two inches high.I did keep the cutting width down to two blades to keep the grass throwing clear i have my doubts that a later model Horse with its longer deck drive belt would have survived the abuse, but the mid mount belt is much shorter with less tendency to stretch. i mowed in second gear low range most of the time with first gear high range at the end. No issues. I let the Kohler talk to me and just kept the ground speed slow enough to avoid much load at all. What a machine!
-
4 pointsThis past weekend was this show with a couple of us in attendance. Weather was hot & dry but very breezy. We all managed to have a good time! Got to hang out with the Acterberg clan & extended family and had an awesome time! A debut outing for Dan's McClean and my 1067. First off was the steam engine fireworks show.. for those of you that have never saw this done they get the boiler good & hot and a nice head of steam and then throw bags of shavings form the shingle mill on the fire! Our line ups.. Ice cream making with a hit n miss
-
4 pointsGaining a little weight are we Aldon?
-
4 pointsThe 1075 I am working on was a victim of RTV on the breather assembly to include plugging up the weep hole on the bottom. Put down the RTV and step away from the Horse!!!
-
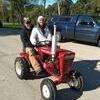
4 pointsProblem is Dan & Ryan were not informed that it was our job to watch your fuel level. A proud man with his new Wheel Horse.
-
4 pointsOther fun & games....the chain pile where you take a length of chain and connect to the hitch and see who can make the smallest diameter pile by driving forward backward over it. Obviously fast hydros rule cause you only get two minutes! Then there was the cart backup contest... theses clowns just tried to do with a guy in the cart!
-
4 pointsI thought of it after we got back. We decided we were going to go for a 'moonshine ride" about 9:30 pm so about five of us take off to make a circuit around the show grounds, which were really nice by the way, The name was fitting for what we were enjoying at the time, and the moon was full and bright! The campers sitting by the fires loved our little parade & after we almost got back I looked in back of us and there musta been 20 GT's jumped in along the way. Was pretty cool to see all those headlights. Next year we will advertise more and get more tractors in!
-
4 pointsLog sawing and other assorted saws. There were some other lumber making going on but I failed to get pics...my bad. I did manage to get some of those log slabs for end table making. Those old saws and heavy bars make straight cuts!
-
4 pointsDan @Achto giving the 'shutt 30 a run for the money! He did place for a trophy in weight class. The nephew gets seat time on the 30 Dan's brother Tim on the 20 & Dan on the Oliver Ollies were the feature tractor
-
4 pointsHe's already done all of that, the white one you see there he had custom molded... ( @Adams94 Looks great by the way!)
-
4 pointsWhat is it with these guys ("professionals") who can't figure out how to properly install a breather assembly? I had the K241 on my 310-8 rebuilt several years ago, and noticed a couple of leaks shortly after that. It turned out my guy had totally screwed up the breather assembly, but with the help of some knowledgeable folks on this forum I was able to fix it myself. I'm glad you were able to get your problem straightened out.
-
4 pointsMr Nut
-
4 pointsmanual area is maintained by @gwest_ca who does an amazing job, and we don't thank him enough!
-
3 pointsI ordered the little L70AE Yanmar air cooled diesel tonight, along with a tapered shaft to 1" keyed shaft adapter. The K181 will be coming out and the diesel going in very soon. Need to get my yards cut early in the week so I have enough down time to get it in and sorted out before they need mowed again. The Yanmar is set up for 24vdc for starter and a pair of intake grid heaters for very cold weather starts. I am in debate mode what to do with it. Most depends on if the extended air filter mount due to the intake heaters helps or hurts hood clearance. I can get a 12vdc starter for $65 for it. There is a place under the seat pan to place a second battery and I can run cables forward thru holes in the bulkheads with gromets to protect the cables. Then tap 12vdc off one battery for the lights. I know the yanmars will start in the local weather without any preheat, so chances are, I will convert to 12vdc. The engine lacks charging, I can add that, but I rarely use the lights on the horse and I planned to put LED bulbs in them anyways. So a simple float charger will work for now to keep the battery up. Pics coming once I start the conversion. Mike
-
3 pointsHorses in the snow. Wouldn't that make for some pretty pictures.
-
3 pointsWell once again I seem to have dropped the ball when it came to remembering to get show pic's. I gotta get better at that. I did manage to get a few though. A pic of my friend Jason taking Lincoln out for a cruise on his Massey 8. Jim grabbing some seat time on my "Rat Rod", Ryan's display in the back ground. Sorry Jim, I missed the wheelie shot. I also need to get a pic of you skiing behind a GT, I will not miss that photo op next time. Jim's display My display I wasn't quite busy enough getting ready for my first show this year so I decided to make new display signs. My idea was to make them resemble the grill the tractors. Despite the heat & wind with plenty of dust to chew on, there was a good size crowd for the show. The club also served up a great breakfast on Sun. morning, which was free to all exhibitors. It included eggs, sausage, & pancakes, I don't think any one left the table hungry.
-
3 pointsThis is a typical mounting position. As Paul said, tilt the pump as depicted below. You can also shine a light into the hole to see where the cam is, and aim the arm over top of it.
-
3 pointsHeres my sign just taped on to the dimond plate but it will be better for next show. Ohh boy i guess that falls on me then . I guess if the old minds cant remeber the young ones can.
-
3 pointsThis guy almost deserves a thread of his own....he built a can crusher out of a hit-n-miss. The time and work this guy must have in this is incredible..... all fully automatic! really had to be seen to be a appreciated my pics do not do it justice. . Yes you need to show the fellas that tractor signage ... Ryan's were pretty cool too! So from now on we need to appoint a official fuel level watcher...usually falls to the youngest or the don't it?!?!
-
3 pointsThese are great pictures. The first picture of the wheel horses make them look like athletes ready to sprint.
-
3 pointsThose tires aren't an exact match, but they are close. Your 1045 tires are 5.50-8 and those are 4.80-8. Also the original Wheel Horse tire says wheel horse on the side, just so you know the difference, but those tires will fit your 1045 rim they will just look skinnier than the originals. Ebay has some good options too as you have to weigh shipping cost. Having said this i just sewed up an original 1045 tire with fishing line/rubber cement and shoe goo so I may be a little crazy when it comes to keeping things original
-
3 points
-
3 pointsWhoo Hoo !!!
-
3 pointsThings are moving along, continued building up the frame bolting all the various parts back on. Got held up yesterday for about four hours sanding down a nylon spacer to use as a bushing for one of the rods associated with the auto lever. Was really hot and windy, so not very good for painting the odds and ends I missed earlier. Decided to use the shiny zinc plated grade 5 hardware from tractor supply. Figured since this one will not really be in service, corrosion should not be an issue. Still have to get the hood, seat pan, and side cover prepped for paint, and get the engine cleaned up and painted.
-
3 pointsDo you think $ 22.85 is too much for a tire you want and can't find anywhere else?
-
3 pointsi have a honda CB750 bike with a kerker 4 into 1 exhaust systen that is welded from one end to the other. The perforated pipe failed inside the muffler and the washer welden on the pipe to the right side cut through the expansion chamber due to vibration. i decided that $400 or so would better e spent elsewhere. You can see the washer to the right of the hose clamps. The second picture shows where the expansion chamber was cut through and forward from that the rest of the chamber and the header pipes form the complete system. The repair was simple in that the perforated pipe was simply hose clamped to solid pipe inserts to restore its integrity and function. Total cost was less than ten bucks--and yes--that is a piece of aluminum spouting holding the severed expansion chamber together on a temporary basis. This is a very quiet muffler that I would compare to Honda factory noise level. I am posting this because the design is so simple that what appears to be a straight through design is actually a two chamber muffler that could be incorporated for small engines with perhaps throw away propane bottles as the expansion chambers. First, the 4 header pipes combine into one and they enter the expansion chamber. The gases expand and hit the solid washer and are turned back toward the open end of the SOLID exhaust pipe, creating all kinds of turbulence. They pass through the solid pipe past the washer to the perforated pipe and can either run straight out the back or expand further into the increasing diameter cone-shaped expansion chamber. All that passing through the screen and back also creates more sound attenuation and it works very well. I did not even replace the glass pack material and if anything, the muffler was quieter than before. http://www.ebay.com/itm/1m-Stainless-Steel-Exhaust-T304-Perforated-Tube-Pipe-3-76mm-Diameter-1-metre-/271048358248 the link shows the appearance of the perforated tube inside the muffler in case my pictures are not clear enough. If i ever get another " short-fat " propane bottle for the build, you guys will be the first to see it
-
3 pointsI think it was Ron White that said:"its not THAT the wind is blowing, its WHAT the wind is blowng"
-
3 pointsIf the tractors are not exposed to extreme dust or water then the sealed bearing should be fine.
-
2 points
-
2 pointsNice Dan nice.... the detail on his signs was fantastic guys .....I thought fer sure they were laser etched but nope....did it all with his fourth grade wood burning set!!!! The lumber was nothing fancy just plywood but it worked! Seat time on the rat rod was the best....guys kept giving me the wheelie sign so I had to oblige and and scared a gal right out of her support hoses!....
-
2 pointsSee what I mean? You had to go there didn't ya?
-
2 pointsFirst, I am a believer in bearings sealed both sides and getting rid of the zerk fittings. Why....? because it is too easy to pump in too much grease and then you pop off the seal and now you have a big problem Second, once you get water (and dirt) into the bearings, the balls rust and before you know it the inner race of the bearing does not rotate on the balls but rather on the spindle which results in the ubiquitous grooves on the underside of the spindle The next time you remove a bearing from a front wheel, clean it out real good. Blow out the balls and race with compressed air. Slip the clean bearing over your finger and turn the outer race with your other hand. Do it slowly enough and you can feel the bearing being snagged. I have done this with many bearings hoping to reuse them (being the cheap yankee that I can be). I throw out most of them afterward.
-
2 pointsLooking great!! You can do it. I went from this to this in the past two weeks. She's a good 5 footer, lol, but I'm happy with how it's coming out. I understand the feeling you have! I took it apart in December, but for some reason, barely dove into it until a few weeks ago. I felt the pressure of the arrival of the big show!! (Not to mention, I needed to finish the 520 for the feature tractor this year)
-
2 pointsa friend said it was a little high, i'm holding off till weekend of 17, i did say yes to it, so i should grab it, he said it was a 18 horse, its really a 12 horse ? Being a Newbie to horses may have nipped the ole man but thats how i learn, if not ill bring it to big show, My Son with the 310-8 wants the attachments hahaha, Boys Missed your post ericj, Yes im bringing the dough to the show, now being a Newbie, you wont miss me, i'm painting my Hard Hat Red , writing Newbie on it & installing sum kind of Button buck horns, I'm sure sum will get a kick out of it ! Its all about Fun, Hobbies & Friends
-
2 pointsWhen installing the fuel pump, angle the pump down and insert the arm into the block. If you have it above the cam (as it should be), you should feel a slight resistance angling it back up to install the mounting bolts.
-
2 pointsI fixed mine back about 1989 haven't had any trouble out of them .
-
2 pointsGenerally, if a manufacturer can save costs they will do so. Looking at your pictures the two items look identical size and shape which which means the same mold. Once the items are molded generally an order for the specific part they are sent to have the holes drilled via a template. The holes are drilled slots are cut per model. It would be very easy to construct a mold using one of your good fenders. You will probably want to do one of two things.. either block off the holes and cutouts so you can mold the casting and then drill and make cut outs per model or simply try to set up your mold with the holes and cutouts in place and then make any changes after the fact. That would be a nice project to lay out the fiberglass and spray the coating and make your own from scratch. Depending on the number of these parts they were either injection molded or simply molded by hand like the boat hulls used to be. keep in mind that these injection molds are very expensive to make and making one requires that the payback will happen very quick in order to cover the die costs.
-
2 pointsJust gotta pull the motor tins, clean the engine, and probably paint the motor tins, and shes just about all set, except for the seat and some odds and ends!
-
2 pointsGot to be more comfortable to work on than a concrete slab.
-
2 pointsNo, that is still from the greasy days.
-
2 pointsHHHOOWWWAAARRRDDD!!! I will buy a pair of cheapies at $ 2.99 ea. Seal them up in one those vacuum baggie things my wife uses for veggies and sell them to you for $32.50 !
-
2 pointsIf you have a few issues from painting the finish coat outside, do not despair. If your paint has some decent build, you can easily remove orange peel and dirt specks with color sanding. What you do is start with 1000 grit and Windex to lightly massage some of the defects away. The sanded areas will appear dull and the little pits or low spots will appear as shiny areas. Do not stay with the 1000 grit very long. Then take out the scratches left from the 1000 grit with 1500 and then 2000. Leave some of the low spots alone. After all, even cars have a bit of orange peel. Then, it is on to the Meguiars. fine cut cleaner https://www.harborfreight.com/16-oz-meguiars-fine-cut-cleaner-62561.html Then make it shine with this https://www.amazon.com/Meguiars-Mirror-Glaze-Swirl-Remover/dp/B0002SQVX0. The advantage to using Mequiars abrasives is you can paint after using them in case you burn through.These pictures show the different stages of sanding and buffing. Te key thing is to sand lightly and let the paper do the cutting and CHANGE the paper before you think you need to. BTW, I am not super experienced at this as this is my first attempt. The one showing the most low spots is a motorcycle fender with maybe a half hour total [with 800 grit] constantly checking by drying it off and checking for progress. The tank is after 2000 grit starting to polish. and of course the completed fender. Paint is Rustoleum with hardener out of a Harbor Freight $29.00 HVLP gun You can do all this by hand with slightly damp T-shirts and they need to be CLEAN. You could always practice on a hidden area like behind the belt guard to get a feel for things.


.JPG.9f2ecb26065c66527b0730084ab7fc7a.thumb.jpg.7dc8a04d9a53d44ee2b23f26ee94496f.jpg)


.thumb.jpg.affe7d34ead61ae3c7684997c39109d8.jpg)


This leaderboard is set to New York/GMT-04:00