
Leaderboard


Popular Content
Showing content with the highest reputation on 04/23/2017 in all areas
-
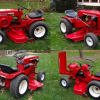
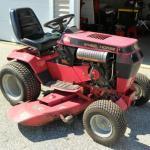
13 pointsThis one came to me last year and after a couple carb cleanings, a carb rebuild, all new fuel lines and filters and three different fuel pumps it still ran crummy....so I parked it all winter in disgust. But when I saw Stevasaurus's video @stevasaurus of a couple of his short frames running it motivated me to try again. First thing I did was reset the points after giving them a light sanding.....AND THE DAMN THING RAN GREAT!!! I can't believe I didn't mess with the points last year 🙄 ! This new development re-newed my interest and this weekend I gave the rims some attention. I love the patina so I won't be messing with the sheet metal. Pics of course.....first pic is when it came home. Mike.....
-
12 pointsMade my rounds yesterday spraying the yards of family members. It is always enjoyable getting a thumbs up or a wave and a smile by those passing by. Jobs are always more fun on some of the old faithful machines!
-
8 pointsAn electrician works on it and the first thing he attacks is fuel!
-
7 pointsThere are over thirty (30) 's...and no acres here. So, there you go...figure that one out.
-
6 points
-
6 pointsYou better plan on getting a head start on that trip; probably take several days for the to tow the pop-up to the "Big Show"
-
5 pointsMy friend Rick Smock and I worked on tilling up his garden this am with my 1979 Wheel Horse C-121 and 36 inch tiller. Rick wanted a bigger garden this year. About 30 by 75 feet is what we ended up with. Heavy matted grass on the sides of the old garden were hard to cut through. When tilling you have to start out high and slowly mover the tiller depth lower with Dial-A-Matic for rear attachments and the n lower the lift chain in back on the tiller one chain link. Doing it that way makes a lot easier tilling job. Video of tiller in action! 002.MOV
-
5 pointsIs anyone getting ready for camping this year? My wife and I try to go out several times a year with our pop -up. We dont have a permanent site like some but prefer to go to different spots. Sometimes we take our kayaks but not often anymore( not enough time). We started with a tent and about 6 years ago, got the pop-up. This is what I am planning on staying in for the Big Show. We are planning one keeping this one for another year then hopefullly going to look at a single axle ultra light.For anyone not familiar, ultra lights are around 16 feet long and light enough to be towed with a minivan/small SUV.
-
5 pointsWell it took a while, but here is my GT-14 with the mower deck attached. Thanks Paul! Unfortunately, the ground wire sort of crumbled. I'll need to do a bit of fixing for that, but then, I hope to fire up the PTO for the first time to let it roar.
-
5 points
-
5 pointsTalk about vague Texas.... with an answer like that your gonna be right, you a politician? And Horsefixer, you've go buckets on the brain, l reckon your a little jealous of that steel, having to wait on yours. Bit cruel really, such a weird build who would guess bonnet supports.. Even though the frame had been lengthened beyond the steering axle 230mm, the bonnet was still going to be to long. This was because when the driver sat back in the seat it went down and back some more. This picture is taken with the seat folded forward, but you can see I've clamped a pry bar to show the area that has to be open to allow the seat to move. consequently this is what I cut these steels for. Basically somewhere for the bonnet to latch down onto. The only slight problem was the engines dipstick, but l got lucky again and had just enough clearance. The bonnet has a slight curve so l shaped the top bar to match. Bonnet down showing the excess, marker pen inside on the top and outside on the sides. Cut made, now I have a stumpy new bonnet. I saved the offcut, to be used later, forward of the steering tower. Time for me cocoa...
-
5 pointsReceived an PM from one of our members who had a Dealer Manual for the 300, 260 and 5XI Series Tractors. It was complete except for the Binder Cover was missing. I went ahead and purchased this manual. I then purchased a Binder and made a nice insert off of one of the inside manual covers and inserted it in the insert area on the binder. This manual is very comprehensive with pricing dealers profit margins on each Tractor and all kinds of Advertisement posters and things that were available to promote and sell these tractors. It also has all the repair and service data for the 522XI. Thanks Jeff 522XI_COVER_SMALL.bmp
-
5 pointsBob @rmaynard ; I think we have a consensus that the seat is !
-
5 pointsI picked up a couple of nice finishing touches for my 520 a while back from Glen Pettit, the steering wheel insert and fuse block cover and very well made and you can't beat his service. Thank you Glen for all you do for our hobby!!
-
5 pointsI'm not going to lie, seat time is usually quality time, thinking time, reflection time. But sometimes it's, get the f#cking job done time!
-
5 pointsYou want the surface of the cylinder end to be the bearing surface - not the steel on the bracket holding it. If the pins rotate they will wear the hole in the bracket they go through very quickly. This is what my loader did.
-
5 pointsWouldn't help me, likely just get the little fellow caught in a button hole.
-
4 pointsNow that I have a pickup again, I started looking into ways to easily load tractor finds into the bed instead of having to drag a trailer around.I stumbled across this (http://www.toyloader.com/) and thought that looked like a good idea. But not worth $600. So I made my own. (Well, my dad ended up doing the welding and metal work. He enjoys it.) The steel ended up being free since my dad got drops from work, but if I had to by it, it probably would have been around $25 from a metal store that sells drops by the pound.The winch was $50, the battery was free from a junk mower, the box was $4, $10 for the connectors, $10 for the pins, $5 for the winch plate. So I spent around $80, but buying everything would put the cost around $140 or so. Haven't had a chance to test it yet.
-
4 pointsMy raider 8 with a lawn sweeper I picked up yesterday. It's in very good shape. I thought it was odd how the bag tilted back instead of forwards.
-
4 pointssolid seat pans are from suburban's. Most rj's from the factory had the thirteen hole seat ( 13 holes around the outside rim and 5 towards the center) some time in 59 when they were changing over to the 1960's models some rj's came out of the factory with the solid pan on them Brian
-
4 pointsLet me know if you need anything else
-
4 pointsI am going to stand corrected. Bob, I looked at those manuals a couple of years ago, and I remember the different pictures with the same part numbers. I'm thinking it is a good thing I posted the wrong information...it certainly brought out tons of solid round seats.
-
4 pointsThe 401 here has one too.
-
4 pointsTwo of the model 400's, and a custom 550 here.
-
4 pointsKarl, I have given all of my sickle bar notes to Tom "Shynon". I'm sure he can supply you with any part numbers for bearings, seals etc. you might need.
-
4 pointsOops, Sorry, I should have used more whizdom before opening this can-o-worms.
-
4 pointsmine has this type of seat and i believe its orginal
-
4 pointsHere's mine Bob ...
-
4 pointsThanks for that 19richie66, I have noticed over time that members say the charging system is not up to a lot of extra work, and I like the easy uncomplicated life when possible so that looks a little involved to me. As I say if oil temperature proves problematic I would place a cooler in line in front of the flywheel screen, (might even make the loader look even more industrial) we will see. Tonight's episode Pump mount. I didn't have a piece of plate wide enough for the baseplate so I butt welded two together, worked out where on the frame the bolts would be, marked the baseplate and drilled the four holes. Then using the four bolts and eight nuts I made a little 'table' of the baseplate, clamped it to the frame making sure it lined up with the pto pulley. With every as it should be I tacked the bolt heads. Took the plate away and welded the bolts finished. I had given myself enough room for some adjustment of belt tension between engine and tank, so I drilled out some holes and with a round file created about 30mm of lateral movement. I wanted to be able to back the belt off so that I wouldn't be loading the bearing any more than necessary. The pump makes its appearance and the vertical plate is self explanatory (more drilling and filing). bit more with welder.... And the pump is shown up. room enough for the pipe work, looking like it might even work.
-
3 pointsI had been looking for a tool storage unit and finally picked up this drawing storage unit that really fit my needs. It is 48"W x 36" D x 18" H with 5 - 3" deep drawers. It weighs 170lb. The drawers are great for hand tools, but too shallow for power tools. I lagged it to the pole barn at the back and added legs at the front corners and a shelf for socket set storage in front and bar stock storage in the back. The top also provides some storage space for power tools in the back and a chest high work table for small assembly and inspection in front. So, I have two drawers left for wrenches and screwdrivers..... that'll have to wait for another rainy day
-
3 pointsHappy Birthday Amcwheel85 Hope you have a great Birthday and many more to come!
-
3 pointsGot it! Changed the plug and cleaned out the air filter and she started up. The old oil and gas wasn't that bad, started up in four cranks and runs great! Now she starts in one quick crank. This is the beginning of something good.
-
3 pointsThat would give me a lot of time to daydream, wouldnt it?
-
3 pointsAs soon as I get my 1045 home I will send you those wheels... sounds like you know what your doing haha! Your tractor looks great!
-
3 pointsI have used a "skateboard tape" like material that had it's own adhesive on the brake pedal of my 520H for a few years till it finally came unglued, Jeff.
-
3 pointsThanks!! It took quite a bit of wire wheeling to get all the flaky paint off.....one good coat of primer and two coats of gloss Almond (all rattle cans of course). Mike.....
-
3 pointsWelcome to Red Square That number you posted is just the Patent Number, it does not tell you what trans you have there. I've been trying to track that down for you, but have had no luck yet. I am thinking it is maybe a #103918 transmission. You have a unique situation here. That needle bearing was used for a short time, with a thryst washer, when Wheel Horse ran short of the #1533 ball bearing. When the needle bearing went bad, Wheel Horse had a different fix and used a #111199 ball bearing to fix that. That bearing is still available from TORO (expensive)...the cross over bearing (much less money) is SKF 6008. Here is the Service Bullitin that kind of explains all this. Here is an older thread that has some excellent information. Read through this thread and see what you think. I have also been trying to find out the number for that needle bearing. I can't make it out from your pictures. Maybe you can figure it out and post that number here. Here is the thread. Let us know.
-
3 pointsAnother member here in Red Square that was self taught on the ends and outs of a Sickle Bar, that did a first class restoration is are very own "dclark". He bought a sickle bar from me and did nothing short of a miraculous job inside and out on it. I have since bought it back. I am sure he could answer any questions on Sickle Bars. Here is some pics of it on one of his tractors that he also redid. As you can tell he leaves no stone unturned or maybe I should say bolt unturned in his restorations.
-
3 pointsTodd those times he comes over are priceless. Enjoy them while you can. Maybe set up a video camera for memories.
-
3 pointsFirst pic is the first mowing attempt......scalp city. Not sure why WH wouldn't have put a few height choices....only all up or all down. Second and third pics are 2 things I did to fix the scalp problem. I added 2 more notches on the lift bracket and a spring assist to let the deck raise evenly. Fourth pic is the result.....mowed pretty nice for a 51 year old mower. It will never be all stock so I figured a few alterations wouldn't hurt. Getting ready to tear down my main mower so I'll use the little LR as a temp fill-in. Yes.....it's purple. I'll hit it with Regal Red in time. I learned the hard way to get the thing totally operational before messing with the look. I also added a trunk!
-
3 pointsBy securing the pin, your forcing the rotation to happen where the grease is, between bush and pin.
-
3 pointsThanks everyone, I got the situation straightened out, it was a broken white wire at the regulator, to begin with, fixed that but had a bad battery I started it with a extra spare car battery I had laying around but when I would unhook the cables from the spare battery it would die out leading me to believe it was not charging. I purchased a new battery today it had 11.6volts in it when I put it in. Tested with a multi meter started it up ran it around the yard for about 45 mins and put it away tested battery again and it was at 12.7 after shutting it off. She's good to go for now. Broken wire and dead cell in battery which was 6 years old.
-
3 pointsBoy did this train get off the tracks.
-
3 pointsMy 400 has the solid seat but I don.t think the front couture is the same, that is more extreme. Could just be the camera angle.
-
3 pointsThank you Lane, so here's what I have: It looks like the u bracket which bolts by the trans is missing, is this a separate part, or is it welded to the shaft? Also missing looks like the apparatus above the outside pulley on the "wobble box" and a belt guard. I also have that loose plate, maybe that's not part of this?
-
3 pointsKarl: This photo is of a 50 inch Wheel Horse sickle bar mower. However the 42 and this 50 bolt up the same way under the frame of the Wheel Horse tractors. On the right bottom -the U shaped piece bolts with 3/4 inch bolts on the back plate of the frame -in front of the transmission. Where the two holed are on each side of the back plate. On the left if the drive shaft and plates that run below the motor. The bolts on each side bolt into the fram (see Sickle Mower Manual for placement) The belt neds to be placed on the PTO /drive shaft and the two pulleys in the center box on bottom. It has a cover that covers the pulleys. In this photo the Wobble Box is NOT mounted to the blade arm, (see three holes without bolts! A belt goes from center pulley seen on drive shaft (between the two plates) and rides on the two pulleys in the center box (top and Bottom) and runs to the pulley on the wobble box! Here is a photo of the wobble box for a close up... pulley goes on right end of shaft of wobble box.
-
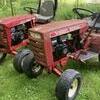
3 pointsThis is the 1st tractor that I actually bought. I got a phone call from a friend that told me of a 502 about 5 blocks from my house. I was there in 4 minutes and met one of my nicest neighbors...bought the horse and brought it home. My farthest trip at the time...round trip=1 mile.
-
2 pointsThat's my Favorite look on a Wheel Horse Tractor.....Good red Patina with nicely painted rims.. You'll notice that when looking at my collection...
-
2 pointsWonder why they didn't think the US market wouldn't like some of those European gadgets as well, I'm sure those cabs would have sold well here in the snow belt of the US, Jeff
-
2 pointsYes, my 520 puffs a little (mostly black) smoke on cold startup as the engine catches. It has just a touch over 900 hours on it. Nothing at all once it's running or working. It takes a couple of seconds for the engine to get a proper air/fuel mixture going, so it's going to run rich for a second or two -- which is why you'll see a few puffs of gray or black smoke. I've read reports that this is pretty typical of the Onans. I'm sure more folks will chime in shortly, too. I grew up running a Kohler-powered John Deere 112 that always did the same thing -- pretty typical of a lot of small engines, particularly ones built before emissions regulations tightened up in the late 90s. Personally, I wouldn't worry. If the smoke stops as soon as the engine RPMs stabilize, and the choke isn't open, it's just clearing out the over-rich mixture from starting.


.thumb.JPG.1b2a1a39cdcedb1e001571713350b32c.JPG)


This leaderboard is set to New York/GMT-04:00