
Leaderboard


Popular Content
Showing content with the highest reputation on 03/12/2016 in all areas
-
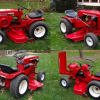
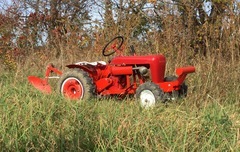
9 pointsWhy use a wheelbarrow? A horse idling in the yard makes any job a little easier. After putting her in the garage last evening I went over to Lowes to pick up some shelving. In the parking lot there were three rows of Troy-Bilt Red Pony's waiting to be sold. Couldn't help stare at them ... really makes you appreciate the old horse in the garage ... no comparison!
-
7 pointsSo giddie as a school girl i go to get my new 520 today ,,and arrive at the gentlmans house , and in our first 5 minites of talking come to find out we have both spoke on here ,, and he actually sent me a message about getting that 520 up for sale,,, what a pleasent suprise he was chev0545 ,, we sat and B.S. About wheel horses and before ya knew it a cpl of hours passed by ,, he is one of the nicest guys ya ever wanna meet... Had a great day and got one hell of a tractor ,, thx david !! Your a great guy thanks for everything !!!
-
4 pointshave you tried filling the plug with new sparks?
-
4 pointsI understand that brand of battery hold down comes in different lengths.
-
3 pointsJohn, had a stroke yesterday (Thursday)...left side paralyzed. I know prayers work...please remember John in yours. He is in the hospital and is OK. The condition is thought to be temporary...but will take some time and therapy. I don't know much more then that. I talked with him, but only for a few minutes. Please keep him in your prayers.
-
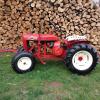
3 pointsWell I've seen a lot of you guys doing it and I kept forgetting to get ethanol free gas to get mine going and out.. Well finally got some and today as me and the wife cleaned shed out more and condensed stuff up getting ready to move I found the time to get my two horses out to stretch there legs. They are the only tractors I'm taking with me on my move south so my other two I got out and sent to my parents garage until later date..
-
3 pointsNothing if the neighbor does not guard the clothes line.
-
3 points
-
3 points
-
3 pointsthanks guys! I would have more horses but being that I'm trying to move I have had to hold myself from buying them until I get down there.. o and tankman its still similar priced, I think its 25,000 now
-
3 pointsSo true Jim, I am only 30 myself, and am happy to carry the torch!!
-
3 pointsSOI: Yes that came to me about 2:30 this morning..when I do my best thinking.
-
3 pointsI often think the same thing. But is it a "quality" issue, or an issue of "optimization"? Today's lawn machines are optimized for a single purpose - mowing a pre-established 1/2 acre lawn for five to ten years while complying with federal EPA regulations. Engineers of the old Wheel Horses were less constrained and thinking more broadly of many more uses than just mowing when they designed the Classics. So, maybe it's not just a quality issue ... just a thought.
-
3 pointsAccording to this service bulletin the H60-75063b was only used in the 1964 34E Lawn Ranger and model 654. The fenders may be bolted on the wrong sides and be the reason they look odd. Garry
-
3 pointsNo need Steve, regulators do not require polarization and the SG would not "motor" if the field shoes did not have residual magnetism. When you hook an SG up onto the tractor, you are forced to ground the SG body (thru the tractor frame). With the ignition switch wired to the A terminal, turning the ignition switch to the START position, you force "flashing" of the armature and the field to the correct polarity every time you start the tractor. Self flashing does not happen on type B generators, Ford type generators or AC based home generators. You end up hearing success stories about how someone's uncle Mo had to flash his tractor regulator and generator, and this means uncle Mo probably had a Ford with a B style generator. Uncle Mo may have had to flash his home generator also to get it to produce AC but that is an entirely different story. The Delco type A gens on WH tractors are "self flashing" in the sense they are connected thru the ignition switch and the regulator to steer themselves in the right direction in regards to output polarity. As far as output from the generator, as long as the pole shoes have the least bit of residual magnetism and the fields are functional, the gen will spin up and produce a charge current in the right polarity and strength. Pole shoes are not likely to loose residual magnetism. How often do you find it necessary to re-magnitize a magnetic screwdriver? Look closely at a wiring diagram for WH SG based tractors. Does this not happen by default every single time you turn the ignition switch to START? The only time flashing may be required is if a rebuilder slaps in a new armature and field shoes (both having no significant residual magnetism when they are new) and hands you the SG without testing it after the repair.
-
3 pointsLord, please be with John and his family, give them strength to continue his recovery and remove the sudden fear they are suffering. Grant them strength and courage in the struggle to recover what has been lost. Guide the doctors and therapists who are attending to John and restore him to be able to resume living fully. We ask this in the name of Jesus Christ; Amen.
-
2 pointsHello everyone. Finally came across a good condition Xi tractor. I couldn't pass it up. Never owned one and curious to hear the pros and cons. I'm thinking about mowing with this and put the zero turn on the chopping block?
-
2 pointsI purchased a mtd ranch king make 18 hp 46" cut hydro back in 1996 got to say I got my money's worth out off that one . Only thing I had to replace was belt and blades . Gave a super great cut even in tall wet grass . Still use it with the bagger for clean ups . I always keep it greased , oiled , and kept out of the weather . I consider my self lucky , but I took care of it . Before my accident I was in the HVAC trade . When replacing some old 30-40 year old furnaces the home owners would ask me if the new furnace will last that long . Then I break the news to them that the new one might last 15 if your lucky and thats why that old furnace company is out off business now cause it was made to last . It's sad to make a good product then to go out of business because you don't sell parts because it's made so well .
-
2 pointsI drilled the hood hinges and front tach bracket where they attach to 1/2". Then make up a new 1/2" rod with a couple of cotter keys to hold them (I don't have a lathe to cut a groove for an e clip). Hood is now nice and tight and the 1/2" rod will wear longer than the original smaller rod.
-
2 pointsWe`ll be watching ! Seriously I`ve seen some good deals at the big show. I bought a C160 auto. with 42in. deck and a parts tractor for $350 three years ago. The engine wasn`t original, it was a newer 16 magnum. Been mowing with it ever since.
-
2 points
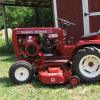
 Soaking up the son after some work .
 -
2 pointsNapa 1410 hydro filter
-
2 pointsHow much does the hold down cost per foot?
-
2 pointsMike knows....1410 Napa/WIX I believe for the Hydro....don't listen to the guy's at auto zone lest they be members here....check here.... there are guys here that forgot more than what I'll ever know about a 520 I was a Fram dude till Sqounk educated me...
-
2 pointsThat filter crosses to a Napa 1348 which is about 8 bucks. Do yourself self a favor. Next oil change cut that filter open and see if it's really a good filter. You can't get much better than a Napa gold which is actually a Wix. You might be able to save some money next time.
-
2 pointsCleaning the points would be my first step. Also, put a test light or meter on the coil + to see if you are getting 12 volts. Good luck.
-
2 pointsVICTORY! Unit is polarized, 13.6 volts at the battery when running at about 2/3 throttle! Engine starts and runs strong without issue. Next on the list is some wire brushing, De-greasing and a tune up (plug, coil, capacitor, points, oil change) to get her set for spring (and maybe even a show or two). Gentlemen, what an incredible learning experience - thank you all (SQUONK, PFREDERI, STEVASAURUS, SAVEOLDIRON - and any one I may have inadvertently missed), for sharing your your time, experience and knowledge with me. My best to you and I hope our paths cross again (but not too soon!)
-
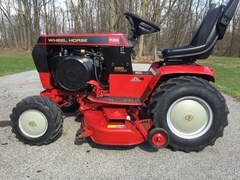
2 pointsI raised the seat bracket the gas tank and the fender pan 1 3/4" to clear 25x900x12 Carlisle All Trails. If you look close I added 1/8"x 1 1/2" steel flat between the shifter plate and the hood stand as both side were broken at the fender mount. They are just bolted in place with the shiftier plate I plan to weld them if I ever take it back apart. I also added 1/8" x 1 1/2" across to help stiffen it, it's on top as I was raising every thing up. I also added a few braces at some other points as this is my dirt machine. You can also see the 3/8" rod I spot welded under the outside edge of the foot pads as the were warped and gave every time I stepped on them.
-
2 pointsGot to finally work the RJ58. Just a quick trial run and I think this was the perfect WH for my twice a year dethatching and sweeping. I gave the lawn a quick sweeping.
-
2 pointsTheirs no such thing as a yard to small for a WH
-
2 pointsThis topic pops up here from time to time. I think you have to look at it from different point of views and without blinders on. We all on here are Wheel Horse fans for obvious reasons. Now out of all the members on here how many really need a heavy duty garden tractor? How many just mow with a Wheel Horse? Then I am sure there are some that don't have a yard big enough to justify a garden tractor let alone a rider, or a drive that a small walk behind snow blower could handle. That does not mean they don't enjoy the restoring or collecting part. So if you take the whole Wheel Horse crowd we are actually very few. People in today's world don't garden like they once did. The overall need for the well build garden tractor is not there. I like many of you shake my head when I look at that junk at the big box stores. Then again I have to open my mind and quit comparing it to a Wheel Horse. They were never design to plow heavy snow or pull a ground engaging piece of equipment. Design to fill the need of the city dweller that needs to mow his 1 acre or less and do it efficiently for 1 to 5 years. They were never designed to last. As said many times before they are disposable. So if you take the blinders off those junk tractors are just like Wheel Horse's, they are doing what they are design to do. It's just the world we live in now. Wheel Horse's are just a connection to what once was. If it weren't for people like here on the site the Wheel Horse would have started to dissapear a lot faster then it is.
-
2 points$2,122.00
-
2 points
-
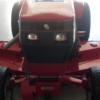
2 pointsSteering wheel almost finished I need to do a little more plastic welding.
-
2 pointsAnother update
-
2 pointsRan into the seller, got his shed key. The NOS 520H is heading to Eastern PA along with the snow cab, 2-stage blower, FEL, cat 0 3-point hitch, 54" blade, tiller, 60" deck, more. Seller was upset, one headlamp out. Dropped his price to two hundred bucks since I promised to take care of the Stallion. And then my alarm clock woke me up.
-
2 pointsJust what I was gonna say Richard.!!!!! but i get to see the following posts....those would look really good as duals....i've never seen them that narrow... Now i haffta do a little shop time.to be ready for June......Yep !!!!!! Pie time !!!!! um......The BIG SHOW !!!!
-
2 pointsif the regulator terminals are corroded or oxidized, chances are the terminals of the ignition switch are suspect also the battery voltage has to pass thru the ignition switch to the regulator compromise electrical connection anywhere along this pathway and you will loose the charge function
-
1 pointI honestly don't have any idea. I'm afraid if I soldered it up that it would break again due to vibration. Almost looks discolored from heat?
-
1 pointDennis, I'll try to post more pictures as I continue to work on it. I also have the harbor freight electric plastic welder. I bought the rods as well but so far have not been able to use them effectively. I repared a Rubbermaid tank and a drone landing rail for a co-worker so far. I have found that Rubbermaid storage tote lids that I have been saving work very well and i have an assortment of colors to choose from. I cut strips to whatever size I need. This material blends better than any of the rods I have tried. I make the repair by building up material a little high then use various files for rough shaping. When th shape is close i use sandpaper for final finish. I have to do this about 3 times to achieve acceptable results. My wife doesn't ask that any more after I showed her a couple of Craig's list ads. Now she wants to know when I will finish it and what will I use it for or do I plan on selling it.
-
1 pointI`ve got eight and the only one I`ve paid more than $400 for is the one with the loader...
-
1 pointAre you using cast iron pipe fittings, or worse yet, galvanized cast iron? A lot of the hardware store pipe fittings today are made of a very low quality cast iron that will form porous welds and cracks as the weld bead cools. Galvanized pipe fittings are almost impossible to weld with a mig without grinding all the galvanize off first. Find some hydraulic grade STEEL fittings and you should be able to weld it up leak-free.
-
1 pointSome are slow, some fast but leaks are leaks. I'm surprised 'cause your welds looked better than most newbies but slow down, make sure you got a good flowing puddle that fuses everywhere and stays molten longer. Were those flux-core? Either way, clean your lens and take your time.
-
1 pointYou may want to disconnect the wire from the coil to points, check for continuity to ground while turning the engine over. Should be shorted to ground the majority of the time, only time it wont be grounded is when points open. Also the condenser may be bad; you can run without one for a test without harming the points.
-
1 pointMore than one picture is required when plastic welding a steering wheel. I've learned a few things over the decades, and plastic welding is included, but I can't say it's become one of my skills. I can heat it and push it around and sometimes get by and I have a Harbor Freight electric/hot air plastic rod welder but I hope there are others better than I! So please share more info on how to fix chew toys! Oh! And some further thoughts on removal. Indeed you had issues with heat and perhaps there was no "heat" solution to your stuck steering wheel, but for others tough removals, quickly heating one part with the high heat of a cutting torch tip while cooling the endangered parts with a wet rag can be a very handy technique. And man! I keep looking at where the tooth marks were and I'm impressed! More info please! Your wife still asking if it would have been cheaper to buy a brand new one? Whole tractor I mean? If so, tell her you are going to sell the screen rights!
-
1 pointjohn my prayers are send, might take them some time to get there, but they are send
-
1 pointI always agreed you only get what you pay for. But if you don`t have to have it today you can still find good Wheel Horses for a few hundred bucks. And that`s a steal....
-
1 pointFully charged Battery should be 12.6 volts at rest. What is yours reading. Secondly what is voltage while machine is running. Should be around 13.5-14 volts.
-
1 pointDo it yourself wheel weights! Now that's funny right there! also true! I'll have some at the show. I'll save you a piece!
-
1 pointYou commented "VHT is a division of Dupli•Color, Inc.". In looking around for the VHT product you recommend in this thread, I ran across a DupliColor product sold at AutoZone. Do you believe this is the same product you used only, retailed differently? Dupli-Color/Gloss black vinyl & fabric coating http://www.autozone.com/paint-and-body/paint-vinyl-and-fabric/dupli-color-gloss-black-vinyl-fabric-coating/645634_0_0/?checkfit=true


This leaderboard is set to New York/GMT-04:00