
Leaderboard


Popular Content
Showing content with the highest reputation on 10/01/2014 in all areas
-
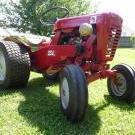
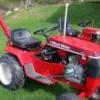
8 pointsNew to the herd 551 original
-
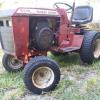
6 pointsYes, thank you, just created an account for this WH site. Really great site from what i have been looking at and reading to answer some questions, My brother got the tractor in the late 80's Started to restore it, and never finished, so it has been sitting arounfd for a very long time until last year. This 400 was a year long build,. Sometimes progress was minor and even slow, to leaps forwards in progress. Parts list, 3-5 hp Industial series briggs engines( picked briggs, for fit, easy to get parts, and easily modifyable, these engines are drag raced, so i have the option to go very radical) Troy Built pony tiller electric start system, 3-plumbling chrome fittings for the exaust, 3 chrome air cleaners, 3 thecumseh H50 carbs, 1 fuel pump operated from the crankcase pressure, 1- triple snowmobile trottle sysem, 1 john deere belt gaurd/ elevator sheet metal, 8 pulleys, 3 idol pulleys, made the battary box and used a motorcyle battary for the small space i had left under the seat that was not taken up by the gas tank/ seat bracket, and belt gaurd , made and mounted the steering system on top the middle engines's L head offset the steering shaft. Deck lever(shortend to fit under air cleaner and remade bracket), reworked clutch/brake pedal, wider tires for the back, 5" ones for the front. and many more hours with metal brackets, intakes manifolds , air cleaner mounts. overall i just got it running and driving late spring of this year, I still have to finish it, just not now, maybe next year,, but painting, will not be an option, i kept it as gotten condition and i wanted a Ratrod themed tractor, lot of work just to get it to this point, a lot of EBAY parts since my brother lost a decent amount of the parts he took off
-
3 pointsWell... it's commonly used to refer to the mid-engine 1960 and 1961 models, the 400/550 and 401/551. Beyond that in a much more complicated fashion though... Wheel Horse used the term/name Suburban for several years. Just the term "Suburban" refers to the fact that this was a tractor for the "Suburban households" that were gaining in popularity in that mid-50s era. Expansion of housing into Suburban developments where people wanted their small patch of land with a lawn and a garden. Many people were losing interest in living in the "urban" city. In advertising, Wheel Horse started referring to the RJ-58/59 as a Suburban tractor sometime during production. Then, in the 1960 brochure, they named the tractors the Suburban 400 and Suburban 550 as shown in the brochure and on the manual. In 1961, the manual cover removed the "Suburban" title, but the advertising literature still referred to them as Suburban tractors. This is generally where collectors quit calling tractors suburbans... although interestingly if you look at the cover of the 1962 manual, they were still called Suburban Tractors! They were still referred to as a "Suburban Tractor" in ads as well, but I think this was going back to the original reference to Suburbia itself. Even as late as the 1963 brochure they used the term, but I think clearly this was used as a general term. After that though, I don't recall seeing the term used.
-
3 pointsI will be using my first Wheel Horse. Just got a free 314-8 and went out and picked up a snow blower attachment.
-
2 pointsHere is what I believe is causing the condition. The shift rails are supported by blind bores in the transmission case and machined to a fairly close tolerance. Add gear oil to the mix and it gets even closer. The top rail in the illustration is for 2nd and 3rd gears and the rear rail in the transmission. Both shift rails are in the neutral position. The 2nd and 3rd rail when shifted into 3rd gear is slid farther into the case bore. When you shift back to neutral from 3rd gear vacuum is created behind the rod. If you go through the neutral gate the shifter lets go of the 2nd and 3rd rail and enters the 1st and 2nd shift rail. The second the shifter leaves the 2nd and 3rd rail the vacuum behind the rail (rod) sucks it back into the blind bore and engages 3rd gear again. BUT the shifter has already selected 1st or R gear. If you are is 2nd gear and shift to 1st or R the same thing happens but this time it is pressure in the blind bore that returns the rear rail to 2nd gear without the shifter in the rail. To vent the blind bore my plan is to grind a shallow spiral groove in the rod so that the vacuum and pressure is relieved faster. Location of the ground groove is critical at the detent ball notches in the rod so it does not interfere with them. A spiral groove would minimize future wear in the casting. I discovered this many years ago and have lived with it by pausing at neutral before shifting to the other rail. The pause gives time for the pressure or vacuum to dissipate and it works. I have since acquired a short angle drill and wonder if a vent hole could be drilled into the bottom of each shift rail bore. That would be even better but don't know if there is room to get the drill in to do it. Garry Adding Wheel Horse addressed this problem in late 1964 As a result all the transmission model numbers used in 1964 got new model numbers in 1965. I suspect this was a result of the change. It would be interesting to see what tractor models or transmission models still experience this problem today.
-
2 pointsWow! That just about sums it up. Mounting tires on a tractor is a chore. It took me all day, but I am proud to say I did it myself. Anyway, looks good. Much better than the tires I had... I haven't seen a surface like my sidewalls since someone spilled a bucket of oil on a dry salt lake bed! I mean, they were CRACKED. 3 of the tires had tubes in them, otherwise, I don't think they'd have held air. Before I took on the task, I browsed the net, watched videos, read tips and even researched tools available for the job. I settled on making my own bead breaker using a 6' long 2x4 bolted to my work bench. This was the lever of the bead breaker. I bolted a short 2x4 to the first one about 18" from the bench to act as the "shoe horn." Both bolted joints articulated. Later, I cut a taper on the shoe horn, making it more pointed where it met the rim. To the tapered surface, I then screwed a 1/4"x1-1/2"x3" brass plate for strength. Worked like a charm. I was glad I had the extra leverage on the front tires. Aside from the bead breaker, the only other tools used were two of the cheap $5 tire irons from Harbor Fright (typo intentional) and a flat bar (wonder bar). Okay... here are my tips... things I didn't see elsewhere in my research. #1 Measure the rim!!! BOTH SIDES!!! Geesh... SOME rims the tire will only go on one way! I wish I had known that. Futzed with one of the front wheels for 2 hours before I figured out one side of the rim was a good 1/4" larger in diameter. Once I flipped it around, the tire slid right on (relatively speaking). #2 NO LUBRICATION! (if mounting manually). Rather, only lubricate AFTER the tire is on the rim. I had more trouble with lubrication than without. Seemed to make the tire iron slippery enough, but couldn't get purchase necessary to stretch the tire over the rim. Dry was no problem. Once the tire is on the rim, I sprayed the bead with windex prior to inflating. I figured that might help the bead seat. Tip #3... take your new tires and rims to a garage and PAY THEM TO MOUNT THEM! Okay, I doubt I'll ever follow that tip, but boy will I be tempted. Finally, I'll finish with this... I decided on BKT tires. Since I plan on using my C-125 as a FEL, I bought 6-ply turf tires for the front. I also plan on using the tiller, so I chose the TR-315 trenchers for the rear. I had seen someone on this site talking about the diameters of the Deestones being considerably smaller than comparable brands (Carlisle?). For that reason, I avoided the Deestones. Sadly, the BKT's are also small. Same size Carlisle Turf tires (23-8.5-12) were a good 2" larger in diameter. I can't help wonder if the larger turf tires won't have nearly as much traction as the smaller trenchers. I'm really disappointed about this. I may try to sell them and get something else. Anyone have any recommendations?
-
2 pointsYes that blower is a 1962 and should fit your 702 and looks to be in VERY nice condition. Jason is correct about removing that suburban bracket. That bracket and the lift arm make it the st302 for a mid engine tractor but those are the only differences I can remember between it and the st3072. If it's only a 1/4" too narrow then it's probably just tweeked in a little and bending the mounting brackets back out should work. It bolts directly to the frame with 2 bolts each side in the front 2 holes of the frame. You'll need to make a lift arm. Maybe cut the pipe of that one and weld in a new length of pipe or rod?????? Or just make a new one out of angle????? I might be interested in that bracket for a suburban. Made one for my blower and thought I bought one to replace it but just haven't seen it around.
-
2 pointsThis is what I use. Do not pound out on the back of the hub you may pull the axle out of the transmission.
-
2 pointsI think that most of the "Spray Bed Liners" have a rough-softer surface (to keep things from sliding around in the bed of a truck). On the underside of your deck, you want a very smooth-hard surface so the moist clippings slide off easily and don't stick. POR15 alone is excellent, hard and very smooth. I like to also use "Slip Plate" (liquid Graphite) on the underside, and then redo the graphite every year. IMO, the Bed Liner may not be the better choice if it is rough-soft, unless the actual surface itself resists grass sticking (like a silicone coating would).
-
2 points****UPDATE**** The beans are coming off the field. Make sure to pack those plows and be ready to turn some soil!!!!!!
-
1 pointI've seen the topic come up a couple times about using spray on bed liner for under a deck so I thought i would share my experience with it here's a few pics of my deck off my lawn ranger that I used this summer for mowing that I used spray on bed liner. I will say the only place that is flaking off is were I welded in a stainless steel patch when I restored the deck I'm not disappointed in how it held up its about what I expected I think using POR15 or easy slide graphite coating would be the better route but this is cheap and was worth a try hope this helps someone out
-
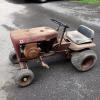
1 pointJust picked this up sunday afternoon, guy said it was froze up... he was right but nother alittle pb blaster didnt fix.! should fit nicely behind the new c-160.
-
1 pointMore room for the red one's now Geno.
-
1 pointI have been a member for a few years and have enjoyed reading other posts and info. I had a GT-14 given to me last week which is my first Wheel Horse (a brand not common here in northern MN). The GT is a 1970 model 1-7451 serial # 630763 with a 48" deck and a 30" snowblower. Also, all the tires say Wheel Horse on them. The GT has been in the woods for 5-8 yrs. But after changing oil & putting in a battery, got spark and with a shot of ether it fired. Now I am cleaning carb. & gas tank. Pictures are on arrival at my shop. I think it will be a Winter project with many questions to follow.
-
1 pointSure is a nice looking 551, original paint? WOW that looks nice. My 550 has same tires also have a set of spares. Tom
-
1 pointI'm with Geno on this one. Especially on the rears which easily fit on any garage's tire machine. I gave my local garage, (great guys too), 10 bucks to take the old rotted turf tires off, clean up the inside and bead surface of the rims and mount my new Deestone Ag tires two weeks ago. Total time was about 15 minutes. The front tires.........................yea! Well the front tires on my 520 need changed so we will see how the spirit moves me on that chore. An eight inch rim won't fit on a car tire changer and to take it to a Lawn & Garden Dealer is going to cost more than 10 bucks.
-
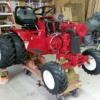
1 pointToo much gray, liked N3PUY's red belt guard and clutch linkage guard. So......
-
1 pointNot worth the time to mess with that stuff yourself sometimes, I get 5.00 to mount a tire, any size. The cussing fit would far far far outweigh the 10.00 for me.
-
1 pointThanks for all the encouraging words. This 444 has been a fantastic machine, and has logged quite a few hours in the garden already. So far so good, and I've really enjoyed its performance. Matt
-
1 pointThe two balls and pin are an interlock mechanism to prevent both shifting forks from leaving the neutral position at the same time. Besides acting as a spring guide the pin maintains a minimum distance between the balls. The only way either fork can leave neutral is for its ball to pop out of the detent. If the opposite ball is in the shallower detents of its fork then the pin cannot move far enough to allow the first ball to move for shift fork to leave neutral. A longer pin would be necessary if the modified neutral detents are deeper than the original detents. All that said, if you have a problem with two gears locking in at once you either have a missing or damaged pin or balls.
-
1 pointThat's surprising.... it should be interchangable. Did you remove the Suburban bracket like this?
-
1 pointI did this before I new about por 15 like a week before I found out about it and as you can see the grass does stick to it but I don't see any rust
-
1 pointClear POR -15 was used (two coats and one spray paint rustoleum overcoat) on two of my deck restore projects several years ago. They are both still operating and no rust or undersurface holes!
-
1 pointThis is very interesting to watch. Keep the photos coming. What a great project.
-
1 pointGood point Lane. The service bulletin addresses the stop pins. The older style pin can be used with the newer rails but not vice-versa. I'm assuming the newer stop pin is a bit longer and offers a firmer grip in the neutral detent of the newer rails but in my case with the 5010 transmission it should be irrelevant. I like the idea of drilling the holes. Maybe it could be done with a smaller angle head drill.
-
1 pointBrandon, Well said.. I just called a meeting with the barn guy and the town zoning guy to confirm a few things in terms of the height restrictions. I am pretty sure we are good to go. There was a disconnect between the concrete plans and the barn plans. The corner posts were suppose to be longer and sit on the gable ends of the foundation and not the front and back. Yesterday morning the installer told me this so it was not a good day. No work was done when I expected to have the barn raising yesterday. After my meeting today I received a credit for the foundation plans ($500) and the extra 4 posts I keep to use on the back slab down the line if I install a shed roof off the back. I hope to also get the barn guy to provide me with the header I need to install it 14' x 36'. We shall see if they are back at it tomorrow, that is the plan...
-
1 pointYou have to be careful with hammering. The axles are held in the differential with clips and if you hammer it you could pop one of the clips and then require a full tear down. If your puller has a pointed end on it (like mine) i used a 1/4-20 nut to spread the force out without mushrooming the axle. I put it under a lot of pressure after soaking in PB blaster and tapped the hub itself with a hammer. After just working on it slowly (just a small turn) for a while it broke free. However, many people using the jaw pullers break the cast hub because its on there so tight. If you look around people have made pullers with other WH hubs to spread the force out even more. Search the forums for "hub puller." There are many different ideas.
-
1 pointFinally the long road to restore my C-141 to its former glory is complete. She looks good and runs great.
-
1 pointPicked this one up a couple weeks ago at mentone from Brrly. Finally got it complete and running today. First tore it apart and power washed everything. Went through the drive system, and had to change some gaskets on the engine, and rebuild the carb. Runs pretty good now. In pretty decent original shape. Plan to leave this one as is, just straighten out the hood a little more and possibly some new decals.Still needs a few little things here and there, but is ready to take to Scotts Meet and greet this weekend.
-
1 pointBetter be some plowing video's or you'all will feel my wrath!
-
1 pointThat's one of the best original suburbans that I have ever seen, don't restore it
-
1 pointLook for Martin's "416 Adventures" in the restoration category. He used them on his fronts.
-
1 pointYep, that's a different harness. There isn't a universal wiring harness that will fit every C-120. But having said that, it's pretty simple to make one. Just a few feet of 14 or 16 gauge wire in several colors, some readily available 1/4" spade terminals terminals and ring terminals, a wire crimper, and a couple of connector housings, some electrical tape, and you can make your own. I know there are a few threads here on the forum where others have shown how they made their own.
-
1 pointYou and I have the same taste in our collection. I would much rather have a nice original patina machine that a show queen. A real nice machine for sure !!
-
1 pointAwesome job, looks great!!
-
1 pointJust received the glass windshield, wiper and mirror for the snow cab that will be on the 523Dxi. Also, finally broke down and ordered the JB Sleeve Hitch so I can use a rear grading blade for in front of garage doors while using the 523Dxi with the blower. Three week backlog- but I don't think that I have to worry about snow during that time. I'm still cutting grass, and the leaves have yet to turn! I still have to use the Cyclone Rake yet.
-
1 pointWhatever you do, DO NOT MESS WITH THAT CAT! The cat seems to have already taken claim of a great find! Rob
-
1 pointHoly crap... you cut all the apples first!!!???? Man, that takes some time. Won't the grinder do whole apples? I spent every fall of my childhood, that I can remember, picking buckets and buckets of apples with my grandfather. The very same grandfather that is the reason for my fondness of Wheel Horses. We lived next door to my grandparents when I was a kid, and their place had two acres of fruit trees and bushes. As I remember, there were many varieties of apples, several varieties of pears, several varieties of peaches, two kinds of plums, three kinds of cherries, apricots, persimmons, blue grapes, green grapes blackberries, red raspberries, black raspberries, white raspberries, and even gooseberries. That doesn't even count the nut trees. He was an avid hobby orchard grower. An aspect of my childhood I'd love to be able to give to my own kids, but fear I won't be able to. I grew up eating every one of those kinds of fruit right off the tree/bush. A privilege that I now as an adult realize very few have had. To anyone who's never had experienced it... do yourself a favor and visit any local orchard you can for some fresh produce. There's just no flavor in the world like ripe, fresh fruit directly from the tree. He had an antique grinder and press, and some nights after school and most weekends this time of year, we'd be loading buckets in the cart behind the Wheel Horse. When we had a full cart we'd stop for the evening or day, take the load up to the hydrant and fill all the buckets with water to wash the apples. After letting them soak a little while we'd tote them over to the press. It was an old four post setup, painted red of course, with a tray big enough for two bins. One bin under the grinder and one under the press crank. Ideally with two people you can operate both ends at the same time with one person grinding and one person pressing. The grinder was of course hand powered by a big crank wheel and the ground apples fell directly into the pressing bin underneath. Then that bin slid over in the tray to the press side. It was hard work for a kid, spinning that grinding wheel, but I wouldn't trade anything for the memory of those days. It's been so long ago I couldn't begin to tell you what apples we were using or how many bushels per gallon. I know Grandpa knew that stuff, but he's long gone. I have to say thank you for bringing up that memory. It puts a smile on my face just thinking about those simpler carefree days of being a kid. Thanks for sharing and good luck with your cider. I'm sure it will be delicious...... and be sure to freeze some! Nothing like a hot apple cider on Christmas Eve!!
-
1 pointGood ole 1067
-
1 pointYou won't have to worry about tornados, hurricanes, or anything else for that matter. You may have to rename it to the Wheel Horse Shelter.
-
1 pointI'll be using the electro 12. Never plowed with her before cuz she's new, but I just swapped the 42 side discharge for the 42 snow blade! Flipped the plowing edge and she was ready to go. We'll see how she does when the white stuff starts fallin. Also a pic of my Manuel PTO "adaption". I didn't mess up any of the tractors originality, it just bolts right on, 2 bolts. Gets the 42 SD spinning really we'll haha.
-
1 pointI THINK IT IS TIME FOR ME TO PUT ANOTHER (OR TWO MORE) DIESELS IN MY 1054. RUSS
-
1 pointHere you go John.... http://youtu.be/b4N1Ow3cziA
-
1 pointIt's not even leaf season yet! Plows and blowers not goin on for another month
-
1 pointAs usual, I will be putting a B-100 with a 48" blade into service this winter.
-
1 pointThe C-161 has snow duty this year
-
1 point
-
1 pointI should have clarified myself. There's a small hole that can't be seen in the picture. It looks like it's hooked to that by the paint wear that can be seen. It doesn't go in the larger hole that's visible.
-
1 pointi got to stop looking at those pics, next thing ill be pulling the 1848 down for some work......
-
1 pointJust a question, wouldnt that be kinda like jumping from the frying pan into the fire? I thought the 195s were far and few between also, I guess it couldnt be any worse on the parts side of things? Do regular C attachments fit those or are they like the GT14?


.thumb.JPG.1b2a1a39cdcedb1e001571713350b32c.JPG)


.JPG.9f2ecb26065c66527b0730084ab7fc7a.thumb.jpg.7dc8a04d9a53d44ee2b23f26ee94496f.jpg)


This leaderboard is set to New York/GMT-04:00