
Leaderboard


Popular Content
Showing content with the highest reputation on 11/08/2012 in all areas
-
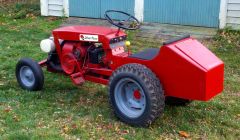
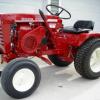
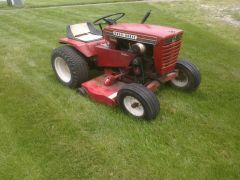
3 pointsI acquired my C-125 about a year ago. The tractor it's self is in pretty good condition for it's age. The cutter deck was something else though. So a bit of rebuilding had to be done. First strip the deck. Deck was used as pattern for new top Then old top cut out. New top welded in and painted. All re-assembled. I fitted two new spindles as they got damaged getting them out. Also renewed all the bearings.
-
3 pointsIf you can fab a spot for a fridge,microwave and porta-potty ,you'll be good for days. Normally,I wouldn't wish a blizzard on anyone. But for you Duke,I'll make an exception! Your new rig is just screaming for the "Mother of all Snowstorms" just so you can show that beast off! I have this picture in my head of a local news chopper filming at night. It's cold and the entire town where you live is paralyzed by the huge storm that dumped tons o' snow hours before.The searchlight pans from side to side,and the news crew spots a lone ,unidentified vehicle moving in the night. At first they believe it is a UFO. But no ,as their eyes adjust to the glare of lights and strobes,they see snow spewing as high as the chopper! As the pilot swerves to avoid the plume,the cameraman zeros in on the "Snow Chucker" decal.......... Film at 11 ! Super job on your SC ! :bow-blue:
-
3 points
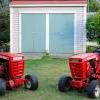
 Rat Trac Old School Racer Reworked 69 Workhorse 700. Frame extended and flipped. Axle reversed. Wheelbarrow front wheels and tires. Lowered dash and custom built rear body Currently powered by K181 off my 875.
 -
2 pointsMy wife is a goldsmith so she made this one for my brothers birthday.. can be used as a keychain or pendant it is not cast .. it is sawed from a thick silver plate, so this is really handwork it's only made ​​two of them as it is relatively expensive to make them
-
2 points1 buck lol.
-
1 pointSo, I work for one of the largest leather companies in the Country. Very high end, and very expensive. This is one of the original horses that leather calf hides were kept on from waaayyyy back in the day. They are well built and have been around since the early 50's. The wood ones are slowly being replaced. The original owner of the company would die if he knew these were getting junked, (he sold the company a few yrs. ago for a cool 80 million.) I have been re-purposing some of the wood horse's when I have time and this is what I came up for this one. The tops of the horse's had a 8 inch round piece of oak (cut in half) that I removed and I'm looking for something cool to do with them, something will come to me. My wife thinks I should take the wheels off but I think they are too cool to take off.
-
1 pointLooking to purchase a plow for the tractor.Need to push alot of matted leaves and branches into the woods,basic property clean up.Need some help with direction with plow type and numbers .Have read alot of conflicting topics on the internet .The tractor does have sweeped forward front axel.All opinions and suggestions would be appreciated.Thankyou...
-
1 pointWell Let me start of by saying wow it was a close race!! I just thought i would take the time to say Thanks to all those people who got out and voted! I feel as americans it is our job to vote for what we belive in! Although the elections may or may not have produced the resualts you wanted if you vote you made a diffrence! I also wanted to say this and this is my perpose for this post no matter who was elected we need to pray for our country and its leaders! It is important we do our best to make a diffrence in america and in the times we are in now its also very hard for our president to do his job because all of the leaders from both sides are scared about what 1 wrong choice could do to our country!! and GOD BLESS AMERICA!!
-
1 point
-
1 pointJust looked out the window, it's been snowing for an hour now. Last week, hurricane Sandy hit the east coast, this week it's a nor'easter that's coming a shore... Geeze O' Man, I'm not too sure I'm ready for four more years of this crap...what will they think of next? :confusion-shrug:
-
1 pointCheck out this forecast for this coming weekend.... Talking BAD storms Saturday night!!!
-
1 pointTonight got home and did some layout work and mounted some angle Iron. Im hoping Im useing strong enough materials w 9/16" Grade 8 Bolts. Dont want to spill any of my preciouse fuel at $3.45 a gal. Here is something how it will look, I have a couple more adjustments to make. I was thinking about how low to the ground structure would be but really all bracketing is no lower than tranny and way higher off ground than the blower mounts and hardware. Yep and as you can see I can easily still get to both the engine remote filter and hydro filter. Well Any opinions shoot em at me before I fire up MR. Lincoln 255 and throw the sherbert to her herbert. Here are some pics. One last thought, do you think I should make a round bumper like outta a 3" Pipe? ~Duke
-
1 pointunder 2bills incl ship. think China
-
1 pointI have always bought Kohler parts from my local dealer where i purchased my first new WH tractor in 1979. The problem is , kohler is making alot of their parts in China and it seems they keep adding to the list of parts they make over there. Hope i'm wrong but i fear someday all their parts will be made in China. :hide:
-
1 pointC'mon...that'll buff right out.
-
1 pointHere's a set, front and rear.
-
1 pointTake the nut off until the flat side of the nut is flush with the end of the crankshaft..... Then soak the flywheel and shaft with PB blaster.... then Get a large screwdriver and pry behind the flywheel pulling the flywheel out... (making sure the screwdriver is agianst the block and not anything it could damage) Then take a few swings with a hammer and they usually pop off... dont hammer down or up on the crank just striaght into the end the nut being there will keep you from messing the threads up or mushrooming the end. dont hit really hard either but dont be affraid to give it a good smack.... If you can't get it off this way heat the flywheel with torch for about 2-3 mins and reapeat the previouse process... Last but the mose invasive soke the crap out of it with PB blaster or ATF and acatone 50/50. heat up for about 10 to 12 mins with Maap gas ( yellow bottle) it gets it a bit hotter than propane and repeat process one..... If that doesent do it put a puller on it and slowly tighten it up and heat it and give the end of the puller a few hits and see if you can tighten it up more. alot of times if after a few weeks of this last process you will just have to cut the flyweel off the shaft and and get a new one. Hope this helps you out!! Most of the time though you will not have go beond step 1 or 2! just with methood 1 gets about 70% of flywheels off and the second methood gets 15% of those 30% that wont come off with the first methood . And the last step gets gets 10 precent of the ones that wont come off with step 2. and the ast five precent are those buggers that have to be cut off....
-
1 pointBeing unfamiliar with that model, if two holes exist on face next to crank hole use a harmonic balencer type puller. If all you have is a long wide two jaw puller fit it on two flats if will clear between bearing plate and flywheel, but watch "boogering" threads on crank. if no pullers you might consider rental or purchase. But whatever keep your hand(s) away from in between pulling tool and flywheel as somtime they pop off quick. If no holes or not tapped/threaded wait her for another idea before hittin' crank end. You'll get it>
-
1 pointYou rub the tractor down with fine (00) steel wool then wipe down with WD-40 or at least that is the way I did a couple of mine. Gives them that used but took care of look. By the way I like your tractor combo!
-
1 pointhere's the engine. mine is an aftermarket engine. mine did not have the correct stator in it for the lights (no diode). that's why i had to change the stator to get lights and correct charging.
-
1 pointchevyaddict83 here's a pic of the wiring coming from the stator. there's only 2 wires. if your engine is original 1 will have a diode on it. 1 is for the charging and the other is for the lighting. 1 of them should have a diode(under the black cover) on it. that's the one for charging.
-
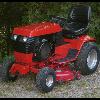
1 pointCongragulations to you Matt, and to Danny. I am looking for my issue to be in the mailbox any day now. Ms. Kate at LAGT Magazine is a really nice lady. I have e-mailed her with a question, and she got right back to me the next day. I was very impressed with that, and her personable reply. I like doing business with people like her. Anyway, your tractor build is really fine, and I look forward to your next project! Van
-
1 pointHey Craig.... what happens in four yrs?
-
1 pointBoth use the same, basicly use what ever Gear oil you want, thinner for winter use might be a good choice.
-
1 pointWell today Imgot the Par 36 12V Led replacement tractor headlights in the mail and decided to show you guys the difference they make. The whole idea and to stick with the theme of low energy usage as not to tax the charging system heavily those old lights had to GO! the two of them suck almost 6 amps when I can do the job with a tad over two amps and have more light its a no brainer. Here is what we will be testing. Below Is A Side By Side Comparison Of The Old Lights Left Is Lights Off The Right is Lights On so with 8.7 amps - minus 2.8 amps = 5.9 amps, and notice the voltage drop with them on. Now this is a comparison of amperage with the new lights installed. So with the lights off we are again at 2.8 amps but with them on we are 5.0 amps so 5.0 amps minus 2.8 amps we are useing 2.2 amps. So with 5.9 amps on the old lights minus 2.2 amps = 3.7 amps we are saving.. Cheers ~Duke Now lets look at at side by side brightness comparison. The lights on the left are the old lights and the lights on the right are the new LED's. So I think with the savings and Brighter Light These Will Fit The Bill. Yeah there not cheap but neither is replacing a stator or voltage regulator. I think an ounce prevention is worth a pond of cure. :thumbs:
-
1 pointThanks Guys Rich now Thats funny, I have that same descriptive Picture in my head ...... Im not ready for the snow yet guys, ya gotta gimmie till the end of da month. I am a weekend warrior on the fabbing, and i got a bunch to do. now on this tank. Tim I didnt want to do the tank thing either. I think its big and bulky but it is funtional. The cab sticks out in back almost as far as the tank so that will give me a picture when Im backing up that Im getting to the end of my road. "I HOPE" How do you fill yours? Im just not gonna slop a bunch of gas in my cab and un-snap and un-do the cab fabric everytime I fill the tank. ~Duke
-
1 pointHI guys, stacked up some horses today. We were just out of room in our side of the barn for horses, 50x50 was too small! We purchased some pallet racking that we put along on wall and it worked out very nicely. we have a forklift so the ones on the skids will come right down and to get the ones not on skids down we just have to put a empty skid to the edge and roll them on. There's still about a dozen horses at home and some are going to stay outside but this is way better than what we had before. Here are some pictures of the horses stacked. ~Jake the mess we had some room!!!
-
1 pointI like it Jake.... now you have room to take all of them apart at once.
-
1 pointNope...after his first place in the pumpkin contest, I've decided to assign the "Chief" to fair weather operations only. From now on, I'm saving all my grunt work for the new thumper.
-
1 pointLooks like it would make a very nice tractor stand.... Way to "save" that history.
-
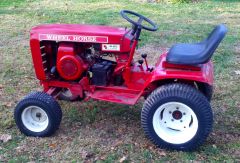
1 point
1976 B-80 8 speed.
-
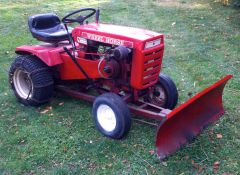
1 point
!975 B-100 Automatic. My "bulldozer"
-
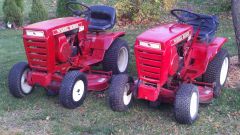
1 point
Twin 1974 B-80 4 speeds. My mowing tractors. 36" decks, great fuel economy.
-
1 pointScott, my K301 in my B-80 was rebuilt using aftermarket parts. Piston, Rod, Gaskets, ETC., and its a worker. So far my Kohler is running great with alot of hours on it for only being back in service for almost a year. The price I would have had to pay for genuine Kohler parts was crazy high, and that was not an option. The complete rebuild kit was only $109, and so far I'm very happy. I'm an American, and proud of it, but unfortunately I'm not a rich one. Matt :flags-texas:
-
1 pointYou can use a 12v power window motor hooked up with a switch to have a power chute. This is a different blower but the same principle.
-
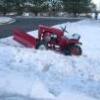
1 pointI plowed for the first time this year !!! (with the suburban 400) ...
-
1 pointI thought I'd pull this thread out of the mothballs long enough to show you guys what came in the mail today. I got my issue of LAGT Magazine in the mail today, and there was Danny's tractor sitting right next to the Lady Ranger! (whfan74, or Scott). My son was so excited he took off with the magazine to his friends house to show them. This really is a priveledge to be in LAGT, and a real honor to be sitting next to the Lady Ranger. Both tractors were built for our kids, and I can't think of a better thing to do for our kids in these days of hi tech stuff! I would like to say a special thanks to Kate over at LAGT, who is sending me some extra copies, which is good, because Danny is going to wear this one out! Matt :flags-texas:
-
1 pointThere was an article in a local newspaper a few years back where for a specific period of time, a week or a month, I can't remember, a reporter tried to buy everything US made. Unfortunately it was impossible. I think the toughest thing was clothing. Almost nothing was made in US. Very sad. Jim
-
1 pointNo wonder I'm seeing more and more of these crop up - w/ statements like that !! Not to worry, A quick trip to the fine tractor clothiers at TSC, a new pacemaker from Bosch and a quick HyTran enima turned that frown upside down !!
-
1 pointVery nice Lars. Is it silver plate or sterling silver. My wife is into metal smithing also and I'm thinking this would make a great Christmas gift for ME :woohoo:
-
1 pointThats for the Wheel Horse collector who has everything!!! Beautiful :handgestures-thumbup:
-
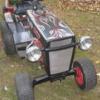
1 pointOk here is the difference in the big base block and the small base block, there is a exception to the rule and I will show that in the pics. Small base block, these are the engine like the K241AS any big Kohler that has "AS" on the tag means it is the small base block, this is the style block used with the shaker mount engines. This is a small base oil pan This is the big base block oil pan, used on solid mount engines. This is both pans lined up on top of each other, see how the big pan will not bolt in place of the small pan. Small base block with oil pan setting on it, there is no place to bolt the big oil pan to this block. Small base block setting on big base oil pan, again no place to bolt pan up. Here is a exception to the rule, I have seen a few but not many blocks set up to use both style oil pans, this one is a JD 12hp you can see it has the small pan AND the ears to mount to big pan. This is a big base block with a small base oil pan setting on it, see where the block is machined out so the pan will not seal. This is the bottom of a big base block, this one is drilled but not tapped in the 4 corners where a small pan would bolt, most I've seen are not drilled, I guess you could drill and tap the holes or on this one tap them, and find a way to seal the ends of the pan at the block, but with the ears on the block, I'm not sure it will bolt in to the shaker mount with out hitting the mount plate for the shaker style tractor. Ok I said it might not fit, and I just had to know, so I went back out to the barn and mocked up a big base block on a small pan and set it on a shaker plate, 3 of the 4 bolts will fit tight but fit, one of them will not, as the engine moves on the rubber mounts the bolts that holds the plate in place through the rubbers do not move, so the ears on the engine block I'm sure will hit at least one bolt if not 2 of them, one on each side, even more so if the rubber mounts are in bad shape like most are.
-
1 pointYes, I modified a copy of Smoreau's hitch with the steel I had. If you build one the bolt holes need to line up with the snow plow hitch that mounts below the rear axle. I also modified mine to use with the clevis hitch. Here is the post.
-
1 pointThe overall frame assembly looks like this. --- The original bagger bracket is still on the lawn tractor. 2 vertical bars are bolted to the inside of it and remain on the tractor. The horse shoe shapped lower frame, is hinged to the botton end of the 2 vertical bars. (pull the door hinge pins and the lower frame is off). The top cross pipe is made to drop into the original bagger frame, just like the original bagger hood did. I used side links from a set of snow chains, with a snow chain link clip on each end ( dog chain clips will also work), to connect from the pipe cross bar, to each end of the lower frame. Thye dog cage is also hinged to the ends of the frame, for dumping. The inside of the cage is lined with SEPERATE pieces of 1/4" mesh rat wire, so the cage will fold up flat. I fastened the rat wire with hog rings. One entire side of the cage became the door. Original shoot tube was cut off and 8" flex hose was used to reach heating duct pieces at the top of the cage. Also, I used .060" clear plastic, to cover the top and front side of the cage. It is held on with hooks, made form chain links. It keeps the dust and chaf, from coating me from behind. I already had these pics, but will take some of the details, if you want me to post them. ----- John
-
1 pointI have two with blowers on right now, a 161 with a different hood, a C81, a Commando 800 with atv tires and weight box that is waiting for me to mount the blade, and a B60 with a blade already mounted. I just picked up a mid mount grader blade to scrape the slush. I am ready this year so there won't be any snow, lol. Gene,,
-
1 pointI'm in the central Finger Lakes. I got Horsies and a King too.
-
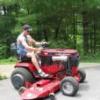
1 pointI got the tires mounted, and I like em! Matt :flags-texas:
-
1 point


.JPG.9f2ecb26065c66527b0730084ab7fc7a.thumb.jpg.7dc8a04d9a53d44ee2b23f26ee94496f.jpg)


This leaderboard is set to New York/GMT-04:00