
Sign in to follow this
Followers
0
-
Similar Content
-
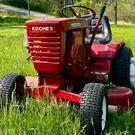
 By morePEdal
*16 HP Onan Engine, 665.4 Hours
*8 Speed Transmission
*48” Snow Plow- Works Great! Set up and READY TO GO BEFORE THE SNOW!
*Nice 42” Mowing Deck, no rot or welds, smooth spindles
*OEM Wheel Weights, 50 lbs. Each
*Chains
*Valves adjusted this summer, runs great!
*Good battery
*Tires All Hold Air
*LED lights all the way around
*Manuals included
Bought a Honda tractor with 4WD and 4WS with deck, plow and snowblower so I don’t need this tractor.
Cash Only!
*WILL NOT RESPOND TO “IS THIS STILL AVAILABLE?”
*COMING SOON: Also selling a Wheel Horse 520H with a 2-Stage Snowblower. Check out that listing if you want a snowblower garden tractor!
-
By Charles99
ok I'm new to these and first time really working on small engines. i have a k301 engine. i ordered the tune up kit with new coil, condenser, and points. after installed it won't fire. it turns over that's it. I made sure everything is grounded and the points have proper gap . 20. i have voltage at the coil i have spark at the points. i took the plug out that has spark. I'm not sure what else to do I'm about to start putting old parts back on and see if that changes anything. it did run before hand pretty well actually besides an occasion sputter or hiccup.
-
By cJ_3D
Hello helpful Wheel Horse enthusiasts!
Maybe you all could help me figure something out. I don't think I am installing the mower deck properly on my 1989 252-H and I don't know if the PTO clutch is adjusted right.
So referencing this image here from the service manual for the mower deck (37"):
What exactly am I doing with this adjustment knob and how does it fit into this piece?
Also for the PTO clutch where am I sticking the feeler gauge exactly and do I need to do all 3 springs? Or does adjusting the one in the manual adjust all three?
Much obliged for the help!
CJ
-
By lsc1257
I have a 1996 520H Wheel Horse for sale. The tractor has just over 800 hours on it. It comes with a 48 inch deck. The deck is a 1995 and has over 1,500 hours on it, as it came brand new with my 312-8 that I sold several years ago. This 520-H has the swept front axle so it can handle a 60 inch deck. I just replaced the battery and the deck belt this summer. The engine is a 20HP Onan and it starts right up but requires the full choke. The transmission is an Eaton 1100-062, hydrostatic. The deck is in rough shape but the spindles appear to be in good working order. The right rear tire has some cracking. The original operator's manual for the 520H is included, as is the original operating and maintenance instructions for the deck, plus the installation instructions for the deck. Also included is a new PTO belt and several miscellaneous deck wheels and rollers. Additional pictures available upon request. Asking $500.
-
 By BrianKoch
Gentlemen,
I’m having trouble with getting my deck to raise up and lock and I think it might have to do with the deck being incorrectly set up.
Based on the picture, does my mower deck look incorrectly positioned? That is, should the pivoting support bar be positioned above or below the wheel support pin?
Brian
-