Horse Newbie 7,405 #276 Posted May 4, 2024 I wasn’t planning on all this with this tractor… I guess make it better, right ? 1 Share this post Link to post Share on other sites
ebinmaine 79,514 #277 Posted May 4, 2024 1 minute ago, Horse Newbie said: Guys, I hate to ask so many little questions, but I don’t know things… Do NOT be concerned with asking questions. Keep em coming. Quote what are the little bushings called that go on certain shafts where they pass through sheet metal pieces?… Like in this particular case, the PTO engagement lever going through the steering wheel tower… and shouldn’t it be like a ring/ washer type thingy with a shoulder? Hmmm… would it be called a shoulder bushing ? I don't actually know what that's called. Some of mine don't have anything there at all. Might be a locking ring to hold side to side position. Do you have a local hardware store? 1 Share this post Link to post Share on other sites
ebinmaine 79,514 #278 Posted May 4, 2024 2 minutes ago, Horse Newbie said: I wasn’t planning on all this with this tractor… I guess make it better, right ? Absolutely!! Ask @peter lena. Do what you can to improve the performance for your worker. Tighten this. Oil that. Heim joints here n there. Bushings on the right places make a HUGE difference while operating. 1 1 Share this post Link to post Share on other sites
Horse Newbie 7,405 #279 Posted May 5, 2024 2 hours ago, Lee1977 said: I still have that front spindle that you need, I may ride up tomorrow and get/ check on it… 1 Share this post Link to post Share on other sites
Horse Newbie 7,405 #280 Posted May 5, 2024 (edited) 3 hours ago, ebinmaine said: Do you have a local hardware store? Yes sir… Monroe Hardware and they still have LOTS of those little hardware drawers. Edited May 5, 2024 by Horse Newbie 1 1 Share this post Link to post Share on other sites
Lee1977 7,688 #281 Posted May 5, 2024 Just now, Horse Newbie said: Yes sir… Monroe Hardware and the still have LOTS of those little hardware bins. He's lucky to have it as most of the old Hardware Stores are gone. 3 Share this post Link to post Share on other sites
ebinmaine 79,514 #282 Posted May 5, 2024 33 minutes ago, Horse Newbie said: Yes sir… Monroe Hardware and the still have LOTS of those little hardware bins. 2 minutes ago, Lee1977 said: He's lucky to have it as most of the old Hardware Stores are gone. Excellent. I'm very lucky here as well. Several good old hardware stores around. 3 Share this post Link to post Share on other sites
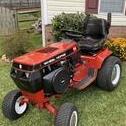
peter lena 9,934 #283 Posted May 5, 2024 @Horse Newbie got cha ! looking right at the START OF PTO LEVER MOTION , see the stack of washers right there ? used plastic / Teflon and metal m to firm up that space , also used silicone grease , to insure smooth / solid operation . that back of dash area is a gold mine for improvement , notice HEIM joint on lever end ? thats just a die nut rethread , right over the original thread , 3/8 x16 to 3/8 x 24 for joint screw on . lubricate rethreading as you go , new joint screws on easily. notice how tightly / smoothly the pto lever fits to side of dash ? thats the added washer / lube effect . also notice the , BATTERY TENDER ,plug in wire ? right there for easy access . also note the added battery cable to the corner of engine base ? from battery ground point , enhances engine electrical issues , take advantage of a problem , improve on it , its regular irritation , will show you the way , ask away , glad you are on board , pete 1 Share this post Link to post Share on other sites
Handy Don 16,917 #284 Posted May 5, 2024 On 5/4/2024 at 2:25 PM, Horse Newbie said: I think it will go another 40 years or so with this repair. I’m thinking four years, max, on the front axle pin repair. Sorry. JB weld is strong but doesn’t stand up especially well to friction. Also, if there is this much wear on the pin, the axle and frame are probably wallowed as well. Me? I’d replace the pin and look into drilling out and bushing the axle and frame if they needed it. I’m sure you can get a pin with less wear or it might be easiest to get your welder guy to make up a new pin. Round rod stock, cut the external retainer ring slot on the lathe, drill and cut a piece of ¼ plate for the tab and then weld it up, 1 Share this post Link to post Share on other sites
oliver2-44 11,611 #285 Posted May 6, 2024 On 5/4/2024 at 2:51 PM, Horse Newbie said: Also found a stress/ metal fatigue crack in the dash tower where the base piece for the height adjuster bolts on. Guess I will have my friend weld the crack up… Just a suggestion, you might weld that angled seam above and below that crack for maybe an 1” + length to strengthen that area. On one that I had totally apart I had it welded from the inside. But That would be complicated to do on an assembled tractor. If you can make a small piece of metal to go behind that crack as a reinforcement if there’s nothing that bolts on the back side. Roughly an 1/8” thick or what ever you welder likes would give him something to help get good weld penetration while not burning through that sheet metal. 2 Share this post Link to post Share on other sites
Pullstart 70,447 #286 Posted May 6, 2024 Tim, great work as always! 1 Share this post Link to post Share on other sites
953 nut 67,240 #287 Posted May 6, 2024 On 5/4/2024 at 6:01 PM, Horse Newbie said: I don’t know things… what are the little bushings called that go on certain shafts where they pass through sheet metal pieces?… Like in this particular case, the PTO engagement lever going through the steering wheel tower… and shouldn’t it be like a ring/ washer type thingy with a shoulder? Hmmm… would it be called a shoulder bushing ? I don't know what to call it but McMaster-Carr has an assortment in bronze, copper or plastic. https://www.mcmaster.com/products/bushings/plain-bearing-type~flanged-sleeve/ 1 Share this post Link to post Share on other sites
Lee1977 7,688 #288 Posted May 6, 2024 (edited) I just used regular oillite bearings in the PTO and Clutch shafts. Drilled the frame out to 5/8" and used 1/2" ID x 5/8" OD on the c-120/180 you drove yesterday. There isn't a flange on them', used 1" long bushing and saw them in half. " Clean up the shafts so the bushing would slide on. PTO bushing installed. Edited May 6, 2024 by Lee1977 3 Share this post Link to post Share on other sites
peter lena 9,934 #289 Posted May 6, 2024 @Horse Newbie nice ! on those front wheels , replace them . thats the result of not firming up the side spacer washers , the wheels " shuck " from side to side with loose play , you can get regular shims for final fit , but use regular steel flat washers , for the big gap , also like a green hi stress grease in the bearings / repack ,did that on my units , no problems at all , like hi mileage ATF fluid for a drive around trans flushing , get some time on it , use every gear , like to grease the lower INSIDE of a shift boot , for easier sliding over irregular surface ,also grease shifter rod easy slide on , tye wrap about 1/2" above boot to trap it on shaft . also in your engine run in , regularly add rislone zinc to my rotella 30 wt , the engine ease and smooth running is very apparent. good luck with it , lots of feed back here , pete 1 Share this post Link to post Share on other sites
Horse Newbie 7,405 #290 Posted May 6, 2024 15 hours ago, Handy Don said: I’m thinking four years, max, on the front axle pin repair. Sorry. JB weld is strong but doesn’t stand up especially well to friction. Also, if there is this much wear on the pin, the axle and frame are probably wallowed as well I already knew that some of you fellows would not put your stamp on the JB Weld solution… I did show the pin to my machinist friend and he seemed to think that the pin was not worn much. I will revisit the subject with him again and see if he is willing ( semi-retired ) to build a new pin and possibly sleeve the axle and frame if needed. My thought process is not much wear to start, plus when it wears now thorough the JB Weld it will be no worse than when I bought it. 1 Share this post Link to post Share on other sites
Handy Don 16,917 #291 Posted May 7, 2024 On 5/6/2024 at 10:45 AM, Horse Newbie said: when it wears now thorough the JB Weld it will be no worse than when I bought it. This could be a quote from a fabricator friend. He often asks how long I’m planning to live to use whatever thing I’ve made or am repairing. 3 Share this post Link to post Share on other sites
Horse Newbie 7,405 #292 Posted May 7, 2024 (edited) @Handy Don, I appreciate your suggestion/ opinion concerning the axle pin… You got me thinking… plus I filed the JB Weld tonight after work and it doesn’t stand a chance against a file. So I will be exploring other solutions, and who knows I may wind up using one of the ones you mentioned. I also talked with @Lee1977 Sunday when I went to pick up some front spindles. He has used a bolt in place of the pin on at least one of his Wheel Horses. I also got a brake band pad from him. Filed and sanded on my JB Weld pin and some places I could peel the JB Weld off with a fingernail… so no go on that. Also talked to @kpinnc, and he mentioned a bolt also… (Got to put much faith in what Don and Kevin suggest because if I muff something up they are the closest members to me- that I know of- to help me fix it)😆 So I have in mind 2 or 3 possible fixes… 1. Hex bolt with large washer and nut on front. 2. Fab a pin, center tap each end, use washer and bolt on front and back. 3. Fab a pin with factory like tab on back, center tap front with washer and bolt. Edited May 8, 2024 by Horse Newbie 2 Share this post Link to post Share on other sites
ebinmaine 79,514 #293 Posted May 8, 2024 4 minutes ago, Horse Newbie said: He has used a bolt in place of the pin on at least one of his Wheel Horses. Let's look at the available space for possible pin replacements. The head of a bolt or pin needs to be small enough to allow the front attach-o-matic to function. The amount of "stick out" facing rearward toward the steering is only limited by the fan gear having the ability to move. We've used a trailer hitch pin as that replacement. The head at the front was around ¼" stick out. The rear had a few cross drilled holes to accept a hairpin or other type. Worked fine. If the axle bore is wallowed out you can get a tool to drill that out and install bushings. 1 Share this post Link to post Share on other sites
Horse Newbie 7,405 #294 Posted May 8, 2024 3 minutes ago, ebinmaine said: If the axle bore is wallowed out you can get a tool to drill that out and install bushings. By hand or drill press, milling machine ? 1 Share this post Link to post Share on other sites
ebinmaine 79,514 #295 Posted May 8, 2024 3 minutes ago, Horse Newbie said: By hand or drill press, milling machine ? We done it by hand with a cordless drill. The bit was a tool recommended by @wallfish Worked slick. Took a steady hand and some patience but worked slick. 1 Share this post Link to post Share on other sites
Handy Don 16,917 #296 Posted May 8, 2024 2 minutes ago, Horse Newbie said: By hand or drill press, milling machine ? Ah, good one! To me, a lot depends on thickness and the precision required for position. Thin metal with no need for precise position? Any of the above Thick metal or precise positioning needed? Drill press or milling machine with the workpiece well clamped For the front pivot pin, the axle is thick but the frame flanges and attach-a-matic body are relatively thin. Alignment of the holes in these parts matters so care is needed, but the if the axle is slightly offset on the pin (up, down, sideways) it won’t make a discernible difference. I’ll throw in a caution about using bolts in place of pins. For pins, the forces and wear get distributed over a large surface. Threads are sharp and small at the edges and will themselves wear quickly while speeding wear on the opposing surface. High grade bolts (5’s and 8’s) are very hard and friction with them will nearly always be faster on the other part! 2 Share this post Link to post Share on other sites
Horse Newbie 7,405 #297 Posted May 8, 2024 44 minutes ago, Handy Don said: I’ll throw in a caution about using bolts in place of pins Will be looking for cold-roll steel for pin… if bolt winds up being used it will be grade 5 or 8, with the solid surface of bolt extending through front part at Attach-o-matic. Threads should not be wearing against anything… 2 Share this post Link to post Share on other sites
wallfish 20,158 #298 Posted May 8, 2024 59 minutes ago, Horse Newbie said: By hand or drill press, milling machine ? A 7/8 construction reamer will take care of all those 3/4 holes to put a 7/8 OD x 3/4 ID bronze bushings in. Axle pivots, axle spindles, steering components etc. We are not fixing the space shuttle here so yes, these can be easily done with a cordless drill. The more you do the better you get at it but my 80 year old father can now put bushings in the components he finds that need attention. Is it the best way compared to proper machining? Absolutely not! Is it the best way for us people who don't own a machine shop? Absolutely so. I've done quite a few front axle pivots and spindles successfully using this type of tool. My tool had a flange at the top like the one pictured below so I ground it off so it could run through deeper. Add an extension and it can be run though the axles for the spindles in one direction instead of from both ends of the hole. Po'man's backyard hammer mechanic machine shop fix. My 2 5 Share this post Link to post Share on other sites
kpinnc 18,723 #299 Posted May 8, 2024 5 hours ago, Horse Newbie said: Fab a pin with factory like tab on back, center tap front with washer and bolt. I'll make you a replacement pin, just like what came off the tractor- except the tab on the back will be thicker. 2 1 1 Share this post Link to post Share on other sites
Lee1977 7,688 #300 Posted May 8, 2024 (edited) There are three washers and a nut behind the release lever and it still works. The washers are there to let the treads come past the hitch plate. I used a 8" long bolt and cut the head off then welded the tab on. Edited May 8, 2024 by Lee1977 3 2 Share this post Link to post Share on other sites