
Leaderboard


Popular Content
Showing content with the highest reputation since 05/25/2026 in all areas
-
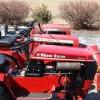
37 pointsFinally got the 953 mostly done. Been a long one but worth it. Still have some small issues and details to get sorted out but 98% complete
-
23 pointsThis past weekend we had the 15th (ish) UK meet. Around 35 horses from around the country. A few custom ones - you can’t have too many and 10 round hoods, which is a record for us here… no idea where they come from! My own basket case made it, and then the pull start broke on the first day leaving it bricked! 😭 here are a few pictures
-
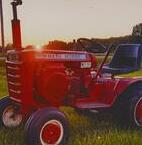
23 pointsSome of you might know that I live in an area of the UK known as gods country… a region called Yorkshire, North Yorkshire specifically. This is the largest county in the UK and the least population density. So those who live there get to enjoy the 3300 sq miles of beautiful scenery. we take the beauty for granted and some of you have often commented on the scenery in my posts rather than the content 🤣 To the point of this post, I’ve heard some of you go crazy on the latest version of All Creatures Great and Small. It’s a good series and we just live amongst those wonderful locations and occasionally get caught in the traffic and filming! Plus we did a wedding in St Oswalds church last Friday and it reminded me of another wedding… anyway here are a few pics of the last five years of me cycling and driving, you might recognise a few locations and characters…. during COVID I followed James car on a trailer up the dale into Arncliffe, where they film the outside of the vet practice Inside of St Oswalds church where james and Helen married Outside of the church Look who I bumped into Skeldale house Yockethwaite bridge and Helens family farm
-
22 pointsGetting in a weeks vacation at my favorite beach before the Show. Half the clan rolled in Saturday. This is the first time to rent this VRBO. Put the crab pots in and caught a few fish on Sunday. The ospreys are looking good. Quite a few nesting. Gotta luv my crowded beach walks. 20 mph NE this morning, so the boat stayed at the dock today. Made the crew a hunters breakfast eggs, home fried spuds, deer sausage, deer scrapple, Then some rest for the old bones. And some Red Square time. Oops, I hear the rest of the crew arriving. More to follow.
-
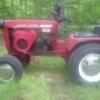
21 pointsA few years ago I traveled to Ky and bought #423 of 425 60th anniversary with less than 10 hour. I drive it a few times a year and it still has less then 15 hour on it. Its in museum condition - maybe it should be in one instead of my garage in IL
-
21 pointsWith some drooling to boot ... Took a little drive to the driftless area today to see Kurt @608KEB. It's a large area in south western Wisconsin that was left unscated by the ice age and sure is beautiful country. He sure is lucky to live there. Valleys and hills galore much like eastern PA. I used to ride there a lot, very nice roads and scenery that won't quit. There's a tavern there that has the best Sunday chicken dinner ... maybe we do a chicken run sometime Kurt you get out the Fat Boy!. Anyway I digress ... picked up a nice set of implements for a price I care not to mention... Sorry @Dan 312-8 ... Bonus I got to look see over the rest of his fine fine harem and he let me take pics... ... Enjoy. Now it's no big secret I am not a huge LSE fan @c-series don or any tractor I can't run a furrow with or stick in the dirt in any fashion but I may have to make an offer he can refuse on this one. He's had it posted here before but fer sure worth a second look. All his horses are in very very well kept shape.
-
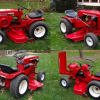
21 pointsOver the past two weeks the 854 got new Firestone Town & Country rear tires. Very pricey but so far they are just what I was hoping for. I took the opportunity to strip and repaint the wheels using the Cottage White (formerly Navajo White). Mounting always leaves marks, so in anticipation of the Big Show, I even did the touchups. Looked so good I got out the can of Regal Red and touched up a bunch of the scratches and scrapes that a worker acquires over time.
-
21 pointsTo those who gave all for our Country... Thank you.
-
20 pointsHello everyone. First my apologies to all for falling off the face of the earth, specially to the ones that attempted to contact me and perhaps I did not answer. It has been an adventure this last year, starting with our health which unfortunately just wants to travel south , keeping us busy just by the multitude of appointments, tests and the lack of peace of mind which many times just takes all and any motivation away. It’s a struggle. With my father’s passing last year now it’s the impossible task of managing properties in two continents without being there. My wife is not up to travel and I cannot leave her alone so it just complicates things. My younger son is now back with us making things a little easier and certain things possible which is a blessing. Only due to that I am actually now waiting to board a plane so I go for a few days to do some closings on stuff over there. Been also quite discouraged with the current “climate” here , due to which I have taken a bit of outright abuse never having in my life imagined it possible. Amazing how all of a sudden so many change their attitudes towards one, clearly intended on making one feel singled out and unwelcome. Again, feelings I never thought I would have specially after 60 years of being here. I was looking forward to the show this year but unfortunately due to the health and overseas issues it’s not going to be possible. I’ll be looking forward to seeing all the photos. Hopefully I’ll also find time and the motivation to start being active here again. I miss you all.
-
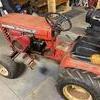
20 pointsMorning... sitting on the "new" 953 out in front yard with cup of Joe. Bought this yesterday not running... but with my pit crews help (Mike, John, Gary & Paul) we had it running and it did a victory lap under its own power in 15 minutes. CHECK OUT THE SEAT!!! Guy says he took apart an office chair, cut vinyl off. Re-cut the plywood and foam to fit then recovered and stapled! LMAO its PERFECT!! Can't wait for the show, see you soon! Tony @wallfish @Sparky @Retired Wrencher
-
20 pointsWho all gets their Horses out in a Parade? I recruit local teenagers and neighbors to drive some and they have so much fun. (It’s also good for when I am out making so much noise working on them that neighbors are more forgiving, lol) plus it gets them out for a good exercising.
-
19 pointsWent out for a test drive.
-
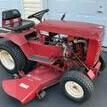
18 pointsHere's some pictures of the C101 I found earlier this year on FBMP, a little more than an hour from home too. It came with a 42"RD deck that looks better than the one a rebuilt last fall, so I swapped all the new parts over from one shell to the other and now have VGC spindles to make another serviceable 42"RD, just won't have the old patina, but it's not rotted out. I really have enjoyed going through this machine. I cut some grass with it yesterday and probable cut some more today or tomorrow. I runs smooth and strong, it's weathered and solid I went with penetrol and steel wool finish refurbish and I like the OG survivor look.
-
18 pointsTRIP 2 consisted of some NOS parts, buckets of used parts, numerous Kohlers, and some more tractors including some little tractor with some kind of cutting attachment on the front of it. Not sure if that's worth anything or not? Best part is that it was 2 tenths of a mile from my house.
-
18 pointsMost of you saw the recently posted AI generated video about the history of Wheel Horse. The inaccuracies were abundant and glaring. Having lived a stones throw from South Bend all my life I vividly remember the tremendous amount of manufacturing in the county with Oliver, Studebaker and many others as well as what Wheel Horse went through as it was happening. You hear a lot of conflicting stories about AMC, Munn and then Toro and what they did to Wheel Horse. I stumbled on to this one this morning and found it to be, by far, the most accurate of any I've seen. My awareness started in 1960 as a child but the memories are still there. Sit back and relax. This is just over an hour long but it kept me glued to the puter screen and brought back a lot of memories. The Brand That Big Box Stores Destroyed: The Fall of Wheel Horse I did catch a major error near the end. Since when was the LX420 the last of the models with any Wheel Horse heritage? It had zero. The last was the Classic GT aka 300 Series, aka 315-8, whatever you prefer to call them. Last year made, 2007. Also, many of you want to see the Ireland Road plant on an upcoming visit to the area. No, it doesn't look like this now but you will still recognize it. The picture they used when making that statement was the BACK of the plant. For many years the less faded paint under the Wheel Horse name was very visible.
-
17 pointsJust finished cleaning off the winter cob webs, changing the oil, sharpening the blades, and replacing the air filters. Ready for the grandchildren. (1967 T1067 and 1982 SK-486)
-
17 pointsBeen wanting a small lightweight jack that I can pop off the handle and toss in the backseat of my truck on road trips (think Wheel Horse show in a few weeks) in case my trailer was to have a flat. And of course to jack up tractors HF had this on sale for $79..regular $109.
-
17 pointsDid the first actual working of the 1257 today. Hooked the land plow up and plowed where I will be attempting to grow a 1000lb pumpkin. I couldn’t get as deep as I wanted since I found out really quick that I need a new belt. But ran great otherwise!
-
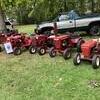
17 pointsSpending my Saturday cleaning out a local collection today, previous owner is deceased. Not too much in the mornings haul, mostly parts tractors / decks , tractor in picture 4 fired right up on starting fluid, maybe something better this afternoon....
-
16 pointsBought this last week not running. Got it running at the show I was at. Thought about a clean up and flip. Then today... new drive belt, took off pump belt, oil change, transaxle service, basic wiring job so I had crank and on/off and charging. Threw a bucket of suds on it... stood back and went nope.... not for sale! LOL Tony @wallfish @Retired Wrencher @Sparky 20260620_142318.mp4
-
16 pointsThis is from the experience I went through the last couple days. It pertains to a B 100 that I picked up a few weeks ago. It’s been quite the experience with the wiring on this tractor. I was trying to fix someone else’s mistakes. Yesterday was I guess you called a head banger or scratcher. Be cause everything I did did not work. So today I guess you could call it a premonition early in the morning. I decided to use a jumper wire form the solenoid to the wire on the starter from the Solenoid.. Bingo it worked. So Squonk AKA Mike was interested how this came about. So I told him. He said the wire was bad. I thought how a 6ga wire could be bad with no bare spots and the contacts were clean and shiny. So as I changed the wire witch is a 4ga brand new. Bingo I have contact. I have had a few of this model in the past. So I guess you could say don’t assume everything is good just by looks. I am not good with electrical never took the time to learn it.. if you read this and liked it say something or give me a thumbs up. Enjoy all your projects. This is something apparently I didn’t follow when I was doing it.
-
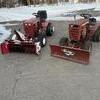
16 pointsMy neighbor finally broke out his slot hitch plow and busted through the pack layer - then followed up with the tiller. Here is my new (to me) C-160 Auto leveling things out. A little later, we decided to get the herds together for a group photo. You can tell they're all workers.
-
15 pointsI started this thread to post pics of your pre trip rigs and pics on your way to the big show!! Hard to post pics in trailer as this is a toy hauler. Here is my ride for the show and my home while there. safe travels to all…
-
15 pointsMore to come on my newest addition. Picked it up last Saturday and have made decent progress so far. It's the one in the background.
-
15 pointsWe plan to do a Red Square 20th Anniversary group photo on Friday, June 26 and Saturday, June 27. The location will depend on the weather, if it is a nice day we will gather near the entrance to the show field (AKA Squonk's Corner) and in the event of rain we will move into the display building. Times are yet to be determined but there will be plenty of advance notice and announcements on the public address system. Plan to be a part of the celebration.
-
15 pointsMajor cleaning of the recently acquired 314H.
-
14 pointsInstalled my last new drive belt on the C-85 this afternoon. Much better clutch pedal action! I don’t like NOT having 8 speed drive belts in stock here. Usually have two new ones on the shelf. Hopefully K&B WH Parts has a couple at this years Wheel Horse Show (hint hint @76c12091520h ) This post gives me a chance to show off the rig
-
14 pointsC-85 I bought awhile back has always had two leaky fronts. Been stored in the shed up on blocks so the rubber wouldn’t get ruined sitting flat..well today I decided to tube em both. I hate tubing the small tires ! This old HF tire changer comes in handy still. But now it’s done and the big test will be to see if they stay “up”.
-
14 pointsI am planning a day trip to the big show on Saturday, coming along with @Rob R I am looking forward to seeing everyone. To help celebrate RedSquare’s 20th anniversary, I will be giving out our special 20th anniversary stickers printed by the one and only @Vinylguy. Be sure to seek me out to get yours while supplies last!
-
14 pointsI have looked for years and finally found a pedal tractor on ebay. It came with the correct sheet of new decals. I just finished painting and reassemble. It looks good. It was built by AMF in Olney IL. I grew up near there.
-
14 pointsA post popped up on my towns FB page for Free Stuff at the curb. I’m usually never around when this happens but it turns out I was just done mowing the front yard with the B-80 and when I saw the drawbars for a 2” receiver in a picture I figured I’d take a little drive. I think I was the first to arrive! Snagged two drawbars, one standard length and one longer one. A 12’ tow strap with steel hooks, some 12-2 and 10-3 romex. Check out what HD is getting for 15’ of 10-3 romex . AND nice two link chains that fit the rears on my WH’s! Score!!
-
14 pointsSpent some time on the B-100 this weekend. Parts came in for the tranny so I was able to reassemble that. I discovered that the idle pulley for the drive belt was locked up so that got replaced. The plastic handle for the parking brake was missing so I spun some new ones out of aluminum on the lathe. Back together and ready for duty.
-
13 pointsThe time has come for me to part with my trusty Wheel Horse and find it a new home. I am the second owner (since 2003) and it has always been stored in a garage. I am located about 20 minutes south of Rt 80 or 15 minutes north of Rt 78 near Rt 33 for those who are attending the Big Show. 1975 C-120 Special, 8-speed (Model 1-0375, Ser. # 133357). Running (no smoke) 12 hp Tecumseh (Model HH120-120180E, rebuilt 1986). Rebuilt carb, new fuel pump, and new ignition module (in 2006). Good used replacement tank, original tank is included in the sale. Brand-new battery, fuel filter, and shutoff valve installed 5/26. The transaxle case is cracked near the center flange and repaired with JB Weld. Solid 42” side discharge deck (Model 5-1010) bearings replaced in 2005. Extra set of Gator mulching blades and spare hi-lift blades included. 42” snow/dozer blade (Model 86-42bc010), with Rear weights, tire chains and hardware. Parts: 4 NOS belts and 2 good used belts, NOS taillight lenses, used starter, used ignition module, more (see pic). 1975 C Series Owner’s manual, 1975 WH accessory catalog, 5-1010 deck manual, original HH-120 manual, updated Tecumseh HH-120 technicians handbook. Selling entire package for $350 Or Best Offer Deck/Blade/Weights/Parts alone are worth that! Please PM to contact HH120_running.mp4
-
13 pointsThe neighbor boys picked the first cantaloupes today. 10 yo Danny picks while 4 yo Amos drives Barney.
-
13 pointsWell I decided to get down early this year and spend a few days enjoying the sites in Gettysburg. I had no traffic and no issues getting here. I am staying in Gettysburg campground the next few nights. Safe travels everyone!
-
13 pointsWell, it's late and I smell like gasoline and thread sealer, but she's alive and kicking with no smoke. Fired within 3 seconds of adding gas. Scared the crap out of me because it was so quick! I know some will not like the voltmeter, but I prefer them to ammeters. And mine is outputting just over 13V on a 100% fully charged battery. One more thing checked off the list. Almost there. Funny side note: my wife bought this machine for me 20 years ago. Even though you think they have no interest in it, she was the first to remind me that it only took me over 20 years to get it running...
-
13 pointsI bought aftermarket wheels for RD deck, $7 a piece, and I installed zerks . Slightly narrower than original but color is right.
-
13 pointsToday, I pulled 2 of the 3 usable tractors the 312 and the C-141 out to get to my ATV with a winch to move my Snowmobile around. Frank, The C-141 definitely likes the more constant use even if it is just moving it out of the way. I haven't had a problem starting it for months. Yesterday, I put a new deck belt for the 37"SD on the 308. I got a few years out of the same old one, and it wouldn't keep tension without needing to extend the adjustment screw on the mule drive.
-
13 pointsWhile not 100% wheel horse related my 10-8 was definitely utilized though. Bought my first antique tractor yesterday. Flying solo unloading it today I had to get creative. Started pulling it out with a chain and a wheel chock to move it in increments, that got sketchy quick. I then had the bright idea to hitch the tractors together with a hitch pin. That made life much easier. Had to resort back to the chain to pull it into the barn. 10-8 put in some good work today.
-
13 pointsWe are talking about a manual transmission that never gets hot enough to need additives. In my opinion a tractor that is kept in a garage or shed and has a good rubber boot on the shift lever isn't likely to need an oil change for the transmission. I have put my hand on the transaxle after two hours of mowing and the case it not even warm. If it has had a tough life with being stored outdoor and the rubber boot is deteriorated then the oil should be changed and the boot replaced.
-
13 pointsMy recently acquired B100 was leaking fluid from the right axle seal. Took the tranny apart today in order to investigate why. Think I may have found the issue. Managed to get the tranny washed out & cleaned up. All ready to put it back together as soon as my parts arrive.
-
12 pointsWell things finally caught up with me and I got a call from a County Sheriffs Deputy yesterday (fake) All thought they missed the big items, (Ha), and just said the judge fined me and sent warrants since I didn't report to Federal Jury Duty Tuesday. (fake) Had a real official mannerism. Had my name, address, garbled a Drivers License number (wouldn't repeat it) He did a bunch of official sounding jaw jacking and fake sheriff radio background noises. Claimed to be Sheriffs Deputy, said he could put me in touch with a bond company over the phone to get an immediate bond, pay with credit card loan, so I don't get picked up and hauled in tonight. Too many little things seemed fake so I hung up. I texted the local Sheriffs office, yep scam they are well aware of but calls are not trace able. I got the same call twice today. (interesting the call came in as "Maybe (wife's name) each time So I started having fun wasting his time. Asked him if he knew my cousin in County Jail there or, my brother Bill from another mother! (he didn't catch that one) I told him I could trade him some good tractor parts, but that they probable would never bond me since I hung around online with the Tractor Mafia (I should get a Mafia T shirt for that one) and on and on. I finally asked him what $ cut he got for "arranging" the bond and he hung up. O the crafty crap that is out there these days.
-
12 pointsWell it’s not exactly in my backyard but it is only about ten-fifteen minutes from my house. It’s the 126th playing of the US Open at Shinnecock Hills Golf Club. I went today for one of the practice rounds that started Monday. Tomorrow official play starts. This is one of the oldest golf courses in the country and it is steeped with history. Founded in 1891, it has hosted the Open several times. It is an ultra exclusive, strictly private club except during this tournament. Figured I’d take a few pictures for those of you who like me, enjoy the game of golf. First picture is Rory Mcllroy teeing off. Last pic is my ugly mug!
-
12 pointsJune 10, 2002, A man was arrested and charged in the attempted murder of a police officer after driving into a patrol car while attempting to flee from sheriff’s deputies. Soon after, police discovered that he was already a wanted man. He stole a Krispy Kreme doughnuts delivery truck, police who pursued and caught up to the vehicle said he had led police on a 15-mile chase, leaving a trail of doughnuts behind. The incident was the subject of nationwide media attention and, as it involved cops and doughnuts, kept late-night comedians busy for several days.
-
12 pointsI fileted over 100 fish this morning. The club held our annual kids fishing derby today. We had 68 kids signed up and they landed some lunkers. The winner was a 26.25 long 10.2 lb. rainbow. Those smiles are the best prize.
-
12 pointsMowed the old cemetery where my great great grandparents are buried
-
12 pointsReplaced the ammeter on my one tractor, the one I replaced was a new one but it was a 30 amp gauge which is a bit high for these tractors and the needle just went everywhere with the vibrations. This one works much better!
-
12 pointsI put some paint on the wheels
-
12 pointsMy 8 year old Grandson wanted to drive Papa's Wheelhorse. His Dad just picked up a 85 314-8 a few weeks ago. We let him drive it in 2nd High range.
-
12 pointsMrs Sylvan once again adorned the yard art with spring flowers... looks a lot better than when I'm sitting on it...


.JPG.9f2ecb26065c66527b0730084ab7fc7a.thumb.jpg.7dc8a04d9a53d44ee2b23f26ee94496f.jpg)


This leaderboard is set to New York/GMT-04:00