peter lena 8,068 #26 Posted July 2, 2021 @Horse Newbie , I regularly add , STABIL to all my fuel , without any starting issues at all . that rislone zinc , is available on amazon for $ 6 , since adding it to every oil change , with rotella # 30 , my engines have remarkably smoothed out and run without effort . the internal added cleaning is a side benefit of that zinc. you can hear and feel the operational running ease , just telling you what works for me , let me know how it works for you , pete 1 1 Share this post Link to post Share on other sites
Lost Pup 172 #27 Posted July 4, 2021 I own a 418A and a 418C. PM if you need any help with pics or info. 2 1 Share this post Link to post Share on other sites
Horse Newbie 6,859 #28 Posted July 4, 2021 On 7/2/2021 at 9:20 AM, peter lena said: regularly add , STABIL to Me too...I have used Stabil in all my small engine fuel...haven't had any fuel/ starting issues either. 2 Share this post Link to post Share on other sites
peter lena 8,068 #29 Posted July 4, 2021 @Horse Newbie obviously agree with you on Stabil fuel additive. add the upper neck area on the bottle to my fuel top off to all my horses, EVERY TIME I TOP OFF , no funky anything in my fuel systems , its simple , easy and it works constantly , isn't that what you want ? like I said , I tell you what works for me , make it bombproof, pete 2 Share this post Link to post Share on other sites
WH1618speed 432 #30 Posted July 6, 2021 UPDATE: I have finally gotten the tractor torn down and the motor is off. I am very surprised how simple these Kohler Magnum engines are. All I had to undo to take off the engine was a wiring harness connection, the connection to the starter, fuel line, and carb/choke cables. I am used to the 520-H's with the crazy jungle of wires to separate and go through. I also discovered that there is oil drain plug is loose where it has a elbow that comes out the side. So that explains the oil mess. Luckily the previous owner kept oil in it so it doesn't knock/ smoke...but there was oil caked everywhere. Had to get some degreaser and pressure wash it. There still is a good amount on the underside...will have to pick it up somehow and clean underneath. I will continue to take it apart like removing the gas tank, and the dash board, and the steering wheel...which will be a treat since there is a rusted roll pin to pound out. 3 1 Share this post Link to post Share on other sites
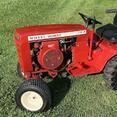
WH1618speed 432 #31 Posted July 6, 2021 (edited) More pics... @pfrederiand also from before. I did confirm this is a 418-A with the spec no. being 24510 and not 12536. Thanks for the help!! Edited July 6, 2021 by WH1618speed 2 1 Share this post Link to post Share on other sites
WH1618speed 432 #32 Posted July 6, 2021 Hey everyone, does anyone know the best way to remove decals? 1 Share this post Link to post Share on other sites
JCM 8,651 #33 Posted July 6, 2021 Hair dryer works well then 3M general purpose adhesive cleaner for any remaining residue. 2 Share this post Link to post Share on other sites
pacer 3,159 #34 Posted July 6, 2021 (edited) 23 minutes ago, WH1618speed said: remove decals? I've settled on one of the small angle grinders with a twisted wire cup wheel .... and some elbow grease! There will still be a residue of glue but some acetone will then remove that pretty easily. Edited July 6, 2021 by pacer 1 Share this post Link to post Share on other sites
ebinmaine 63,150 #35 Posted July 6, 2021 24 minutes ago, WH1618speed said: Hey everyone, does anyone know the best way to remove decals? If you ARE SAVING the paint: 5 minutes ago, JCM said: Hair dryer works well then 3M general purpose adhesive cleaner for any remaining residue. If you ARE NOT: 2 minutes ago, pacer said: small angle grinders with a twisted wire cup wheel 1 Share this post Link to post Share on other sites
Jeff-C175 7,195 #36 Posted July 6, 2021 24 minutes ago, WH1618speed said: Hey everyone, does anyone know the best way to remove decals? Hair dryer as JCM mentioned. Heat from BACK SIDE so as not to over heat the vinyl and it will peel more easily. If you have an infra red thermometer, I've found that 125-130°F seems to be the best balance between softening the adhesive and melting the vinyl. You could go a little higher than that initially but then let it cool a tad before peeling. 1 Share this post Link to post Share on other sites
WH1618speed 432 #37 Posted July 6, 2021 Ok, I will have to try that. Thanks!! 1 Share this post Link to post Share on other sites
JCM 8,651 #38 Posted July 6, 2021 This hood on the 418-A had a couple of indentations on the front that need to be removed before a new decal goes on. The original one was removed using the hair dryer from the front side back and forth until warm. Let sit for a minute and it pulled off easily. @WH1618speed Good luck 4 1 Share this post Link to post Share on other sites
Horse Newbie 6,859 #39 Posted July 6, 2021 4 hours ago, JCM said: Hair dryer works well then 3M general purpose adhesive cleaner for any remaining residue. 1 Share this post Link to post Share on other sites
WH1618speed 432 #40 Posted July 7, 2021 (edited) The 418 came a long good today, I removed the upper portion of the dash attached to the steering wheel and took the dash plate off with the volt meter and hour meter on it. I labeled all the wiring and took apart the firewall area as well. Also took off the rest of the engine covers, revealing more oil which I pressure washed off and I picked up the front end of the chassis and pressured washed it as well. All nice and clean. The loose drain plug really made a mess. I started removing decals and I will have to finish that tomorrow. So far so good! Also @JCM The tractor looks great nice job. I also have a high back seat with arm rests to put on mine when it gets all done! Edited July 7, 2021 by WH1618speed 4 Share this post Link to post Share on other sites
WH1618speed 432 #41 Posted July 22, 2021 I have finally started the process of painting! After a long time and lots of metal prep work, the time has finally come. I am just starting today with the primer with rattlecan and will painting with PPG automotive black paint and the Toro Red paint that was sold from toro with the pneumatic paint gun. So far so good! I will be on vacation next week so I want to get the majority of the painting done so it can harden up well while I'm on vacation. 4 1 Share this post Link to post Share on other sites
Jeff-C175 7,195 #42 Posted July 22, 2021 32 minutes ago, WH1618speed said: the process of painting! That's quite the paint booth you've got there! 4 Share this post Link to post Share on other sites
WH1618speed 432 #43 Posted July 22, 2021 I started painting the black with the pneumatic paint gun!! I'm quite impressed with the quality since the only thing I have painted with in the past was a rattlecan. I need to let it dry for 4 hours so I can tape off the black and begin with the red!! 3 2 Share this post Link to post Share on other sites
WH1618speed 432 #45 Posted July 23, 2021 (edited) I finished the painting today!! The Toro Red really pops!! I hopefully will have the tractor finished as soon as we get back from vacation and/or get the decals in. We will also be color sanding when we get back. Also make sure you're wearing a respirator when painting its pretty important if you see what it caught in the filter! Coming together!! Edited July 23, 2021 by WH1618speed 5 6 Share this post Link to post Share on other sites
WH1618speed 432 #46 Posted July 23, 2021 (edited) The filter was white before!! Edited July 23, 2021 by WH1618speed 4 1 Share this post Link to post Share on other sites
Jeff-C175 7,195 #47 Posted July 23, 2021 19 minutes ago, WH1618speed said: filter was white The fumes will get ya too! I use the organic filter pods on my mask but they're pricey. So to get a little more life outta them I put n95s OVER the pod. Let THOSE get red! 2 Share this post Link to post Share on other sites
Horse Newbie 6,859 #48 Posted July 24, 2021 22 hours ago, WH1618speed said: get the decals I have heard people on here recommend letting the paint gas off vapors before applying the decals...maybe someone can chime in and tell us how long you need to let the paint cure... Share this post Link to post Share on other sites
WH1618speed 432 #49 Posted July 24, 2021 Right @Horse Newbie I'm letting the pieces sit over vacation for two weeks and hopefully that will do the job. 1 Share this post Link to post Share on other sites
953 nut 51,720 #50 Posted July 24, 2021 10 hours ago, Horse Newbie said: I have heard people on here recommend letting the paint gas off vapors before applying the decals...maybe someone can chime in and tell us how long you need to let the paint cure... If a hardener is added to urethane enamil the paint will harden in a couple days, if not you want to hold off for at least a couple weeks, more if cold or damp conditions https://findanyanswer.com/is-urethane-paint-better-than-enamel 1 1 Share this post Link to post Share on other sites