Jump to content
psalms83:18

my 400 suburban rebuild

Recommended Posts

psalms83:18

wow that tranny looks ruff!

his tranny looked like a one price also, but I saw one of his pics had a two piece with bolts.. Are the bolts just for support of the weld?? Was mine originally a one peice or was it welded as a repair or manufactured that way?? I will plan to put in bolts that don't stick out past the bolts either way...but just curious on the function or capabilities of the issue.

Share this post


Link to post
Share on other sites
 
stevasaurus

Psalms...with those welds in there, you are not the first one to be inside this transmission.  It does not come like that from the factory.  :think:  I would put bolts back in there and grind them down to the top of the nuts.  Half of those welds are to cast iron.  :)

  • Like 2

Share this post


Link to post
Share on other sites
 
psalms83:18

ok...will do

now that I have the details all worked out, and I'm fairly sure I got what it takes to put this tranny back together I'm going to phos dip and strip...then to keep the gears from flash rusting before I have a chance to put them back in the case with oil..im going to keep what's not getting painted submerged in diesel.


as for the case itself i have the forks moving forward and back (rotating on their shaft) but they don't move left and right...correct me if im wrong but are they supposed to ?? And if so I figured I would just get them moving and not remove them...they seem fairly clean and I would hate to get them mixed up or put in wrong.


order the bearings and seals...weld the bearings back against the side plates assemble and o yeah the broken bolt receivers on the case,...a well placed piece of angle iron I will show I feel is going to hold very well even without welding it cause of the way it will grab under the lip ..though I will weld also..


Share this post


Link to post
Share on other sites
 
Racinbob

Yes, the forks move side to side too. I would take them out. They can't be clean if they won't move. Just remember there's two 1/4" balls, a spring and a pin held captive between them that like to get lost. It's not hard to reassemble them. Just follow the steps in the manual and watch Steves video.

The problem with putting a backer in there for the missing holes is that you need to be careful because some of the holes don't have sufficient clearance. For the ones that do it's still a problem because it needs to be flush with the side plate all the way around the bolt in order for the gasket to seal. Otherwise it's leak city. You could put a gasket on the bolt and it may work but I'd rather see the repair build up flush to the side plate.

  • Like 2

Share this post


Link to post
Share on other sites
 
stevasaurus

Are you saying that you intend to weld the bearings to the side plate??  :think:

  • Like 1

Share this post


Link to post
Share on other sites
 
nhmikel

Are you supposed to tack weld bearings

Share this post


Link to post
Share on other sites
 
WHX??

Noooo they should not be welded at all... just a good snug friction fit on both the shafts and the receivers in the side plates. Once you get things cleaned up and the new bearings in hand. Check  for that fit. 

  • Like 2

Share this post


Link to post
Share on other sites
 
Racinbob

:text-yeahthat::text-yeahthat::text-yeahthat::text-yeahthat: :)

  • Like 1

Share this post


Link to post
Share on other sites
 
psalms83:18

ooooo....these are not the bearings welded but a sleeve or race for the bearings???

WP_20160613_17_15_17_Pro.jpg

  • Like 1

Share this post


Link to post
Share on other sites
 
Racinbob

Yes, that's correct. Pop those bearings out of there and you'll see. :)

There may be a thin washer thingy under one or more of them. Make note of where it was. 

  • Like 3

Share this post


Link to post
Share on other sites
 
WHX??

Steve's got a video of out to get the bearings out it you don't have a blind hole bearing puller.


LOL Bob that washer "thingy" is called a spacer or shim....you been  hanging  out with Steve too long!

  • Like 2

Share this post


Link to post
Share on other sites
 
Racinbob

Sorry if I was getting too technical for you Jim. :teasing-neener:

  • Like 2

Share this post


Link to post
Share on other sites
 
psalms83:18

thingy"" and "ish" and "whachyamacolits"" are the only language I understands..

  • Like 2

Share this post


Link to post
Share on other sites
 
Racinbob

Here's a good shot of what is holding the bearings in place as well as the...................thingy...............I'm talking about. :D


Transmission thingy.JPG

  • Like 1

Share this post


Link to post
Share on other sites
 
stevasaurus

1.  Do not weld anything in the transmission!!

2.  Bearings need to be flush with the top of the ring they sit in.  Pinching the shafts may occur if they are not right.

3.  Your shift fork shafts should be free to move in all directions...and the shafts should shift with ease (but feeling the detente balls do their thing).

      If they work freely, you may be OK not taking them out.  If you do take the shafts apart, I have a few tricks for taking apart and putting back together.  :handgestures-thumbupright:

Psalms, do you think you could post some pictures of all the parts after you get them cleaned up and before you put it back together??  Thanks  I just would like to see how it all cleaned up with that acid bath.  :)


  • Like 3

Share this post


Link to post
Share on other sites
 
psalms83:18

definetly lots o pics coming thanks for all the advice and even of the bearings and the balls and detent shafts I wassnt sure of how they went together.

Share this post


Link to post
Share on other sites
 
stevasaurus

Any time.  :)  The outer input shaft and brake shaft bearings are in enough to accept the seals and the seals would be flush.  :)

Share this post


Link to post
Share on other sites
 
psalms83:18

is this gear supposed to be welded ?? It kinda not the best weld I have ever seen? And there was a bearing at the top of this gear , u can see the piece that held the balls at the top of the shaft

WP_20160620_14_16_18_Pro.jpg

i also got the shift forks moving good without taking them out, it i didnt have the right punch for that pin and with the balls stuck i couldnt get that shaft out anyway till i free'd them, but now that they are moving im not gonna bother...may regret it..


and these are some pics after 13hr 6/1 phos dip. Blue gray coating is the rust resistant coating left after the dip, and that wipes right off..

shiny metal pics is from running the parts under a brush

WP_20160620_13_29_18_Pro.jpg

WP_20160620_13_29_37_Pro.jpg

WP_20160620_13_29_49_Pro.jpg

WP_20160620_13_30_00_Pro.jpg

WP_20160620_13_30_14_Pro.jpg

WP_20160620_13_30_19_Pro.jpg

WP_20160620_13_57_05_Pro.jpg

WP_20160620_13_57_21_Pro.jpg

WP_20160620_13_57_57_Pro.jpg

WP_20160620_13_58_02_Pro.jpg

WP_20160620_14_00_08_Pro.jpg

WP_20160620_14_00_22_Pro.jpg

WP_20160620_14_00_26_Pro.jpg

WP_20160620_14_02_26_Pro.jpg

  • Like 3

Share this post


Link to post
Share on other sites
 
psalms83:18

that cluster gear in the following pics i cant get separated cause the end are flared/mushroomed from trying to knock them out..so im gonna leave this one also...is that center gears supposed to spin on the shaft of end gears? There's a hole like there was supposed to be a pin to keep it from spinning??

WP_20160620_14_23_32_Pro.jpg

WP_20160620_14_48_21_Pro.jpg

WP_20160620_14_48_25_Pro.jpg

now these last two pics above here notice the screw driver pointing to the pin holding the shaft...it keeps the gear from spinning...see it hits those vertical supports and only spins a quarter turn?? Is that right or should it spin all the way??

  • Like 1

Share this post


Link to post
Share on other sites
 
Racinbob

That's the reverse idler. It should spin freely on the shaft. You're gonna have to get it freed up. :)

  • Like 1

Share this post


Link to post
Share on other sites
 
stevasaurus

Psalms...good work for sure.  For sure the pictures show more then the eye can see...I think you can see where you need to clean things up?  :)  The hole in the cluster gear is to lubricate the 2 bronze bearings seated inside.

    Look, we are going to be at the show the rest of this week and will be back next week.  You do what you want, but it appears to me that you have not really done any search for what is going on.  Some of your questions show that...sorry if I am missing something here.  I will help you when we get back, but it is hard to walk backwards on the ideas you are putting forth.  I reserve the right to be wrong about all of this above.  :think:

Share this post


Link to post
Share on other sites
 
psalms83:18
8 minutes ago, stevasaurus said:

Palsm...good work for sure.  For sure the pictures show more then the eye can see...I think you can see where you need to clean things up?  :)  The hole in the cluster gear is to lubricate the 2 bronze bearings seated inside.

    Look, we are going to be at the show the rest of this week and will be back next week.  You do what you want, but it appears to me that you have not really done any search for what is going on.  Some of your questions show that...sorry if I am missing something here.  I will help you when we get back, but it is hard to walk backwards on the ideas you are putting forth.  I reserve the right to be wrong about all of this above.  :think:

ahh that was another question I was considering the bushings.. The manual said something of bushings but didnt show it and wassnt sure mine had any, makes sense they are inside that cluster gear...I appreciate that wisdom


enjoy the show everyone...and remember to enjoy cause not everyone gets the luxury of attending such prestigious extracurricular activities. One day I will join u...for now I dream of being there.

2 hours ago, Racinbob said:

That's the reverse idler. It should spin freely on the shaft. You're gonna have to get it freed up. :)

that reverse idler is freely spinning but like it shows in the manual it has the pin but the pin also stops it from spinning? Is it a wrong length pin?

Edited by psalms83:18

Share this post


Link to post
Share on other sites
 
psalms83:18

it seems the diagram show the bearing not against the gear at the top like this but maybe at the case cover...so maybe this one sliped down to this point during its previous operation?

WP_20160620_14_16_18_Pro.jpg


good enough...looking at pics from my disassembly that's seems to be just what it is... Notice this plate with no bearing ...that's that...


wp_ss_20160620_0004.png

Edited by psalms83:18

Share this post


Link to post
Share on other sites
 
Racinbob

No, the pins are fine. The shaft is stationary. The gear spins on the shaft. There's a bronze bearing in that gear. :)

  • Like 2

Share this post


Link to post
Share on other sites
 
psalms83:18
12 minutes ago, Racinbob said:

No, the pins are fine. The shaft is stationary. The gear spins on the shaft. There's a bronze bearing in that gear. :)

:wacko:duuhh u said that in your first post...sorry I didn't catch that the first time u said it ""spins on the "shaft""... Thanks for your patience. my brain is spinning from all the heat and plumbing fumes today

  • Like 1

Share this post


Link to post
Share on other sites
 

Create an account or sign in to comment

You need to be a member in order to leave a comment

Create an account

Sign up for a new account in our community. It's easy!

Register a new account

Sign in

Already have an account? Sign in here.

Sign In Now

  • Similar Content

    • wh315-8
      By wh315-8
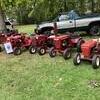
      The RJ58 was the big hit for spectators this year at my local festivals here in Carroll County OH. 
      the children loved getting their pictures sitting on it, then they discovered the bicycle horn under the steering wheel. It’s always a joy even in parades. Just love showing off part of my collection every year and hearing all the stories from those that had WH in their lives at one time. Can hardly wait to get to retirement so I can get some of my other models back to their glory in working order and be able to attend other shows/festivals throughout the year. My fellow tractor enthusiasts always know when a spectacular starts asking about WH, they point in my direction. I study up on the history of the different models and always intrigue those that didn’t know much about how WH came to be. This website is one place that has helped me learn so much about the WH history and I thank you for sharing your knowledge that I am able to pass on to keep WH alive and well.


    • Vaughan32850
      By Vaughan32850
      Has anyone got a WT-30 tiller they can send pictures if pleas? It’s the one fitted with a K91 engine for RJ models. 
      Many thanks

    • Jennifer
      By Jennifer
      Husband wants some advice… lol.  So we did an engine swap today on two suburbans because we could not get the one engine to spark all the time to get it running!  The engine ran last year before parking for the winter sleep…. Points were changed out for new the engine was cleaned to make good contact has new spark plug new coil condenser we even switched out the fly wheel today thinking maybe the magnet was weak…. Advice???   It would where are you out yanking on the recoil five or so times and maybe only get the points to fire twice if you’re lucky..  checked the gap and pull again… same thing over and over!  Thanks in advance!
    • Jeff-C175
      By Jeff-C175
      Detailed wiring from the Demystification Guide #492-4509
      4 pages 1.4MB Color
      p7-67 to p7-70
       
      Onan powered
       
      1989 416-8 model 31-16O801
    • Jennifer
      By Jennifer
      Well my husband got new grownup toys!  Lol. Just wanted to post them on here to share!  Sure most seen for sale but they arrived yesterday at our back door glad we found them before it rained again!  Not sure why delivery person made the effort to go to the back of the house…. 🤔🤯


×
×
  • Create New...