Jump to content
WELD

Intro and Resto-Mod questions (Lots pics)

Recommended Posts

WELD

Hey guys, new to the site, going to kill two birds with one thread and combine my build into an intro also.

Tony from MA, picked up a few wheel horses last season, an RJ and a 502, sold the 502 and am now finding time to start a little resto/mod on my RJ. I started disassembling it yesterday and have a few questions maybe you all could help out with. 

My plans are not to give it a full factory restoration because of time/funds and overall shape of the unit as it stands.

So i have a few motors to chose from laying around the shop and some other parts i am going to be using.


so the first and most important question is transmission seals and bearings. Is there a source i can buy a kit or any one place i can itemize and order all the bearings and seals I need?


also whats the best fitting off the shelf style replacement fuel tank? 


Here are some pictures, 

23934365371_29cf465789_b.jpg

29443473914_3f8a38d370_b.jpg

29777071230_b60ed1289d_b.jpg


29444265833_f0031b12c8_b.jpg

29443438904_5dd2dc5327_b.jpg

29777054350_c63c75069e_b.jpg

When i first opened the case i was a little disappointed but i knew it was not going to be pretty from the water i drained out of it. but luckily 

29444248783_23ef29e4c9_b.jpg

But a quick wipe down revealed that they gears and case were pretty well protected by a layer of grease before the water intrusion so off to the hot tank for everything.

29777045920_ef12f438b1_b.jpg

29777042540_dfdcf1ddc0_b.jpg


So these are the bearings and seals i am looking to replace. 

29987712281_231e183d65_b.jpg

29444235183_a3e7fb5b25_b.jpg

29987709751_e1b7bba24a_b.jpg


I will also be needing a set of front wheels.

29987708621_a1eb151871_b.jpg

29443437694_8fac2db86a_b.jpg


stay tuned this project is hopefully going to make ground quickly. 

Edited by WELD
  • Like 7

Share this post


Link to post
Share on other sites
 
AMC RULES

Message member Jake Kuhn here...

http://www.wheelhorseforum.com/profile/4240-jake-kuhn/

offers complete kits to redo all the seals and bearing inside your trans.

           :WRS:


  • Like 3

Share this post


Link to post
Share on other sites
 
WELD

great thanks, message sent!

  • Like 1

Share this post


Link to post
Share on other sites
 
953 nut

:WRS:  When it comes to rebuilding an RJ transmission you couldn't ask for a better resource than this thread. :text-coolphotos:

Look forward to seeing your project come together;    :wwp:

  • Like 1

Share this post


Link to post
Share on other sites
 
WELD

 thanks, I will read through that thread tonight. 


Share this post


Link to post
Share on other sites
 
Walt

Welcome to Red Square.

Share this post


Link to post
Share on other sites
 
WELD

would i be correct in saying this is an RJ58? As i look up pictures I am seeing a lot of variations of options in all the photos i see.

It appears my hitch has been modified  and i want to try and make it lift and lower again. Someone at one point just made a bracket and had bolted it to the seat mounting holes so it was permanently up. and they did some horrible welding to it that i plan on removing. 


Share this post


Link to post
Share on other sites
 
WELD

Also I'm trying to find reference photos of what a original fuel tank should have been like and how it was mounted. Mine was bolted to the hood via 2 straps that were drilled into the sides where the logo would have been. Its looking like that was also a modification. 

I'm looking at maybe replacing it with a plastic tank from a snowblower or something. but i may try and fill all the drilled holes in the hood before i paint. so i can't mount it the way it was when i got it. 

Share this post


Link to post
Share on other sites
 
JERSEYHAWG /  Glenn

:wh:        :text-welcomeconfetti:        :wh:       glad you found us.


Glenn

Share this post


Link to post
Share on other sites
 
AMC RULES

I've read, being that no one has ever produced a surviving example of an original 1959 ID/serial # decal...

so currently, all are considered to be '58 Ride-Away Juniors...regardless of the date code on the trans.  

The original tank straps were just spot welded to the underside of the hood...

and typically, get incorrectly repaired the way you've found yours. 

Share this post


Link to post
Share on other sites
 
WHX??

Good luck on your resto and :WRS:

Lowell @wheelhorseman1000 should have a lift cable that will get that hitch going again

Share this post


Link to post
Share on other sites
 
WELD

great thanks for the info guys, glad i signed up before doing this. saving myself a lot of time. I made some progress on the case internals and some of the bits today.

ran them through the hot tank and the gears actually came out looking great judging by some of the other threads i have seen with mashed gears and bad teeth.

30012180381_3a9d36815d_b.jpg

29467561104_cb5313095c_b.jpg


Grit blast revealed a crack in the plow frame. I will repair it but i dont think i will be putting it back on because i dont see me using it. we will see.

29467956943_9489344680_b.jpg

A shoddy repair which lastedd but wont be getting re-installed.

30012163191_545d5d2bdf_b.jpg


And can someone tell me what parts of this hitch are supposed to be there and whats been modified. I have never seen such bad welding in a piece of machinery than some of this haha.

29467556044_8dca3b8920_b.jpg

29467959153_bb35586a10_b.jpg


Edited by WELD

Share this post


Link to post
Share on other sites
 
WHX??

Looks to me you need no help ...nice job on cleaning up the gears!:handgestures-thumbupright:


18 minutes ago, WELD said:

have never seen wi=uch bad welding I

unfortunately we have :( ...someone added those angle thingys for some reason....hitch should look like this..... photo courtesy of @MikesRJ I believe

039f_thumb_jpg_8a15122aac0b3f757d7229dccc0d01bf.jpg

oh on the other pic with the twisted metal welded on it ... I have no idea hopefully others will chime in...I'm thinkin it doesn't belong at all??

Share this post


Link to post
Share on other sites
 
WELD

my guess is someone added the twisted metal to add rigidity, or maybe it bent at one point and thats ones way to strengthen it. I think i can build a turnbuckle style link to replace it.  

thanks for that picture! it answers a few questons i had. i take it that cable pictured is what would have originally gone to the lever? 

I see you made a new rod to mount the hitch (pivot) Mine is severely pitted. a simple enough piece to make i like the use of the pins over the C-clips


going to strip the seals and clean up the 3 pieces of the case next.


Still unsure what i'm going to do with the fuel tank situation. I would like to weld up all the extra holes in the hood and make it smooth again. has anyone ever deleted the filler neck hole and mounted a tank lower on frame with a vacuum pump? This is the route i am currently tossing around in my head. if i'm going to be spending the time filling the holes i may as well fill them all. i figure.


Share this post


Link to post
Share on other sites
 
WELD

A hunting trip last week got in the way of progress on this project. But i'm back at it today, sorry for the delay.  I was able to get the trans put back together took a few photos. but not very many photos because i would have had to wash my hands every 2-5 minutes to run the camera phone. 

After assembly it is much tighter and smoother than before.no more axle slop. I don't think the differential was even working corectly before, and the shift linkages were not working correctly either.

Turned out the little spring and pin was rusty and the detent balls were getting caught up a bit.

I also gave the inside a coat of glyptal after I bead blasted the whole thing. 


I found a rubber bellow in Mcmaster that looks like it will work for the shifter boot. what's everyone else using?

http://www.mcmaster.com/#9744k12/=14qelan


Once the sealant sets up on the gasket I am going to replace all the bolts with new ones and will be sealing them up. 

I only had one hiccup during assembly and luckily it was early on. I installed the new bushings in the diff and completely forgot they came long so i pressed them out to leave clearance for the pinion gear and just turned them down in place.

I didn't have a puller that would work with that small a bearing so i welded 1/4" bolts to the bearing races and just used a slide hammer.

here's a few pics

29899510023_44a74d5da9_b.jpg

30415809152_4429309244_b.jpg

30415809172_dd809c52bc_b.jpg

30415811182_ec877b8100_b.jpg


trans-Done

next step is the chassis.

I have been soaking the foot pedals in PB blaster and have put them through a few heat cycles in the last couple week. going to attempt to separate them hopefully they budge. I may have to build some kind of puller. 


  • Like 4

Share this post


Link to post
Share on other sites
 
AMC RULES

You're making some great progress...    :clap:

type in "wheel horse boot" into the Ebay search window.

Share this post


Link to post
Share on other sites
 
WELD

I had a set of AG style 4.80/4.00-8 tires from a national mower that I was thinking of running in the front and it would kind of match the rears, that way the front aren't brand new and the rears used.

Still trying to track down a decent set of front wheels. I couldn't bring myself to buy the ones from TSC that come with tires. they just felt too flimsy to me.


Share this post


Link to post
Share on other sites
 
DennisThornton
On 10/3/2016 at 3:41 PM, WELD said:

great thanks for the info guys, glad i signed up before doing this. saving myself a lot of time. I made some progress on the case internals and some of the bits today.

ran them through the hot tank and the gears actually came out looking great judging by some of the other threads i have seen with mashed gears and bad teeth.


Grit blast revealed a crack in the plow frame. I will repair it but i dont think i will be putting it back on because i dont see me using it. we will see.


A shoddy repair which lastedd but wont be getting re-installed.


And can someone tell me what parts of this hitch are supposed to be there and whats been modified. I have never seen such bad welding in a piece of machinery than some of this haha.


I've seen far worse welds than those!  Far worse!  But those are still pretty bad!  You're making good progress!  Thanks for sharing!  And Welcome to the forum!

Share this post


Link to post
Share on other sites
 
wallfish

Nice job on saving that poor neglected RJ.


--PLEASE don't fill the filler neck hole in the hood. Good hoods are difficult to find and you'll definitely kill the value of it if you do. Seems simple enough to just weld new straps to it to hold a tank since you're already filling other holes!

--The steering link with that twisted steel welded to it can easily be reproduced by bending some round bar. 

--Original style front rims that fit the spindles are tough to find since they are always in high demand but it's not the end of the world if you have to shim some.to fit.

--The original gas tank is a larger oval Kohler tank,


  • Like 1

Share this post


Link to post
Share on other sites
 
WHX??

Nice work on the tranny and yes the shifter boot can be had just about anywhere ...P/N 3577..... google 3577 boot

Share this post


Link to post
Share on other sites
 
WELD

Some great info on here! thanks guys. 

Funny, I never even thought to google for the shifter boot figured it was some out of this world hard to find item. 

Same with the tank, turns out they are not as hard to find if you know the right keywords to punch into a search. 


Trying to weed out some skinny wheels on ebay proves to be a little harder because some sellers don't offer all the info you need. Seems like 8x5.5 wheels are much easier to find. but they probably wont work with my tires.

I was mistaken, they are 4.00-8 either way i think they would look pretty cool.

The rims that they were on were a 2 peice rim and the hub is a drive hub. I could use them if i machined a bushing to adapt them to the front spindles but it would require a lot of cleanup work on the wheels themselves. so at this point an off the shelf option would be ideal.

 these are the 2 piece wheels

29906534314_1a994de9a3_b.jpg

29906533644_3c637c2507_b.jpg

30238837730_c2ecc83d5a_b.jpg

Share this post


Link to post
Share on other sites
 
WHX??

I like the two piece rims. Clean them up, paint & some stainless allen head fasteners to hold them together & hubs. Definitely would be custom! Have to run tubes tho. Could you bore the hubs to 1 3/8" and run standard flanged bearings? Looks like some spacers might have to made too. Lotsa work I know but those OEM  rims are are to find.


Would these work?

http://www.millertire.com/products/lawn-garden-tires/4-00-8/8x3-75-steel-wheel-3-hub-3-4-bearing/


BTW @wheelhorseman1000 has the boots too... nothing like patronizing a fellow member!!

Edited by WHX8

Share this post


Link to post
Share on other sites
 
WELD

Thanks, I ordered a boot about 1 minute after that post about them being on ebay :handgestures-thumbupright:


Well the foot rests came off no problem. however the pedal did not. Broke one of the welds off the sleeve that seized on the shaft. 

I am going to have to cut it lengthwise to remove it i think. I already spent more time than I would like to on trying to remove it without harming it. 


But here is the kicker. Every picture i google of that pedal shows something similar but not the same. I'm thinking it might not be the right one to begin with? I have never ran one of these tractors before so im not even sure what that pedal would have been hooked to because it had no linkage on it when i got it.


30240390880_dcf908bee2_b.jpg

30422111022_0599541404_b.jpg

30538611375_dc2dccff59_b.jpg


Edited by WELD
  • Like 1

Share this post


Link to post
Share on other sites
 
CasualObserver

That right side pedal went with the snow blade. There was a little chain that ran to a pin on the blade. Push pedal... pulled chain, then you could swing blade to left or right using ropes tied to the top corners of the blade... just like the lever adjustment on the later snow blades.

You can see and example of the rope for angling the blade in the picture in this post....


Share this post


Link to post
Share on other sites
 
russellmc301

lookin great:woohoo:

im glad i got referenced:ychain:

Share this post


Link to post
Share on other sites
 

Create an account or sign in to comment

You need to be a member in order to leave a comment

Create an account

Sign up for a new account in our community. It's easy!

Register a new account

Sign in

Already have an account? Sign in here.

Sign In Now

  • Similar Content

    • wh315-8
      By wh315-8
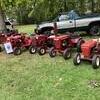
      The RJ58 was the big hit for spectators this year at my local festivals here in Carroll County OH. 
      the children loved getting their pictures sitting on it, then they discovered the bicycle horn under the steering wheel. It’s always a joy even in parades. Just love showing off part of my collection every year and hearing all the stories from those that had WH in their lives at one time. Can hardly wait to get to retirement so I can get some of my other models back to their glory in working order and be able to attend other shows/festivals throughout the year. My fellow tractor enthusiasts always know when a spectacular starts asking about WH, they point in my direction. I study up on the history of the different models and always intrigue those that didn’t know much about how WH came to be. This website is one place that has helped me learn so much about the WH history and I thank you for sharing your knowledge that I am able to pass on to keep WH alive and well.


    • CasualObserver
      By CasualObserver
      Operator manual
      Illustrated parts list
      6 pages 3.73MB
       
      Illustrated parts list #A-7136
      Includes PSB #023 #052 #058 #060 #080
      10 pages 938.48KB
       
      Engines used according to Toro
      Clinton B1290-1107
      Kohler K91-31307A
      Kohler K91-31388A
      Electric start kit
      Electric starter kit model EC-35 for Clinton engine - Listed for 1958 and 1959
      Electric starter kit model EK-35 for Kohler engine - Listed for 1958 and 1959
       
      6-12 tire chains model TC-12 - Listed for 1958 and 1959
       
      Seat cushion Foam rubber with imitation leather cover model FC-24 - Listed for 1958 and 1959
       
      Transmission drive belt 1567 - (4L x 29" or 1/2" x 29")
       
      Details & Attachments
      2 pages 107.33KB
       
      1958 model RJ-58
      1958 serial numbers that have shown up for the RJ-58
      Early models used Kohler K90T-27107D equipped with a Schnacke recoil unit with a backup rope starter contained under the recoil assembly and an oil bath air filter.
      00005
      00251
      01099 - No casting date on trans. Leather gearshift boot, large, round rear wheel hubs, "slab" hitch, replacement engine
      01188 - Has round rear wheel hubs
      01516
      01768
      01789 - No casting date on trans. Leather gearshift boot, 3-ear triangular rear wheel hubs, "slab" hitch, Clinton engine with Schnacke recoil
      01797
      01871
      02525
      03177
      03501 - Located in UK
      03796 - Kohler K90T-27107D with serial 364044 equipped with a Schnacke recoil unit with a backup rope starter contained under the recoil assembly and an oil bath air filter.
      04883
      04885
      05000
      05619
      05714
      05798
      06528 - May be 16528
      06749
      06771
      07633
      07649 - Transmission J12-8 October 12, 1958
      07725
      08440
      08612
      09284
      09337 - Hard to read
      10163
      11432
      11628 - # 3521 spline gear with 10 splines changed to 11 splines in 5003 and 5010 transmissions at serial # 11628 PSB #023
      11916
      12221 - B3-9 trans casting date - Kohler K91 engine with Schnacke recoil
      12291
      14473
      14713
      16097
      16528 - May be 06528
      166x6
      16868 - F4-9 trans casting date - Kohler K91 engine with Fairbanks recoil, solid pan seat without holes
      18348
      June 2023
      18500 and lower 
      Late 1958 units came with a Kohler K-91T-31307A equipped with a Schnacke recoil unit with a backup rope starter contained under the recoil assembly and an oil bath air filter.
      ------------------------------------------------------------------------------------------------------------------
       
      Details & Attachments
      2 pages 106.94KB
       
      1959 model RJ-59
      1959 serial numbers that have shown up for the RJ-59
      Early 1959 units came with a Kohler K-91T-31307A equipped with a Schnacke recoil unit with a backup rope starter contained under the recoil assembly and an oil bath air filter.
      18501 and up - Possible 1100 units built
      20078 - Located in UK
      203xx
      21033
      292xx
      21900 - 1960 Suburban 400 began production at serial #21900 somewhere around Aug-Oct 1959.
      Late model RJ-59 tractors with a Kohler would have a K-91T-31388A with the Fairbanks recoil starter and paper air filter element. The 31388A was also used on the 1960 Suburban 400.
      K91T-31388A Serial 425251 found on RJ-59
    • Vaughan32850
      By Vaughan32850
      Has anyone got a WT-30 tiller they can send pictures if pleas? It’s the one fitted with a K91 engine for RJ models. 
      Many thanks

    • Jennifer
      By Jennifer
      Well got my new weight yesterday!  My valentines gift from my husband now has the front weight less likely to pop those wheelies!!!!  There might be enough power still but doubt it…. He bought me the RJ from David in Arkansas a few years back we posted on the trip!  The moment we saw the ad on here about the front weight we had to have it!  Seize the moment, don’t know when ever come across another for sell…!  So here I just wanted to share pictures of it!  My tractor is a bit dirty from winter setting but i wipped it down just a little for the photo opt!!  


    • Vaughan32850
      By Vaughan32850
      Let’s see all the RJ’s and suburbans that are in Europe / United Kingdom. Here’s my two RJ-58’s. 


×
×
  • Create New...