By
boovuc
Well the Grange Fair was a short visit!
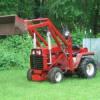
Started uninterrupted work on the loader at about 1:30 this afternoon. Finished at 8:20! It was worth it. After some cutting, grinding, filing and minimal cursing because I had no time constraints, I got it on. Thanks to my Karen who slid the tractor under the mount while I held the frame up. (Never made the stands. Used the brace arms to get it off the blocks). No leaks, no seeps, no noises, and full function of everything. Pump is very quiet and barely moves the vacuum gauge on the tractor. Much less work for the motor than my 48 inch mower deck.
I didn't put the rear weight on so I took it easy and made sure everything was primed in the lines. Plenty of down pressure and fast movement. A big thank you to Malmac, Scott, Wallfish and the others who offered advice and posted pics of their loaders. The biggest pains in putting this on a 520 since it wasn't factory designed for any of the Onan powered tractors was the pump mount and the lever release/lock Attach a matic that is used on the newer tractors and the 1991 520-H. (My 1992 416-8 didn't have the lever design).
It required cutting out a long skinny triangle from the thick metal original sub frame to allow alignment of the frame holes and shortening the actual lever. (The frame cut took three cutting disks and a good portion of a fourth). I also had some issues with the nut/bolt used on the front mounting bracket. The first frame hole on each side has VERY little room to start a nut. (Because of the gear reduction steering assembly). On the positive end, the factory brace arms leave plenty of clearance around the Onan and hood. My suction line to the pump will need moved since it is in harms way. I think the pump is OK where it is at with a guard to be made soon. I'll work it harder on Monday and really heat the oil up and check again for leaks or seeps again. I do have to weld a wallowed loader lift cylinder pin hole but even it isn't too bad. The others are real tight. Not bad for as old as it is and for 500 bucks.
This was always a real want for me so please excuse my over exuberance. This makes the beginning of the work week a joy! It might take until noon at work tomorrow to wipe this grin off my face!
 By edwroy
 By boovuc
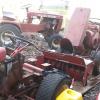 By chevyaddict83
 By prondzy
 By bo dawg