AlexR 3,013 #151 Posted August 14, 2025 9 hours ago, WHX?? said: Save your money on that flea bay crap I will look when I get home. Sure I have one that will work. Up nort right now so it may be abit. Since yer a plow bro yours for shipping. I didn't know there was just a exclusive benefit to be one of the plow guys Thanks! 1 1 Share this post Link to post Share on other sites
WHX?? 56,916 #152 Posted August 14, 2025 O 2 hours ago, AlexR said: I didn't know there was just a exclusive benefit to be one of the plow guys Thanks! Oh yeah... choice cocktails... parts exclusives ... free plowing advice ... 3 Share this post Link to post Share on other sites
rjg854 13,102 #153 Posted August 15, 2025 13 hours ago, WHX?? said: O Oh yeah... choice cocktails... parts exclusives ... free plowing advice ... he forgot to add.... bull hockey 1 1 1 Share this post Link to post Share on other sites
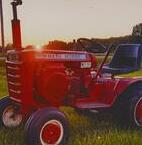
AlexR 3,013 #154 Posted August 16, 2025 My headlight idea in progress. 6 Share this post Link to post Share on other sites
SylvanLakeWH 31,569 #155 Posted August 16, 2025 Nice!!! 1 Share this post Link to post Share on other sites
AlexR 3,013 #156 Posted August 16, 2025 Changed the color. Realized black doesn't really match the Wheelhorse logo so sprayed some grey metallic paint on. The reason the backing plate is taped off is I am going to epoxy the lights and logo to it and wanted to bond to the aluminum itself instead of paint. 4 Share this post Link to post Share on other sites
AlexR 3,013 #157 Posted August 16, 2025 I think I am going to trim down the plastic Wheelhorse piece about 1/4" so the edges match the lights. 1 3 2 Share this post Link to post Share on other sites
SylvanLakeWH 31,569 #158 Posted August 16, 2025 Looks great! 1 1 Share this post Link to post Share on other sites
AlexR 3,013 #159 Posted August 16, 2025 7 minutes ago, SylvanLakeWH said: Looks great! Thanks! I was hoping it would haha I wanted something that looked kinda like it did originally, but with much better light output. Also the original lens in good shape are expensive and as time goes on there is less and less of them. 3 Share this post Link to post Share on other sites
953 nut 66,740 #160 Posted August 17, 2025 On 8/14/2025 at 7:34 PM, WHX?? said: Oh yeah... choice cocktails... parts exclusives ... free plowing advice ... And Frequent Furrow Points which are redeemable at the next plow day. 4 Share this post Link to post Share on other sites
AlexR 3,013 #161 Posted August 17, 2025 Headlight mod is done. It is a long way from lighting it up though I think I got ahead of myself a little here haha. 3 5 Share this post Link to post Share on other sites
kpinnc 18,521 #162 Posted August 17, 2025 Kinda looks a little grumpy. Very cool! 1 1 2 Share this post Link to post Share on other sites
WHX?? 56,916 #163 Posted August 19, 2025 (edited) On 8/13/2025 at 7:21 PM, AlexR said: 20 1/4" total length. The part number is 7447 The hole for the steering wheel roll pin is at 18 3/4" Measured from the male end below the pinion right? Will look today. BTW the head light thing is pretty cool ... Edited August 19, 2025 by WHX?? 1 1 Share this post Link to post Share on other sites
AlexR 3,013 #164 Posted August 19, 2025 3 hours ago, WHX?? said: Measured from the male end below the pinion right? Will look today. BTW the head light thing is pretty cool ... Correct that is the entire length of the shaft. While you are looking if you see a PTO bracket I would appreciate it! Thanks!! 2 Share this post Link to post Share on other sites
AlexR 3,013 #165 Posted August 20, 2025 (edited) Ohh boy... So started welding up cracks and holes. So the hood is a lot rougher then I realized it has a good bit of bondo in it. It's fixable I believe but gonna be some work. Already hammered some but it's gonna be a lot of hammering and then bondo as thin as possible. Might look for some hoods locally as well. One of the hood mount brackets was welded on at one end. So cut it off and got that part of the hood fixed as well. Next is the seat pan had a bunch of cracks and holes that needed filled. Seat mount had cracks as well. Thinking about taking those metal bars that were on the seat springs to strengthen the whole seat pan mounts Also welded the sleeve hitch. Wire stopped feeding halfway through the weld so its got a little clump in the middle but good enough. Edited August 21, 2025 by AlexR 7 2 Share this post Link to post Share on other sites
SylvanLakeWH 31,569 #166 Posted August 20, 2025 Between @Pullstart, @Achto and @WHX?? I bet you could get 35-40 hoods and fender pans... just sayin' ... 2 5 Share this post Link to post Share on other sites
AlexR 3,013 #167 Posted August 20, 2025 3 minutes ago, SylvanLakeWH said: Between @Pullstart, @Achto and @WHX?? I bet you could get 35-40 hoods and fender pans... just sayin' ... This is a fender pan from Pullstart 1 5 Share this post Link to post Share on other sites
SylvanLakeWH 31,569 #168 Posted August 21, 2025 37 minutes ago, AlexR said: This is a fender pan from Pullstart That explains it... 2 2 Share this post Link to post Share on other sites
AlexR 3,013 #169 Posted August 21, 2025 9 hours ago, SylvanLakeWH said: That explains it... Still in much better shape then the original one. 3 Share this post Link to post Share on other sites
ebinmaine 79,197 #170 Posted August 21, 2025 12 hours ago, AlexR said: is the seat pan had a bunch of cracks and holes that needed filled. Seat mount had cracks as well. Thinking about taking those metal bars that were on the seat springs to strengthen the whole seat pan mounts Having repaired or modified several of these myself there are two things to watch that'll add up to the seat latch not working right. 1. The catch bar gets thin or outta line. Look where the latch hits the bar. You can add a bead of weld to the bad spot(s) and grind that back to flat. 2. The bolt holes for the seat springs. You're already repairing them. Be aware that an added piece that's too thick will prevent the whole fender from setting down enough for the latch to work. Looks good so far! 1 1 Share this post Link to post Share on other sites
AlexR 3,013 #171 Posted August 21, 2025 1 hour ago, ebinmaine said: Having repaired or modified several of these myself there are two things to watch that'll add up to the seat latch not working right. 1. The catch bar gets thin or outta line. Look where the latch hits the bar. You can add a bead of weld to the bad spot(s) and grind that back to flat. 2. The bolt holes for the seat springs. You're already repairing them. Be aware that an added piece that's too thick will prevent the whole fender from setting down enough for the latch to work. Looks good so far! I was actually thinking of cutting out the seat pan mount off the original pan to use on this one since that is a one piece between the rear hinge mount to the front latch bar seems it would be little stronger. But the issue is that one was all chewed up on that front bar like you mentioned and then there was a washer welded to one of the mounting holes. So decided to go with the ones already on this seat pan as they are in much nicer shape. 1 Share this post Link to post Share on other sites
AlexR 3,013 #172 Posted August 21, 2025 Still working on the hood, hammered more dents out of it mainly at the bottom of the hood. Stripped most of the paint off it, it's got some dents and such on it. Lots of bondo, I will try to reduce that amount. 3 2 Share this post Link to post Share on other sites
Retired Wrencher 6,734 #173 Posted August 23, 2025 Alex looks like you’re doing a lot of good work on this one. It reminds me of the 1056 that I have was not taken care of very well over the whole two years now been taking my time fixing all the ghosts in it. Lol. Enjoy the project. 1 1 1 Share this post Link to post Share on other sites
AlexR 3,013 #174 Posted August 23, 2025 8 hours ago, Retired Wrencher said: Alex looks like you’re doing a lot of good work on this one. It reminds me of the 1056 that I have was not taken care of very well over the whole two years now been taking my time fixing all the ghosts in it. Lol. Enjoy the project. Thanks! Yeah I am struggling with the dilemma that this will be a tractor that is worked. I want it to look nice and it's all stripped down so if I am spraying paint on it, now is the time to get it smooth. But I also want to get it done lol 2 Share this post Link to post Share on other sites
AlexR 3,013 #175 Posted August 23, 2025 I think I got the hood to a point I don't think it beating on it more is going to help. Before After 3 2 Share this post Link to post Share on other sites