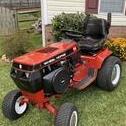
Horse Newbie 6,940 #326 Posted November 14, 2021 Almost finished wire brushing the parts to be painted Satin Black, except for the dash… whole lot more fun putting the Horse back together than wire brushing and sanding… painting is pretty fun… 2 Share this post Link to post Share on other sites
Handy Don 10,703 #327 Posted November 14, 2021 6 minutes ago, Horse Newbie said: over the detent screw and now it looks like the screw may poke a hole in the boot The screw seems like it is out a bit far. Is it fully seated? (Sorry about the "bare ankle" of your shifter!) Share this post Link to post Share on other sites
Jeff-C175 7,195 #328 Posted November 15, 2021 Just a little reminder about those hub set screws: You'll never get them tight enough with an open end wrench. They should be torqued to 25-30 ft lb. You'll need a ratchet and an 8 point socket. I fought with mine for years before I broke down and got the correct tool. They don't loosen up any more. OH, one more thing... use new set screws. 1 Share this post Link to post Share on other sites
Handy Don 10,703 #329 Posted November 15, 2021 I happened across a set of impact-grade deep 8-point sockets at a "flood sale". I thought, flood can't hurt a socket set unless you let them rust so I nabbed them. I use them A LOT! 1 Share this post Link to post Share on other sites
Horse Newbie 6,940 #330 Posted November 15, 2021 40 minutes ago, Handy Don said: The screw seems like it is out a bit far. Is it fully seated? (Sorry about the "bare ankle" of your shifter!) I believe I have the detent screw adjusted correctly… I screwed it in… shifter was in a bind… so I adjusted it so that the shifter works without binding. And maybe I should not have, but I did coat the ball on the shifter that the detent screws in it with a little grease. I hate I have that “bare ankle” too, but I actually painted the shifter farther down than it was… I was surprised the boot did not cover it. 1 Share this post Link to post Share on other sites
Horse Newbie 6,940 #331 Posted November 15, 2021 (edited) 37 minutes ago, Jeff-C175 said: Just a little reminder about those hub set screws: You'll never get them tight enough with an open end wrench. They should be torqued to 25-30 ft lb. You'll need a ratchet and an 8 point socket. I fought with mine for years before I broke down and got the correct tool. They don't loosen up any more. OH, one more thing... use new set screws. I have a set of 8 point sockets… I tightened them with an open end wrench. Do you reckon I could loosen the jam nut, and check them with a torque wrench ? Edited November 15, 2021 by Horse Newbie Share this post Link to post Share on other sites
Jeff-C175 7,195 #332 Posted November 15, 2021 15 minutes ago, Horse Newbie said: reckon I could loosen the jam nut, and check them with a torque wrench ? Yepper. Share this post Link to post Share on other sites
Horse Newbie 6,940 #333 Posted November 15, 2021 Just now, Jeff-C175 said: Yepper. Now the catch is my torque wrench is 1/2 inch drive, and my 8 point sockets is 3/8ths drive… and I’m not sure I have a 1/2 to 3/8ths adapter… Share this post Link to post Share on other sites
ebinmaine 63,377 #334 Posted November 15, 2021 52 minutes ago, Jeff-C175 said: Just a little reminder about those hub set screws: You'll never get them tight enough with an open end wrench. They should be torqued to 25-30 ft lb. You'll need a ratchet and an 8 point socket. I fought with mine for years before I broke down and got the correct tool. They don't loosen up any more. OH, one more thing... use new set screws. Jeff, I learned a neat trick many moons ago. I was taught to ONLY do this with a wrench 🔧. Not a socket because you lose track of the clock position of the tightened screw. Tighten the set screw. Loosen it. Tighten it. Repeat this 3 or 4 times. As you go through the sequence you'll notice the wrench going a few more degrees each time. That's the set screw digging in just a bit to the base where it grabs. Definitely agree with use new set screws. I was told by GM techs they were designed to be tightened ONLY 2 OR 3 TIMES. Since we don't usually know what the actual usage is, just replace. Also, don't get too heavy handed on the jam nut. 3 Share this post Link to post Share on other sites
Jeff-C175 7,195 #335 Posted November 15, 2021 4 minutes ago, ebinmaine said: lose track of the clock position of the tightened screw. I don't understand why that's important? Agree on the tighten loosen sequence. It's dang near impossible to get 25 ft lb out of an open end wrench unless you're Popeye! 2 1 Share this post Link to post Share on other sites
Lee1977 6,274 #336 Posted November 15, 2021 24 minutes ago, Jeff-C175 said: I don't understand why that's important? Agree on the tighten loosen sequence. It's dang near impossible to get 25 ft lb out of an open end wrench unless you're Popeye! You can with a 12" adjustable. I also have a 15" adjustable if the 12 is not enough. 3 Share this post Link to post Share on other sites
Snoopy11 5,713 #337 Posted November 15, 2021 1 hour ago, Jeff-C175 said: Just a little reminder about those hub set screws: You'll never get them tight enough with an open end wrench. They should be torqued to 25-30 ft lb. You'll need a ratchet and an 8 point socket. I fought with mine for years before I broke down and got the correct tool. They don't loosen up any more. OH, one more thing... use new set screws. I always use my impact... never had one loosen yet... Don Share this post Link to post Share on other sites
ebinmaine 63,377 #338 Posted November 15, 2021 1 minute ago, Jeff-C175 said: I don't understand why that's important? By using a solid wrench that doesn't click back like a ratchet the exact position of stopping at "tight" is easily seen. Let's say you stop the wrench at 3 on a clock the first time. Then loosen and tighten again. It should stop a little further along. Repeat a few times and you'll gain several degrees. That's how I was taught to know the set screw is ... Set. 26 minutes ago, Jeff-C175 said: get 25 ft lb out of an open end wrench unless you're Popeye! Those unfortunate enough to have met me can confirm.... I'm ... Not small. 🐻🐻🐻 I actually bought a torque wrench so I'd stop overtightening and breaking bolts. 😳😳😳 1 2 Share this post Link to post Share on other sites
Snoopy11 5,713 #339 Posted November 15, 2021 29 minutes ago, Jeff-C175 said: It's dang near impossible to get 25 ft lb out of an open end wrench unless you're Popeye! Meh... for me (and Mr. P... @Pullstart) it isn't a problem of strength... it is about not stripping the darn bolts... Don 1 Share this post Link to post Share on other sites
Jeff-C175 7,195 #340 Posted November 15, 2021 1 minute ago, ebinmaine said: torque wrench so I'd stop overtightening That's actually what I use mine for the most! Not to make sure tight enough, I have no problem with that either. 2 Share this post Link to post Share on other sites
Snoopy11 5,713 #341 Posted November 15, 2021 5 minutes ago, ebinmaine said: I actually bought a torque wrench so I'd stop overtightening and breaking bolts. Yeah, really... using an open-end for me is the equivalent of using a breaker bar... as I never know when to stop tightening if I don't use a torque wrench... Don 1 Share this post Link to post Share on other sites
Snoopy11 5,713 #342 Posted November 15, 2021 I should add that for those hub bolts... I have an attachment for my impact... which looks like a square socket ...believe it or not... that fits the hub bolts. I believe it is a 1/2 square... (not positive on that... but I think it is...).. De... problem is... when I need the square socket attachment... I never seem to know where it is... Don 1 Share this post Link to post Share on other sites
Snoopy11 5,713 #343 Posted November 15, 2021 Oh, by the way, my impact attachment thingy looks exactly like this... basically 2 female ends... it is called a "pipe-plug socket." I never knew it had a name until I asked Google... You can always lube-up one end to make sure it comes off the impact easier when you want to remove it... aye Jeff? Don 2 Share this post Link to post Share on other sites
Snoopy11 5,713 #344 Posted November 15, 2021 26 minutes ago, ebinmaine said: I'm ... Not small. Don 3 Share this post Link to post Share on other sites
Jeff-C175 7,195 #346 Posted November 15, 2021 (edited) 8 minutes ago, Snoopy11 said: Don Edited November 15, 2021 by Jeff-C175 1 1 Share this post Link to post Share on other sites
Pullstart 59,958 #347 Posted November 15, 2021 @Horse Newbie congrats on the progress of the chassis! I remember in 2018, the accomplishment I felt on Putt Putt when it finally sat down on 4 tires. To quote my build thread, “alas, I started some chassis assembly! I have to be honest here... I see a lot of pictures similar to this, where someone posts a frame with a few parts bolted on. Not that exciting until you realize how much work goes into getting ready for that moment! I am proud of this pic, there's more time and effort (err... Coffee/Pabst/Coors) into this than I thought it might take! Heading to bed early tonight, 2am has been the norm since Sunday, still up around 6 or 6:30. Time to shut my eyes for more than a nap.” Again, congrats! 2 1 Share this post Link to post Share on other sites
kpinnc 10,953 #348 Posted November 15, 2021 (edited) 17 hours ago, Horse Newbie said: Almost finished wire brushing the parts to be painted Satin Black, except for the dash… whole lot more fun putting the Horse back together than wire brushing and sanding… painting is pretty fun… Looks like black windchimes are the order of business! Always nice when the wife wants me to explain why the garage door track looks like a clothes line! Edited November 15, 2021 by kpinnc 1 Share this post Link to post Share on other sites
peter lena 8,113 #349 Posted November 15, 2021 @Horse Newbie nice going on that , love heim joints , my steering , pto foward lever end , snow plow , as you make up levers and linkage points ,try adding a few extra washers and grease at each point, firming them up , enhances their action , making very smooth/ easy use. pto lever , is a sloppy fit , inside end, next to battery , frame mount , added about 3/8" of washers , grease , very solid and smooth , do it , also a good time to 2 bolt flange bearing on steering column on dash flat support . get a heavier bearing on line , $ 7 . use cable wrap on your wiring , and free it up with no tight bends, use cable clamps to hold it in place. dielectric grease every connection . add a fuel check valve ,in vertical position just under your fuel pump , aluminun , on line , cheap. add ground cable 4 ga from your battery ground cable point , to lower engine corner , clutch pedal side , go from there with 12 ga wire to rectifier bolt mount , and from there to headlights , solid ground and better electrical connections over all , stuff i use , pete 1 1 Share this post Link to post Share on other sites
peter lena 8,113 #350 Posted November 16, 2021 @Horse Newbie nice going on that , love heim joints , my steering , pto foward lever end , snow plow , as you make up levers and linkage points ,try adding a few extra washers and grease at each point, firming them up , enhances their action , making very smooth/ easy use. pto lever , is a sloppy fit , inside end, next to battery , frame mount , added about 3/8" of washers , grease , very solid and smooth , do it , also a good time to 2 bolt flange bearing on steering column on dash flat support . get a heavier bearing on line , $ 7 . use cable wrap on your wiring , and free it up with no tight bends, use cable clamps to hold it in place. dielectric grease every connection . add a fuel check valve ,in vertical position just under your fuel pump , aluminun , on line , cheap. add ground cable 4 ga from your battery ground cable point , to lower engine corner , clutch pedal side , go from there with 12 ga wire to rectifier bolt mount , and from there to headlights , solid ground and better electrical connections over all , stuff i use , pete 1 Share this post Link to post Share on other sites