JaysHorse 288 #1 Posted June 7, 2019 I need some help. My sprocket on my single stage blower went to hell on me. I was wondering if anyone knew if the auger from a unit for 260 is the same as mine for my 518? Or is there any other way to repair my existing one. Thanks Share this post Link to post Share on other sites
gwest_ca-(File Mod) 12,346 #2 Posted June 7, 2019 Some are the same. Can you get the model numbers and serial numbers of both units? With those we could compare the parts lists. A worn out chain is the biggest cause of sprocket failure. Garry Share this post Link to post Share on other sites
JaysHorse 288 #3 Posted June 7, 2019 79263 sn 200000354 79360 sn 7900001 Share this post Link to post Share on other sites
JaysHorse 288 #4 Posted June 7, 2019 After a little research I’m guessing it’s the same. My part is 105-1478 which replaced 93-1615-01 which is what’s called for for the thrower for 260. Anyone ever try just replacing the sprocket on the auger? Share this post Link to post Share on other sites
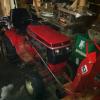
JaysHorse 288 #5 Posted June 12, 2019 Before and after shot. New sprocket picked up from TSC. 2 Share this post Link to post Share on other sites
peter lena 9,940 #6 Posted June 12, 2019 nice fix on that, using a 36 - 42 single stage now for years , i would say that LUBRIPLATE CHAIN AND OPEN GEAR SPRAY IS THE BEST OPEN GEAR LUBRICANT YOU CAN USE ON A BLOWER. my unit spins up with total ease by hand, i never let the gears or chain dry out, i also spray it down after use. i also detailed the idler pulley frame on this , totally eliminating any rusty contact points. btw, if you want to take out any impact points on the auger , use 2 large crescent wrenches in oposit directions on the auger area, makes the repair very easy. pay attention to the chain adjustment point, i use crescent serated washers to hold the setting , they bite into the area. good luck with that , pete 1 1 Share this post Link to post Share on other sites
JaysHorse 288 #7 Posted June 13, 2019 Thanks for the lubing tip Pete. I think while I got it this far down I’m going the distance and will be sanding and repainting to get another 30yrs out of it 1 Share this post Link to post Share on other sites
rjg854 13,180 #8 Posted June 13, 2019 not a bad idea at all , and just remember 1 Share this post Link to post Share on other sites
JaysHorse 288 #9 Posted June 14, 2019 Starts in 2 weeks. Stay tuned........ Share this post Link to post Share on other sites
gwest_ca-(File Mod) 12,346 #10 Posted June 14, 2019 On 6/7/2019 at 1:13 PM, JaysHorse said: 79360 sn 7900001 Do you realize that is the very first serial number issued for 1997? Garry Share this post Link to post Share on other sites
JaysHorse 288 #11 Posted June 15, 2019 No I didn’t. That make it worth more? Share this post Link to post Share on other sites
bc.gold 3,406 #12 Posted June 16, 2019 It does not look like the teeth on the replacement gear have been hardened nor do we know if the gear is made from a material that is capable of being heat treated. Put a file to a tooth to the check hardness, below is an example of an induction hardening you can also flame harden by quenching. 1 Share this post Link to post Share on other sites
JaysHorse 288 #13 Posted June 16, 2019 Thanks for the tip. I will give it a try. Also anybody know how to remove the bearing from the end plates without harming them? They are in great shape. Share this post Link to post Share on other sites
bc.gold 3,406 #14 Posted June 16, 2019 1 hour ago, JaysHorse said: Thanks for the tip. I will give it a try. Also anybody know how to remove the bearing from the end plates without harming them? They are in great shape. The shaft needs to be pressed out - hydraulic bench press. There's also a split bearing puller threaded for a puller. Be sure to report the file test. Share this post Link to post Share on other sites
JaysHorse 288 #15 Posted June 17, 2019 Well I put the file to it. Scratched it a little but not much more then that. Did the same effect on the original gear. 1 Share this post Link to post Share on other sites
JaysHorse 288 #16 Posted June 17, 2019 Ideas on getting these off? Share this post Link to post Share on other sites
bc.gold 3,406 #17 Posted June 17, 2019 (edited) Those collars just slide onto the shaft it's the set screws that have made a burr on the shaft, once you get past the burr your home free. In the old days to remove a tie rod used a heavy hammer on one side the used another hammer to give to opposing side a good whack. Those collars are cheap to replace, any farm supply or bearing house will have them in stock. The civilized way is to use a pickle fork, you might try a wedge. Edited June 17, 2019 by bcgold Share this post Link to post Share on other sites
JaysHorse 288 #18 Posted June 18, 2019 I have one of them. I will give it a try. I get it to move except where there is a partial drilled hole next to set screw. 1 Share this post Link to post Share on other sites
gwest_ca-(File Mod) 12,346 #19 Posted June 18, 2019 When installing the collar you place it in position and use a hammer and punch in that blind hole to turn the collar in the direction of rotation when the unit is operating. The cam will lock the inner race of the bearing to the shaft so the shaft won't spin in the bearing. So tap it in the opposite direction to release it. Make sense? Notice how the hole in the bearing appears to be not centered? The collar is the same and that eccentric is what locks the bearing. Think of it as a circular wedge. Garry 2 Share this post Link to post Share on other sites
JaysHorse 288 #20 Posted July 9, 2019 Making progress on the restoration. Share this post Link to post Share on other sites
JaysHorse 288 #21 Posted July 10, 2019 Getting closer. 1 Share this post Link to post Share on other sites
jay bee 915 #22 Posted July 11, 2019 Looking good!!! 1 Share this post Link to post Share on other sites
JaysHorse 288 #23 Posted July 12, 2019 Nice and shiny. Next project........ 2 Share this post Link to post Share on other sites
BenvonCamp 22 #24 Posted June 26 On 6/12/2019 at 6:38 PM, peter lena said: nice fix on that, using a 36 - 42 single stage now for years , i would say that LUBRIPLATE CHAIN AND OPEN GEAR SPRAY IS THE BEST OPEN GEAR LUBRICANT YOU CAN USE ON A BLOWER. my unit spins up with total ease by hand, i never let the gears or chain dry out, i also spray it down after use. i also detailed the idler pulley frame on this , totally eliminating any rusty contact points. btw, if you want to take out any impact points on the auger , use 2 large crescent wrenches in oposit directions on the auger area, makes the repair very easy. pay attention to the chain adjustment point, i use crescent serated washers to hold the setting , they bite into the area. good luck with that , pete Picking up this old thread with the hopes you are still active. My SS blower cog is getting very tired. As far as I can see, this part is one with the full auger. Do you know if this is indeed true and if so, can the full assembly be found anywhere? Part numbers from my resources don't get me anywhere. Share this post Link to post Share on other sites
peter lena 9,940 #25 Posted June 26 @JaysHorse / @BenvonCamp https://www.google.com/search?q=single+stage+snown+blower+%2C+drive+coupling%2C+wheel+horse&sca_esv=f2191a8c18cbf8a0&rlz=1C1CHBF_enUS866US866&sxsrf=APpeQns5bKecbHZhrorJqDqBVbXaklcIBw%3A1782486596574&ei=RJY-arjUIomU5OMP45qOqQQ&biw=1024&bih=607&ved=0ahUKEwi4hp-DmKWVAxUJCnkGHWONI0UQ4dUDCBI&uact=5&oq=single+stage+snown+blower+%2C+drive+coupling%2C+wheel+horse&gs_lp=Egxnd3Mtd2l6LXNlcnAiN3NpbmdsZSBzdGFnZSBzbm93biBibG93ZXIgLCBkcml2ZSBjb3VwbGluZywgd2hlZWwgaG9yc2UyBxAhGAoYoAEyBxAhGAoYoAEyBxAhGAoYoAEyBxAhGAoYoAEyBxAhGAoYoAEyBxAhGKsCGAoyBxAhGKsCGApI3kBQohJY0zxwAXgAkAEAmAGeA6AB7xCqAQowLjExLjEuMC4xuAEDyAEA-AEBmAIOoALPEsICDhAAGIAEGIoFGIYDGLADwgIIEAAY7wUYsAPCAgsQABiABBiiBBiwA5gDAOIDBRIBMSBAiAYBkAYIkgcKMS4xMC4yLjAuMaAHvIIBsgcKMC4xMC4yLjAuMbgHuxLCBwYyLTIuMTLIB5QBgAgB&sclient=gws-wiz-serp , pete Share this post Link to post Share on other sites