chris sutton 610 #1 Posted October 19, 2018 Looking for some help with a snowblower I've just picked up. Its all in bits and has no ID tag on it, I've downloaded some manuals for it and it looks all there. It's has had some welding done to it and came with new bearings, rollers and chain . If anyone can help with model or date that would help also I'm looking for photos and size of decals so I can get them reproduced here in the UK 2 Share this post Link to post Share on other sites
gwest_ca-(File Mod) 12,341 #2 Posted October 19, 2018 You most likely have one of these provided the housing width is about 37". The wings added to these make it 42" wide. Reason being you have a bushing in the rear of the frame bracket (4th & 5th photos) where it attaches to the tractor. A long bolt goes through the tractor frame. They started to use the front quick hitch instead of the bolt in 1973. 1966-67 model ST-376 1968 model 6-1211 1969 6-6211 plus 6-9111 1970-72 model 6-6212 plus 6-9112 - All without front quick hitch so not a direct fit for 1973 and later tractors. Garry Adding I don't see the wings. The first used were a plain flat plate. They then added a bend to the front of the wing that matches the bend on the end plate of the housing. When mounted the front 2" of the wing was parallel with the housing end so it would not suck you into a snowbank. See you have some new rollers for the chute. They have not been available for years. The wheels were originally solid cast iron and much smaller. 1 Share this post Link to post Share on other sites
chris sutton 610 #3 Posted October 19, 2018 Thanks Garry. The wheel bolt was broken and one missing, iwas lucky to have one in stock from an old mower deck and the broken bit came out with a bit of heat hears some more progress photos, Share this post Link to post Share on other sites
chris sutton 610 #4 Posted October 20, 2018 Got a few bits cleaned up and primed and new axle bearings. 1 Share this post Link to post Share on other sites
gwest_ca-(File Mod) 12,341 #5 Posted October 20, 2018 In case you have a 1975 or newer model they have a spool on the crank for the cable. This manual has the cable wrapping description. Garry Share this post Link to post Share on other sites
chris sutton 610 #6 Posted October 21, 2018 Had some nice weather so I managed to get some of parts painted. 4 1 Share this post Link to post Share on other sites
chris sutton 610 #7 Posted October 22, 2018 Next item out of the box of bits was the flag with a badly rusted pin, after a clean up with the grinder and new pin welded in made it serviceable. 3 Share this post Link to post Share on other sites
chris sutton 610 #8 Posted October 29, 2018 Ive managed to get a few more bits done. The drive pulley was full of rust holes , i found another pulley but the centre was different so I cut the centres out on the lathe and welded the old centre in the new pulley also got some more parts cleaned and primered 1 1 Share this post Link to post Share on other sites
chris sutton 610 #9 Posted October 29, 2018 As this is an early model it had the old 3/8" nut and bolt to fit it to the frame of the tractor so I've drilled out the hole to 5/8" and fitted a solid bar to fit it to the quick hitch. 2 Share this post Link to post Share on other sites
chris sutton 610 #10 Posted October 29, 2018 I'm trying to fit the drive shaft , I have new bearings and noticed that one has 2 set screws the other has 2 holes that I'm guessing a roll pin goes through and the shaft. Can anyone tell me which side of the housing the bearing carriers fit and I'm guessing that both fit one side 2 Share this post Link to post Share on other sites
pfrederi 20,837 #11 Posted October 29, 2018 Chris: the mounting brackets for the bolt through the frame version and the front tachmatic version are different lengths 2 Share this post Link to post Share on other sites
WHX?? 57,359 #12 Posted October 29, 2018 (edited) Nice job on that pulley & lift flag repair Chris! On the drive shaft bearings the one with the set screws looks correct but the one with the pin doesn't look to be correct unless you pin it to the drive shaft. They should both be eccentric locking bearings. looks like the one with the set screw is. There is a particular way they should be installed. Check this out Toro Technician Tips Eccentric Collar quality_tips_june.pdf After studying your pics some more it does look like the one bearing is pinned to the drive shaft by looks of the hole on the outboard side of the drive gear keyway. Mine are both locking style but a late model blower. Edited October 29, 2018 by WHX21 2 Share this post Link to post Share on other sites
chris sutton 610 #13 Posted October 29, 2018 Thanks Paul, at least it's shorter so I can cut it down and drill 2 holes and I'm glad I haven't painted it yet. Thanks Jim the link was very helpful Share this post Link to post Share on other sites
chris sutton 610 #14 Posted October 29, 2018 I've just had a look and put a tape as you have done, one side of mine has a 3/8" hole which is in the right place so I will drill through both sides and cut the excess off. i might be able to leave the brace in place but if it snags the quick hitch I'll cut it out Share this post Link to post Share on other sites
chris sutton 610 #15 Posted October 29, 2018 Back into the workshop and changed the mounting bracket, I've drilled 2 5/8" holes and welded a piece of solid bar to the measurements that Paul gave me, I'll cut the excess off tomorrow and get some primer on it. 2 Share this post Link to post Share on other sites
chris sutton 610 #16 Posted October 30, 2018 Got a few more bits done, Ive cut down the mounting bracket and was hoping to get the last parts painted untill I noticed the chute aim adjuster was missing so more fabricating and by then it was to late to paint as the temperature was dropping. 4 1 Share this post Link to post Share on other sites
Tach-a-matic 357 #17 Posted October 31, 2018 great job putting some old iron back into service! 1 Share this post Link to post Share on other sites
chris sutton 610 #18 Posted November 3, 2018 Hopefully got the last 22 parts painted today, just assembly now and looking at the manual. 3 1 Share this post Link to post Share on other sites
chris sutton 610 #19 Posted November 17, 2018 Fitted a few more parts on, after fitting the new chain and aligning the sprockets I found the bracket to hold the guard on missing and as its all painted I didn't want to weld something on so I just made one and bolted it on. I don't really want to do much more until I get it off the bench and fitted on a tractor as its getting heavy now. 1 1 1 Share this post Link to post Share on other sites
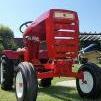
chris sutton 610 #20 Posted November 18, 2018 Made some good progress today after getting it off the bench, I put it on a sack trolley and got it from the workshop to under the carport. It was quite easy to fit into the quick hitch on the front of the Raider 12, the flag was easy to fit to the lift lever and all I had to do was fit a 1/2 inch spacer to give me a bit more height. The next hour was spent looking through all my belts and was lucky to find one that fitted. Bolted some more bits on so the parts box is almost empty and as darkness fell I fired the tractor up and ran the blower, spinning well and fast and the best thing it's spinning the right way. 4 1 Share this post Link to post Share on other sites
gwest_ca-(File Mod) 12,341 #21 Posted November 19, 2018 Looks like new. Super job. See you have what looks like a spring pin retaining the lift tube to the snowthrower hook. They have been known to get pushed out at the worst time. Lift hook cotter pin 932034 is 3/16" x 1" Lift hook flat washer 920013 is 5/8" SAE Garry 1 Share this post Link to post Share on other sites
chris sutton 610 #22 Posted November 20, 2018 On 11/19/2018 at 10:44 AM, gwest_ca said: Looks like new. Super job. See you have what looks like a spring pin retaining the lift tube to the snowthrower hook. They have been known to get pushed out at the worst time. Lift hook cotter pin 932034 is 3/16" x 1" Lift hook flat washer 920013 is 5/8" SAE Garry Thanks for that Garry, I just put the R clip on temporary to hold to lift tube on while I tried it on the tractor, If I fit it permanently i’ll Fit the right pin and washer. Share this post Link to post Share on other sites