LJUSNINGEN 26 #1 Posted October 30, 2016 Hi from Sweden! Love my Wheel Horse C-160 Automatic from 1977, and recently bought an old C-120 8-speed too. Will be the project for this winter. I have a snow blade ready for winter season, but also have a new project... To the point of my new topic; I bought a Toro snowblower model 59136, because it was in very good condition, and I thought it would be quite easy to convert to fit my C-160. Before I get to it though, I thougt I should be smart and ask if someone else already have done such a project, to fit a Toro Snowblower to a Tach-A-Matic system on a Wheel Horse? The Toro Snowblower has horizontal pulleys for the belt, like a mower deck, due to that they have the engine on the tractor mounted with vertical axle downwards. So, my idea is to make a new fitting for the middle Tach-A-Matic and the one mounted on the rear axle (for snow blade attachement), and then use the front mule normally used for mowing decks, to be able to drive the snowblower. There is a function to lift the snowblower built in to the frame of the snowblower, so I don´t have to use the lift on tractor. Comments, ideas, anyone? Share this post Link to post Share on other sites
wallfish 19,508 #2 Posted October 30, 2016 Think I get what you are trying to do but it would help if you can post some pics of the blower. Share this post Link to post Share on other sites
LJUSNINGEN 26 #3 Posted October 30, 2016 Some pictures....sorry about the poor light, but it's evening here, and no lamps in that place... Hope you can see what you want on these. Share this post Link to post Share on other sites
Ed Kennell 45,443 #4 Posted October 30, 2016 Very interesting project. I suspect you will have some clearance problems if you use the existing horizontal pulley and belt tensioning system under the tractor. You will be adding two more idler pulleys with the mule drive and it will require an extremely long belt. My suggestion would be to remove the existing pulley system and extend the existing horizontal blower drive shaft to line up with the engine pulley . You would have to add one support bearing. You could then mount the existing belt tensioning pulleys vertically between the tractor and blower in typical WH fashion. 1 Share this post Link to post Share on other sites
LJUSNINGEN 26 #5 Posted October 30, 2016 Thank you for your input Ed Kennell! Your suggestion has been an alternative in my mind, with some questions, though. How to best attach the blower to the Tach-A-Matic system, or to use one of the frames for the dozer blade. If making a new attachement, I loose the lift function built in to the current frame. Using the dozer frame would mean that I can lift the blower, if not to heavy. Will need some thought, and experienced input from you guys! Big thanks for supporting! Share this post Link to post Share on other sites
Ed Kennell 45,443 #6 Posted October 30, 2016 I was thinking your frame is long enough to attach at the rear axle mount and use the center deck lift to lift the blower like a typical WH snow plow. If your frame is too short , it could be extended. Share this post Link to post Share on other sites
wallfish 19,508 #7 Posted October 30, 2016 24 minutes ago, Ed Kennell said: extend the existing horizontal blower drive shaft to line up with the engine pulley You'll need to reverse the direction too. Figure 8 the belt maybe? Share this post Link to post Share on other sites
LJUSNINGEN 26 #8 Posted October 30, 2016 Wow, didn't think of that, the need to reverse the direction. Great input! And yes, the frame for the snow plow should be ok to use. Think I will dismount the current frame (blower) at the front end, (4 bolts) and attach it to the snow plow frame via some cool adapter. In that way I can use the frame for the blower, or the blade if I choose to. I will be sending pictures of the project, but it can take a couple of weeks to find the time for the project, so don't sit up and wait for it. Thanks again! 2 Share this post Link to post Share on other sites
CTBT&D 77 #9 Posted October 30, 2016 I did this conversion about 6 or 7 years ago. Similar model 06-36SL01, made for the 200 series tractors with vertical shaft engines. Attached some pictures. I bought the upper mounting arm (at the time about $80, now $117) The rest I made, added angle supports to upper arm, tension idler pulley assembly, made a longer drive pulley shaft, moved the bearing out on the drive pulley shaft, chain cover, as mentioned above added an idler sprocket to reverse the rotation and longer chain. In the photos I added power window motor and belt for chute rotation. Everything works on it but I purchased a two stage before it was ever used. I bought this brand new still in the box just for the auger for $300.. At the time the auger was going for $360, now almost $900 from Toro. I had another single stage that the auger was beat up. The new one was to nice to install on the old one, so I did this project. Craig 2 Share this post Link to post Share on other sites
ACman 7,714 #10 Posted October 31, 2016 Isn't @Walt doing a similar project right now ? calling Walt , calling Walt... come in Walt ? Share this post Link to post Share on other sites
Ed Kennell 45,443 #11 Posted October 31, 2016 4 hours ago, LJUSNINGEN said: And yes, the frame for the snow plow should be ok to use. Think I will dismount the current frame (blower) at the front end, (4 bolts) and attach it to the snow plow frame via some cool adapter. In that way I can use the frame for the blower, or the blade if I choose to. I used a plow frame in a similar fashion to mount my tiller. 2 Share this post Link to post Share on other sites
Walt 339 #12 Posted October 31, 2016 My project is for a different model there are some over lapping similarities but he would be better getting advice on his from CTBT&D. He needs same bracket to attach to Tacamatic only advice I could assist him with would be reversing auger rotation and drive shaft lengthening. I read through this earlier and did have question and now that I have a few before bed guess no better time to ask. 4 hours ago, CTBT&D said: The rest I made, added angle supports to upper arm, tension idler pulley assembly, made a longer drive pulley shaft, moved the bearing out on the drive pulley shaft, chain cover, as mentioned above added an idler sprocket to reverse the rotation and longer chain. Don't quite see what you came up with for chain tension on yours. I see the slot that the idler for tensioning would be mounted in but with no nut or washer not sure how the tension is maintained. Okay looking at what Ed Kennell has done with the tiller head he wouldn't need the same Tacamatic as CTB&D is using. If he fabricates mount to attach to plow frame He would need to reverse auger rotation, lengthen the drive shaft, the bearing mount moved or one made and mounted and the addition of tensioner and idler for belt. 1 Share this post Link to post Share on other sites
LJUSNINGEN 26 #13 Posted October 31, 2016 9 hours ago, Walt said: Okay looking at what Ed Kennell has done with the tiller head he wouldn't need the same Tacamatic as CTB&D is using. If he fabricates mount to attach to plow frame He would need to reverse auger rotation, lengthen the drive shaft, the bearing mount moved or one made and mounted and the addition of tensioner and idler for belt. Curious about how you solved the challenge to reverse the auger rotation on yours, Walt. CTBT&D's solution was to mount a extra sprocket, and longer chain. Did you do the same? Share this post Link to post Share on other sites
Walt 339 #14 Posted October 31, 2016 Just now, LJUSNINGEN said: Curious about how you solved the challenge to reverse the auger rotation on yours, Walt. CTBT&D's solution was to mount a extra sprocket, and longer chain. Did you do the same? I added 2 sprockets this allowed me to leave the adjustable one in place for tensioning. I did have to open bottom of the hole were chain enters auger housing and will have to open top when I need to adjust for chain stretch. This make using the original chain guard unusable so next year I will be working through designs for it and inner chain guard then have local sheet metal shop cut parts to assemble them. Now I'm not sure the end plate on both our throwers are the same bu in pictures they do look similar. If you take measurements of you left end plate from bottom to top and bottom to the auger bearing mount then from bend where plates mount to extend throat of throat I'll check them against mine to see if locations I came up with will work for you. 2 Share this post Link to post Share on other sites
LJUSNINGEN 26 #15 Posted October 31, 2016 Great pictures, Walt! They did the trick, so my brain now got it. Looks like a very good solution. Thank you very much. I will get back to you all, with pictures, when we get to work! 2 Share this post Link to post Share on other sites
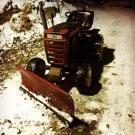
LJUSNINGEN 26 #16 Posted November 9, 2016 Well, I didn't even manage to get the project started before first snowfall, but it will come around. Took a turn with the C-160 and dozer blade to get rid of the first snow. Great fun! My plan is to have the C-120 8-speed with dozer blade, and the C-160 automatic with snow blower attached in the future... 3 Share this post Link to post Share on other sites
Sarge 3,470 #17 Posted November 10, 2016 You won't regret it - the 16hp single has so much torque the only thing that might suffer is the belt drive...lol . Sarge 1 Share this post Link to post Share on other sites