redrooster 83 #26 Posted January 20, 2014 After further inspection I was able to use a pick to get the rest of the oil seal out. Share this post Link to post Share on other sites
redrooster 83 #27 Posted January 20, 2014 All the transmission seals have been replaced. Next step will be to blast, and paint all the parts on the tranny including the wheels. Share this post Link to post Share on other sites
leeave96 487 #28 Posted January 20, 2014 I removed one of the old seals and it all came out in one piece. On the other side it seemed to slip into the tranny somewhat and I was only able to get small pieces of it. It looks like there is plenty of room for the new seal. Just not quite sure if I should proceed.uploadfromtaptalk1390195604480.jpguploadfromtaptalk1390195664447.jpg I'm always amazed at how SIMPLE and straight forward the Wheelhorse design is as compared to my other color tractors and those pics really remind me of that. Nice wooded fixture too! Share this post Link to post Share on other sites
redrooster 83 #29 Posted January 21, 2014 (edited) Finally got to paint some transmission and gas tank bracket parts. Transmission next. Edited January 24, 2014 by redrooster Share this post Link to post Share on other sites
redrooster 83 #30 Posted January 25, 2014 Got the transmission partially cleaned and removed from the frame along with the front axle. Right now I'm trying to do all the things I can in a cold garage. Share this post Link to post Share on other sites
redrooster 83 #31 Posted January 26, 2014 Gas tank/rear fender mount painted and back together. 1 Share this post Link to post Share on other sites
dclarke 4,011 #32 Posted January 26, 2014 Lookin good so far, keep the pics coming. Share this post Link to post Share on other sites
redrooster 83 #33 Posted January 31, 2014 Need some warmer weather to paint and sand blast. I have been taking a lot of pics. Each little sections parts and hardware goes into a plastic bag with a drawing and description of their location. Share this post Link to post Share on other sites
doc724 924 #34 Posted February 2, 2014 That's absolutely the way to do it. I never made the drawings, just took lots of pix. When I was ready to reassemble I had the painted parts, little parts in the plastic bags and printed assy drawings from RCPW or Partstree to guide me. No errors and no parts left over either. What a great way to spend a dreary winter! Share this post Link to post Share on other sites
Tom. 70 #35 Posted February 2, 2014 Hi, It's looking really good! Thats a nice stand you have there, it will make your life much easier ziplocking all of the hardware! Are you going to be sandblasting the transmission? Tom Share this post Link to post Share on other sites
redrooster 83 #36 Posted February 2, 2014 I don't get the sand blaster near anything with bearings. The stand has made it nice to move it around without the wheels attached also I wanted it elevated so I wouldn't have to bend over to get to everything. I'm down to the frame now so as soon as I get it painted I can begin to reassemble it. Woo Hoo!! :-) Share this post Link to post Share on other sites
redrooster 83 #37 Posted February 2, 2014 Not blasting the transmission. I don't get the sand blaster near anything with bearings. The stand has made it nice to move it around without the wheels attached also I wanted it elevated so I wouldn't have to bend over to get to everything. I'm down to the frame now so as soon as I get it painted I can begin to reassemble it. Woo Hoo!! Share this post Link to post Share on other sites
redrooster 83 #38 Posted February 3, 2014 Bare frame Share this post Link to post Share on other sites
redrooster 83 #39 Posted February 16, 2014 Frame and tranny ready for paint. Pesky cold weather makes it difficult to keep the barn warm for painting. Share this post Link to post Share on other sites
redrooster 83 #41 Posted February 22, 2014 Finally got some red on the tranny and frame Hopefully things will get on a faster track now! Share this post Link to post Share on other sites
Wishin4a416 2,189 #42 Posted February 22, 2014 Looks like it is coming along real good! Going be nice when done. Sure is fun doing them one piece at a time. Share this post Link to post Share on other sites
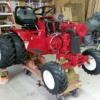
redrooster 83 #43 Posted February 23, 2014 (edited) Frame and tranny back together:) Edited February 23, 2014 by redrooster Share this post Link to post Share on other sites
redrooster 83 #44 Posted March 5, 2014 More parts painted. Got to make sure I lay down 2 coats of paint and than a good wet coat. Really like my 3M full face mask! 3 Share this post Link to post Share on other sites
JERSEYHAWG / Glenn 4,487 #45 Posted March 8, 2014 That looks great so far. I have a couple questions please, how did you strip the tranny down? Are you using a hvlp gun? What color? Lastly, with the full face mask in your spray / work booth, I guess super air circulation isnt much a problem? Keep us posted, pics are awesome. ty Glenn Share this post Link to post Share on other sites
redrooster 83 #46 Posted March 8, 2014 I cleaned the tranny with engine cleaner and then used several different types of wire brushes in my drill and 4" grinder. I'm learning to use a hvlp gun on this project so I'm painting the panels last. Im using the ppg code suggested at the beggining of this post. As far as air circulation goes and from what I have read you need the best air circulation possible. You shouldn't rely on any type of mask in heavy vapors. Fresh air supply mask would be better but that cost $$$. I am having some problems with dust so I hope to address that before painting the exterior panels. Share this post Link to post Share on other sites
redrooster 83 #47 Posted March 10, 2014 (edited) I'm wondering if the end of the steering shaft should be greased. I never lubed it in the past. Its steel on steel I think. Edited March 10, 2014 by redrooster Share this post Link to post Share on other sites
redrooster 83 #48 Posted March 15, 2014 Like somebody else said rims are challenging to paint! @$/&*#^ Glad they are done! Share this post Link to post Share on other sites
redrooster 83 #49 Posted March 18, 2014 Next phase will be the steering tower. Everything came off easy with exception to the piece that the lift chain connects to. I have soaked it with PB blaster and heated with a blow torch. Its not moving! Share this post Link to post Share on other sites
redrooster 83 #50 Posted March 19, 2014 More pb blaster and an air chisel persuaded the lift lever mechanism to let go. Now the steering tower is blasted and nearly ready for paint. Share this post Link to post Share on other sites