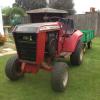
Tom. 70 #1 Posted June 11, 2013 Hi all, So 5 days ago now me and my dad set off for the 3 hour journey south to pick up the 856 from Ian (Stigian) I had bought off of him - thanks Ian for the refreshments, spare parts and for letting me and my dad have a nosey at your 6x6 project! I am quite lucky really as I only know of one other 856 in the UK which is owned by neil, so it's quite a rare piece! I bought it aiming to get it running use it for a bit, and then restore it and get rid of the awful green paint it currently has! However things didn't go as planned - when do they ever! - and it turns out the camshaft is broken so I need a new one of those, which isn't going to be easy to source. After speaking to a few people I may have laid my hands on one but it won't be a deffinate yes for a couple of weeks so in the mean time I have decided to build an e-tank and tear the 856 down completely and start to e-tank them, prime them and then paint. By the time that is all done I would hope to have a camshaft and have fitted it. Other than that I am really happy with it, it's really original other than the fuel tap I think. The front two wheels are original - one holds air the other doesn't however I am going to put a new tube in it. It has the original cigarette lighter which is quite amazing, and the spring in it still works! It also has a slot hitch on the back which I am still trying to free up, it will come eventually. Parked up for the night The next morning pre-wash Lifted it up to make life easier for me! After a good wash Engine after a wash The damage inside And as it stands now, and yes that is an old cement mixer tyre! It's just to I can roll it around easier Thanks, Tom 1 Share this post Link to post Share on other sites
C-101plowerpower 1,606 #2 Posted June 11, 2013 nice project, i'll be watching this one. i see the right front tire isn't the only leaky tire you've got Share this post Link to post Share on other sites
neil 2,415 #3 Posted June 11, 2013 Im sure you will eventually get the camshaft sorted . i only know of two of thes 856 in this country , which is mine & yours. im sure there must be one or two others lurking about somewhere , but there aernt many . you have picked up a really good tractor and im sure you will not be dissapointed with her when she is done. have fun with your restoration and we look forward to the progres reports in the comming weeks Share this post Link to post Share on other sites
meadowfield 3,087 #4 Posted June 11, 2013 Keep the pics coming Tom and good luck Share this post Link to post Share on other sites
Sparky-(Admin) 25,964 #5 Posted June 11, 2013 Looks like a great start for a restoration . Good luck! Mike......... Share this post Link to post Share on other sites
wheeledhorseman 579 #6 Posted June 11, 2013 You had me worried there for a moment Tom, you mention building an e-tank then this pic Must be a big e-tank! Only kidding but that's a great project to take and one for all of us to follow so enjoy every minute of it and post regular updates with lots of pics. Andy 1 Share this post Link to post Share on other sites
Stigian 1,235 #7 Posted June 12, 2013 Morning Tom, your not wasting any time getting started on the 845 are you Good to see that you have another camshaft sorted. I hope those spares come in useful for you. Yep an E-tank is the way to go to get the panels etc cleaned up, saves an awful lot of rubbing down and dust everywhere.. I will be watching your progress with interest, it will be nice to see the ol girl back to her former glory Share this post Link to post Share on other sites
Tom. 70 #8 Posted June 12, 2013 nice project, i'll be watching this one. i see the right front tire isn't the only leaky tire you've got hi, thanks, I'm really looking forward to it! well spotted with the tyre, luckily that was easily fixed with some tyre sealent. Tom Im sure you will eventually get the camshaft sorted . i only know of two of thes 856 in this country , which is mine & yours. im sure there must be one or two others lurking about somewhere , but there aernt many . you have picked up a really good tractor and im sure you will not be dissapointed with her when she is done. have fun with your restoration and we look forward to the progres reports in the comming weeks hi Neil, thank you, I also only know of two which are mine and yours but as you say there are probably a few hidden around. so I'm sure ill have some questions for you when I get a bit more into it! Tom Keep the pics coming Tom and good luckhi, thanks Meadowfield! I may need some decals for it when I have finished it!!! Tom Looks like a great start for a restoration . Good luck! Mike......... hi mike, Thanks for the reply, it is a solid base so I'm really happy with it as there no major rot. Tom You had me worried there for a moment Tom, you mention building an e-tank then this pic Must be a big e-tank! Only kidding but that's a great project to take and one for all of us to follow so enjoy every minute of it and post regular updates with lots of pics. Andy Hi Andy, haha, it would deffinetly have to be one big e-tank, unfortunately mine isnt big enough! I am taking as many pictures as I can so I can post them up here but also to help me remember where certain parts go. I will be adding an update tonight as I've made a little more progress. Tom Morning Tom, your not wasting any time getting started on the 845 are you Good to see that you have another camshaft sorted. I hope those spares come in useful for you. Yep an E-tank is the way to go to get the panels etc cleaned up, saves an awful lot of rubbing down and dust everywhere.. I will be watching your progress with interest, it will be nice to see the ol girl back to her former glory Hi Ian, Yes, it's good news about the camshaft, I'm hoping its sorted. I'm really glad I had a nosey at your e-tank as it deffinetly made me want to get one as its so cheap but cheerful! I'm hoping to get it setup this weekend. I was also considering getting a cheap sand blasting gun just to run over the parts when they come out and then coat in red oxide then the final paint. Oh, and great news on your GT14, I'm glad you got it going! Thanks again, Tom Share this post Link to post Share on other sites
Tom. 70 #9 Posted June 13, 2013 So I've made a little progress, just got a few more bits and bobs off The reason it's tipped up as pictured is because I have a bowl of diesel which I am soaking the slot hitch in which I hope will help in aid of freeing it up and its really solid! It's coming on slowly, I have all the bits for an e-tank except the power pack now so I am going to order one and get e-tanking. I hope in my next update there will be a lot more to see! Thanks, Tom Share this post Link to post Share on other sites
neil 2,415 #10 Posted June 14, 2013 good luck with the progress Tom Share this post Link to post Share on other sites
Stigian 1,235 #11 Posted June 14, 2013 Your soon have it finished at the rate your going Tom Share this post Link to post Share on other sites
Griff 17 #12 Posted June 14, 2013 I do like seeing what folks have to contend with when restoring like this, getting the mechanicals sorted and getting it painted up. I'm looking forward to seeing more, best of luck mate. Share this post Link to post Share on other sites
Tom. 70 #13 Posted June 14, 2013 good luck with the progress Tom Hi, Thanks Neil, it's getting there slowly! Tom Your soon have it finished at the rate your going Tom Hi, I wish Ian!! Still a long way off but steady progress is being made which I'm happy with. Tom I do like seeing what folks have to contend with when restoring like this, getting the mechanicals sorted and getting it painted up. I'm looking forward to seeing more, best of luck mate. Hi Griff, I deffinetly agree with you, I have looked through numerous threads and you learn alot, which is handy because you can the apply it to when you do your own restoration! I see you're in Lincoln, thats not too far from me, do you have any wheel horses at the minute? Tom Share this post Link to post Share on other sites
Tom. 70 #14 Posted June 14, 2013 Hi, I have made a little more progress tonight: Parts pile keeps growing Nice set of rears, hold air, I think the tyres are originial as they have wheel horse written on them?? I took the whole dash and console off, I am going to split this apart more before I e-tank it The rear end It's coming apart well so far, no major rust or rot; I've even found some original paint under there!! The only thing that isn't going so well is the slot hitch, it's real stuck. I have tried soaking it in diesel, heating it and spraying loads of penetrating oil and WD40 on it but still no movement. Does anyone have any suggestions? I had thought of maybe drilling the pin out? Thanks, Tom Share this post Link to post Share on other sites
Anglo Traction 761 #15 Posted June 14, 2013 The only thing that isn't going so well is the slot hitch, it's real stuck. I have tried soaking it in diesel, heating it and spraying loads of penetrating oil and WD40 on it but still no movement. Does anyone have any suggestions? I had thought of maybe drilling the pin out? Thanks, Tom Those Pins are a pain if their seized up. You really need to soak them for a long long time to have any affect. There have been many threads on this, Here's an example - Plenty more if you do a search in the Transmission Section for :- Hitch Pin. May find a way that suits your situation. Take your time on it, those Tranny casings are brittle Cast Iron Rgds Share this post Link to post Share on other sites
wheeledhorseman 579 #16 Posted June 14, 2013 (edited) Everything tends to be stacked against you with these. If the rusting is that bad then crystals of rust will have formed between the two surfaces effectively blocking the passage of penetrating fluids. Striking the end, even with a heavy copper mallet, will tend to start the mushrooming of the end of the shaft, particularly if it has a groove for a c-clip in it. The other problem is that striking the end makes the pin swell very slightly by a thou or so at the moment of impact effectively making it an even tighter fit. Having said that I did recently get a well stuck pin out of the tranny on my 316. The copper mallet was getting nowhere even after much soaking so I had to resort to using a heavy hammer striking the end as cleanly as possible. First I marked the ends of the pin against the tranny case with a hacksaw blade - not a cut just a mark I could see. Found a wack from the hammer actually moved the pin very slightly. Wacked the other end and moved it back again. We're talking half a mm or less perhaps. Repeated again. Knowing that there had been some movement left to soak overnight. Next day used the copper mallet and the movement too and fro steadilly grew. Left to soak again and repeated gradually the movement increased. Knowing that the end would have mushroomed a bit I then filed it back, a PIA job. Finally used the largest dia drift available in the workshop that I had to drive the pin back and forward gradually further each way till it was out. It's a long slow process so I understand why many simply cut it off flush with the casing before drifting it out. If you do resort to this then read the following thread - genius use of a scientific principle. Good luck and BTW that hitch is worth a few bob so don't damage it. Andy Edited June 14, 2013 by wheeledhorseman Share this post Link to post Share on other sites
Stigian 1,235 #17 Posted June 18, 2013 Good to see work progressing on the ol girl Tom.. Every time I look at your photo's I'm amazed at how much red paint there is left on her... Good luck with the hitch pin, over the years I've had equal mixed luck getting them out.. Some have come out easy, some have put up a bit of a fight. and a couple I've had to drill out in the end.. I'm sure it will come out sooner or later for you. Share this post Link to post Share on other sites
Stormin 9,988 #18 Posted June 26, 2013 a couple I've had to drill out in the end.. That's how I got the one on my C-125 out. Share this post Link to post Share on other sites
Tom. 70 #19 Posted June 30, 2013 Hi all, I'm sorry for the recent lack of updates, I've been real busy with other projects! At the minute the 856 is ready to go in the e-tank, I transported it down to my shed where the e-tanking will take place(the e-tank will be just outside of that shed) and its now a matter of putting the e-tank together as I have everything for it. The pin is still stuck but there is movement, very small movement something like half a mm but its something. I will continue to soak and move it back and forth, I'm hoping that will work. If not I was wondering if somehow I could put the hitch and pin in the e-tank, just that pin and hitch and suspend the transmission out of water and try that. Would it be any help? The only thing I'm worried about is the transmission gasket, would it hurt this at all? Last resort would be drilling though, I had a little go at it with a drill but it didn't even touch it. I mean the drill bit wasn't going anywhere, if I did decide to drill it I think I'd have to get some really good drill bits. So that's where I'm up to now, hopefully ill start e-tanking this week and then a layer of red oxide. I have a few pictures of the pile of parts I will add later. All for now, Tom Share this post Link to post Share on other sites
Stigian 1,235 #20 Posted June 30, 2013 Tom. The trick to drilling hitch pins out is to start with a small drill bit and work your way up in size... No need to rush it, do a bit and walk away for a while.. It saves frustration and aching arms.. Once you have drilled through the pin, you can get a hack-saw inside to cut through the rest.. Once you have cut through the tension should be released and what's left of the pin should tap out.. Just take care not to damage the trans or hitch. Here's a pin that I drilled and cut to get out of the trans. Share this post Link to post Share on other sites
Griff 17 #21 Posted July 5, 2013 Sorry for the late reply Tom, i'd lost track of the posts i've replied to. I've got two 512D's and am watching threads like yours for inspiration, so don't muck it up Share this post Link to post Share on other sites
Tom. 70 #22 Posted December 24, 2013 Hi all, I have been slacking with this project really badly!! I have still got the 856 and it's still in pieces but I am determind to get on with it within the next week as I'm just finishing off another project, I seem to have too many projects going on at once! Anyway I have hopefully got my hands on a sandblaster so will be sandblasting the rest of the 856 instead of e-tanking, mainly because I'm impatient and I want to get it done! As mentioned earlier the original k181 has got a broken camshaft however I have acquired a donor engine that I will be using. It does run, not very well mind you and smokes badly so I've got new valves and all the bits for them and will be ordering piston rings as well. I will also thoroughly go through the carb and get it nice and clean, the throttle shaft is real good which is a bonus too. I will try to keep you all updated as I go but for now the only picture I really have is of the donor engine! Hope you all have a merry christmas!! Tom Share this post Link to post Share on other sites
Sparky-(Admin) 25,964 #23 Posted December 24, 2013 Good to hear your back on on it! Mike.......... Share this post Link to post Share on other sites
Wishin4a416 2,604 #24 Posted December 24, 2013 Thats the beauty of redoing these. You can take as long as you want. They dont eat much just sittin there. Share this post Link to post Share on other sites
meadowfield 3,087 #25 Posted December 24, 2013 Hey tom, Glad to see you are back Merry xmas Share this post Link to post Share on other sites