cleat 5,049 #151 Posted December 28, 2023 Did a little work today cleaning up the headlight harness for the hood. This is the entire harness with the plastic covers removed from the headlight connectors and connectors partly polished. Headlight plastic connector covers as removed. Wire harness connector before disassembly and cleaning. Plastic covers cleaned up. Wire connectors polished and cleaned. Wire harness reassembled. Harness complete and ready to install. 2 3 Share this post Link to post Share on other sites
HorseFixer 2,012 #152 Posted December 28, 2023 On 12/20/2023 at 8:35 AM, cleat said: Snow chucker looks great. How well do the rib tires work in the snow ? Not bad.... The fronts push a little bit with the chucker down and the weight off the Front Wheels and I have and always had chains on the rear and I have 4 lead wights cast to the rims which is 100 lbs in the rear and 75 lbs on the fronts. 3 Share this post Link to post Share on other sites
cleat 5,049 #153 Posted January 1 Hood latches ready for assembly Hood latches assembled Just working on little things while hood and fender are at the painters. 8 1 Share this post Link to post Share on other sites
cleat 5,049 #154 Posted January 2 Seat assembly was already restored on this machine a couple of years ago. The paint was messed up on the pivot brackets so I pulled them, sanded them smooth and flat then primed and painted in low gloss black. They have been drying for a few weeks so I decided to put the seat assembly together today. New stainless steel hardware and pivot bushings were used. One side complete Seat assembly ready for installation. 5 2 Share this post Link to post Share on other sites
cleat 5,049 #155 Posted January 14 (edited) Rear fenders back from my painter's One is for the 520-8 I am building and the other is for a 520H that I was working on last year that has not got finished yet. I will let these dry likely until spring as the tractors are moved to a garage out back and snowed in. He still has the hoods. The red paint is finished but he still needs to paint the black grill. Edited January 14 by cleat 1 8 Share this post Link to post Share on other sites
cleat 5,049 #156 Posted January 21 LED tail lights installed in the rear fenders. One of these is for this tractor and the other is for a 520H I am refinishing. 5 1 Share this post Link to post Share on other sites
cleat 5,049 #157 Posted January 29 Hoods back from my painter. One is for this tractor and the other is for a 520H I have been working on since last year. These will sit here until the snow melts and can move the tractors from the garage out back easier. That will allow the paint to dry more as well. 2 7 Share this post Link to post Share on other sites
Pullstart 60,157 #158 Posted January 30 @cleat I noticed your battery storage shelf. Away from danger and high to keep warm? Nice! 1 Share this post Link to post Share on other sites
cleat 5,049 #159 Posted January 31 On 1/30/2024 at 7:31 AM, Pullstart said: @cleat I noticed your battery storage shelf. Away from danger and high to keep warm? Nice! Thanks, shelf is made from 2x10 and the brackets are 2" x 1/4" angle iron securely screwed into studs. When I get 2 car batteries and 4 Wheel Horse batteries up there I want to be sure it does not collapse. Bungee cords keep batteries from falling off due to vibration from the doors. 2 Share this post Link to post Share on other sites
cleat 5,049 #160 Posted February 25 Fender and seat gas lift bracket bolted on using all SS hardware. Hood bolted on using SS hardware. I still need to order the decals for this machine. 6 Share this post Link to post Share on other sites
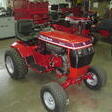
cleat 5,049 #161 Posted February 29 Moved tractor to shop. Installed seat. Installed seat gas lift and fender protectors. Hooked up headlights. Overall view of tractor as of today. 9 Share this post Link to post Share on other sites
cleat 5,049 #162 Posted February 29 Polished shift knobs best I could by spinning them on a stud mounted in the drill press. I used scotch brite, then 2000 grit sandpaper followed by rubbing compound then back to black polish. Not perfect but a lot better than they were. 8 Share this post Link to post Share on other sites
ebinmaine 63,508 #163 Posted March 1 Top shelf work Cleat! 1 Share this post Link to post Share on other sites
kpinnc 10,996 #164 Posted March 1 5 hours ago, cleat said: Overall view of tractor as of today. Both machines look fantastic! Very thorough work! 1 Share this post Link to post Share on other sites
cleat 5,049 #165 Posted March 1 Put a battery in and went for a maiden drive. Machine is very fast with the hydro pulley on the engine. However, low 1 is still quite slow so it should be just fine. Now I just need to order the decals and I am good to go. 1 8 2 Share this post Link to post Share on other sites
SylvanLakeWH 24,297 #166 Posted March 1 Looks great!!! 1 Share this post Link to post Share on other sites
ebinmaine 63,508 #168 Posted March 1 4 hours ago, cleat said: Put a battery in and went for a maiden drive Just excellent work Cleat. Very nice. 1 Share this post Link to post Share on other sites
Pullstart 60,157 #169 Posted March 2 Amazing quality! Do you have a boot wash you run through before stepping onto these beauties? 6 Share this post Link to post Share on other sites
Tractorhead 8,684 #170 Posted March 3 You made an excellent job 👍 lots of detail work on this Beauty. it is a lot of Work and greatly solved. For me my machines must be first technically ok, the look is for me secondary. - because i will allway’s feared for a first scratch, that will give me nearly a Heartattack. i would not use such a Beauty - because of this reason. 2 2 Share this post Link to post Share on other sites
cleat 5,049 #171 Posted March 4 I do use the machines that I build but treat them with care so damage is not done. They do get dirty when used especially mowing but that cleans up. I bought a new truck in 2020 and it still has very few miles on it because it sits in the garage so it does not get scratched or dinged. I will need to get over that and just enjoy it like I do my tractors, shiny or not. One of the cars I built is a Merkur XR4Ti (Ford Sierra in Germany) I was afraid to get scratched but I have been driving it for several years now and it still looks great. 5 5 Share this post Link to post Share on other sites
cleat 5,049 #172 Posted March 18 Headlight bezels installed. Now I need to order the decals from Terry. 1 2 Share this post Link to post Share on other sites
ebinmaine 63,508 #173 Posted March 18 On 3/3/2024 at 2:57 PM, Tractorhead said: i will allway’s feared for a first scratch, that will give me nearly a Heartattack. i would not use such a Beauty - because of this reason. I understand that logic but these mo-chines are built to be put to work. Trina's been asked the same "why put so much work into blah blah blah just to scratch it up?" Both here on Redsquare and at events. I've written her response before and it deserves another mention: She replies "I know where to buy more paint" ....... 1 1 Share this post Link to post Share on other sites
cleat 5,049 #174 Posted March 18 Exactly. I build my machines to look and work good. They get shown off but also worked. The unlucky one that gets put on grass cutting duty will get the dirtiest but if treated with reasonable care they don't get too scratched or banged up. They are all kept inside and that in itself saves them a lot. 1 4 Share this post Link to post Share on other sites
ebinmaine 63,508 #175 Posted March 18 All the exact same here. 1 Share this post Link to post Share on other sites