ebinmaine 63,270 #27 Posted November 10, 2023 On 11/9/2023 at 10:06 AM, cleat said: I'm not very familiar with the later models like a 520 H vs 8 speed. Is this section of sheet metal the same on either tractor? 1 1 Share this post Link to post Share on other sites
cleat 4,990 #28 Posted November 10, 2023 Yes, same part number. You just use different pre-punched holes for either. 3 1 Share this post Link to post Share on other sites
cleat 4,990 #29 Posted November 11, 2023 (edited) Not a lot of change today. Went to the Remembrance day presentation in town today. Waiting for the paint to dry on a lot of the parts for another day or two. I did install the brake band that was bead blasted and painted a few weeks ago. Installed using Stainless steel fasteners that I will use a lot on this build (you will notice the drum is held with a grade 5 steel bolt because I wanted a stronger fastener there). Edited November 11, 2023 by cleat 4 5 Share this post Link to post Share on other sites
cleat 4,990 #30 Posted November 12, 2023 (edited) Worked on Tach's today. I bought the rear one from Lowel. It came red but I was going to install it on the Work Horse so I painted it black. I decided to leave it black for contrast. Lock levers are painted with cold galvanizing. Rear Tach assembled. I put thin washers between lock levers and Tach itself as well as under the nuts. I don't have the angle spacers as mentioned in the manual for the 8 speed so I made up spacers that slip onto the bolts from Stainless tubing (there are 4 total, one for each bolt). Tach installed. Lock pins installed. Edited November 12, 2023 by cleat 3 4 Share this post Link to post Share on other sites
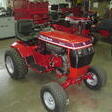
cleat 4,990 #31 Posted November 12, 2023 Installed the mid Tach. Tractor as of today. 2 4 Share this post Link to post Share on other sites
c-series don 7,858 #32 Posted November 12, 2023 I have to say @cleat that you don’t do anything half ass! I always admire your attention to detail, you’re a man after my own heart. The extra effort it takes to do it correctly really comes through in the end results. Keep up the good work 👍🏻 5 Share this post Link to post Share on other sites
ebinmaine 63,270 #33 Posted November 12, 2023 3 hours ago, c-series don said: I have to say @cleat that you don’t do anything half ass! I always admire your attention to detail, you’re a man after my own heart. The extra effort it takes to do it correctly really comes through in the end results. Keep up the good work 👍🏻 Absolutely agreed. Anyone who would take the time to set up parts all in a row for a pic is likely going the extra mile on the restoration. Excellent. 5 Share this post Link to post Share on other sites
c-series don 7,858 #34 Posted November 13, 2023 1 hour ago, ebinmaine said: Absolutely agreed. Anyone who would take the time to set up parts all in a row for a pic is likely going the extra mile on the restoration. Excellent. Oh, you mean like this? 🤣 2 5 1 Share this post Link to post Share on other sites
cleat 4,990 #35 Posted November 13, 2023 Gotta be organized. 1 1 Share this post Link to post Share on other sites
lynnmor 6,802 #36 Posted November 13, 2023 13 hours ago, c-series don said: Oh, you mean like this? 🤣 A clean linen tablecloth would make for a more presentable portrait. 3 Share this post Link to post Share on other sites
cleat 4,990 #37 Posted November 13, 2023 (edited) Tunnel ready to install. Yes I know the back bit is missing that connects to the front fender bracket on both sides but I have a fix for that being installed soon. Dust cover ready to install Lift latch plate ready to install. Tunnel sat onto frame. Left lift bushing installed (right one was left in as it was really stuck). Tunnel, dust cover, and lift latch plate bolted to frame using stainless fasteners. Progress as of now. Edited November 13, 2023 by cleat 3 3 Share this post Link to post Share on other sites
cleat 4,990 #38 Posted November 13, 2023 I cleaned up, rearranged, and bookmarked the 520-8 parts list that I downloaded from the manuals section on here. Not perfect but I believe it is easier to read and use. Tractor 1990 520-8 41-20O801 TIPL.pdf 2 Share this post Link to post Share on other sites
cleat 4,990 #39 Posted November 13, 2023 (edited) Brake rockshaft, pin, and spring ready to install Brake rockshaft, pin, and spring installed (excuse the fingerprints, they have been cleaned up). Edited November 13, 2023 by cleat 2 1 1 Share this post Link to post Share on other sites
cleat 4,990 #40 Posted November 14, 2023 Clutch idler arm assembly ready to install. Brake rear rod ready to install. Clutch idler arm assembly and brake rear rod installed. 4 2 Share this post Link to post Share on other sites
cleat 4,990 #41 Posted November 14, 2023 Fender support bracket and gas tank brackets ready to assemble. Fender support bracket and gas tank brackets assembled (note button head bolt for rear lift clearance). 4 1 Share this post Link to post Share on other sites
cleat 4,990 #42 Posted November 14, 2023 Side panels ready to install. Side panels installed along with a few wire harness clips. Battery support ready to install. Battery support installed. PTO lever installed. 3 2 Share this post Link to post Share on other sites
cleat 4,990 #43 Posted November 14, 2023 Installed front plate assembly. ++ Installed PTO clutch rod assembly. 4 1 Share this post Link to post Share on other sites
ebinmaine 63,270 #44 Posted November 14, 2023 @cleat I want to thank you for taking such great pictures of this process. This is excellent reference material. I'd like to find the brake area of a 520H so Trina can see what that looks like.... 1 Share this post Link to post Share on other sites
Moparfanforever 737 #45 Posted November 14, 2023 3 minutes ago, ebinmaine said: @cleat I want to thank you for taking such great pictures of this process. This is excellent reference material. I'd like to find the brake area of a 520H so Trina can see what that looks like.... 2 Share this post Link to post Share on other sites
cleat 4,990 #46 Posted November 14, 2023 (edited) Here are some hydro brake photos. On the lower left is the self centering roller in the brake cam. Ignore the bearing on the right as that is part of the foot control. This is the procedure for setting up neutral position and brake. Wheel horse 520H service manual.pdf Edited November 14, 2023 by cleat 1 4 Share this post Link to post Share on other sites
ebinmaine 63,270 #47 Posted November 14, 2023 AWESOME!! 1 Share this post Link to post Share on other sites
cod 116 #48 Posted November 14, 2023 Great work Cleat! Unfortunately one runs out of adjectives when view your posts but to me it's amazing! Good Luck!! 3 Share this post Link to post Share on other sites
cleat 4,990 #49 Posted November 15, 2023 Front brake rod ready to install. Pedal end with nylon washer, stainless washer, and cotter pin. Bellcrank end with stainless washer and hairpin clip Rod installed onto bellcrank. Brake pedal ready to install. Brake pedal installed. 4 6 Share this post Link to post Share on other sites
OoPEZoO 370 #50 Posted November 15, 2023 As the others have said......great pics. Thank you for taking the time, and the tractor looks fantastic 2 Share this post Link to post Share on other sites