cleat 4,984 #77 Posted January 29 Hoods back from my painter. One is for this tractor and the other is for a 520-8 I have been working on. These will sit here until the snow melts and can move the tractors from the garage out back easier. That will allow the paint to dry more as well. 3 4 Share this post Link to post Share on other sites
cleat 4,984 #78 Posted February 23 Snow melted down enough I could get the tractor from the back garage into the heated shop. It will warm up and dry off overnight then I can continue the assembly. 1 2 Share this post Link to post Share on other sites
cleat 4,984 #79 Posted February 24 Tractor cleaned and plastics polished. Stainless steel hardware ready to install fender and seat 3 2 Share this post Link to post Share on other sites
cleat 4,984 #80 Posted February 24 Fender installed along with seal gas lift bracket Seat installed. Seat gas lift seems weak so I installed a new one. New one uses ball mounts instead of the eyelet style so balls had to be installed. Seat stays up better with the new gas lift. Turned on the lights and the taillights both work. 3 4 Share this post Link to post Share on other sites
cleat 4,984 #81 Posted February 25 Some of you eagle eyes may have noticed the indicator panel went from a single oil light to the full array of lights. It went from this. To this That is because I swapped the dash and wiring with the other 520 I am converting to a 520-8 That tractor went from this. To this. The other thing I did was to stick down little 2" hard plastic discs under the seat bumpers to protect the paint on the fender. 1 4 Share this post Link to post Share on other sites
mrc 727 #82 Posted February 25 hi cleat, love that snap-on puller set in the wall mounted cabinet! 1 Share this post Link to post Share on other sites
cleat 4,984 #83 Posted February 25 That came from work likely around 10 years ago. The cabinet had been picked quite bare so they let me have it. I was able to gradually source all the missing pieces one by one and it is now complete. It does not get used very often but sure is handy when required. Inside is a shadow board with all the part numbers which made finding the right pieces easier. Some of the puller jaws I ordered new because all the used ones I could find were bent or damaged. 5 Share this post Link to post Share on other sites
OoPEZoO 366 #84 Posted February 25 Ooof…..that cabinet would be handy. I can’t tell you how many times I’ve had to cobble together some sort of fancy puller to get a job done. Usually involves some scrap steel, the welder, and a bunch of swearing. The tractor looks amazing BTW. 1 Share this post Link to post Share on other sites
cleat 4,984 #85 Posted February 25 Hood bolted on. Underside of hood. Air cleaner lid polished Headlights plugged in with some grease in the plug to hopefully stop corrosion. 1 4 Share this post Link to post Share on other sites
cleat 4,984 #86 Posted February 25 Wire harness showing sealed fuse holders and 9 pin connector. 1 4 Share this post Link to post Share on other sites
cleat 4,984 #87 Posted February 25 Air cleaner decal installed. Model number decal installed. Do not tow decal installed. 1 6 Share this post Link to post Share on other sites
cleat 4,984 #88 Posted February 26 Maintenance decal installed on back of hood. The main hood decals and rear fender decal will be installed by a friend who is very good installing these. These decals have been here for several years so if they are no good any more I will order new ones. 2 1 Share this post Link to post Share on other sites
cleat 4,984 #89 Posted February 26 Gave air cleaner lid a good coat of Mothers Synwax top and bottom for protection and shine. 1 2 Share this post Link to post Share on other sites
kpinnc 10,738 #90 Posted February 26 35 minutes ago, cleat said: The main hood decals and rear fender decal will be installed by a friend who is very good installing these. Just spray the area and backside of the decals with Windex. It allows you to slide them around and then wipe them with a cloth to squeeze out bubbles. If they start to get sticky, lift and re-spray. The Windex evaporates over several hours. Works great! 3 1 Share this post Link to post Share on other sites
Pullstart 59,733 #91 Posted March 2 Such a nice machine Cleat! 1 Share this post Link to post Share on other sites
peter lena 8,069 #92 Posted March 3 @cleat OUTSTANDING JOB ON THAT ! btw , my son has had his 312-8 coming on 25 years , has used MOBIL 1 , oil / grease , from the start , never a lubricant issue , that and keeping in touch with anything . also been using a mineral oil wipe down , on paint , looks fresh / clean , zero rust / rot . like boat / plastic / vinyl cleaner on plastics , keeps them looking fresh , no fading , pete 1 Share this post Link to post Share on other sites
cleat 4,984 #93 Posted March 18 (edited) Gave up on waiting for my decal guy to come over and just decided to try installing them myself. Dampened the tractor with distilled water with a few drops of Dawn mixed in. Started with the rear fender to work up the nerve to do the hood. Left side of hood done. Right side done. Front done. I found this one to be the most difficult. All decals on tractor. Machine is almost done. Decals have no bubbles or wrinkles. What looks like that in the pictures is little dents in the hood. Edited March 18 by cleat 6 Share this post Link to post Share on other sites
cleat 4,984 #94 Posted March 18 Headlight bezels installed. 3 1 Share this post Link to post Share on other sites
cleat 4,984 #95 Posted March 18 I will let the decals adhere for a couple of days then install the hood latches. Until then this is how she sits. 2 7 Share this post Link to post Share on other sites
kpinnc 10,738 #96 Posted March 19 Absolutely beautiful! 3 Share this post Link to post Share on other sites
cleat 4,984 #97 Posted March 20 Hood latch ready to install with the two slightly different length rivets as required and new rubber installed. Right side hood latch installed. Both hood latches installed. Hood latched shut. Tractor is almost done, needs a battery then to drive it around and check for any issues. 3 1 Share this post Link to post Share on other sites
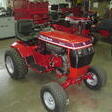
cleat 4,984 #98 Posted Tuesday at 12:55 PM New battery installed. Got this tractor and the 520-8 clone I built both out in the sun together for the first time. I then drove around the yard for a while. Tractor runs and drives amazing. 4 1 Share this post Link to post Share on other sites
Thetbone 3 #99 Posted Tuesday at 05:53 PM Absolutely looks awesome, nice thread that documents everything. I'll be looking to do the same to my 520-H this winter. Share this post Link to post Share on other sites
Damien Walker 223 #100 Posted Tuesday at 09:25 PM Doesn't half get the restoration juices flowing! Share this post Link to post Share on other sites