rog 8811 33 #1 Posted June 20, 2015 I thought I ought to start a thread to show progress with my rescue horse. It is a 1972 800 3 speed that was destined to go to scrap.It seems that a number of people had had a go at it and given up without ever getting to the bottom of the problem. As the coil appeared to be missing I was guessing a lack of spark might be in there somewhere.Well the coil turned up in amongst the leaves in the gap under the rear mudguards on top of the transaxle. I took it and the battery to the workshop. The battery turned out to be U/S so (new one on order). I tested the coil and it sparked as it should. This afternoon I had a bit of time so I whipped the points off, they were pitted....(new points and condenser on order), for now I have just tickled them up a bit, gapped them and connected all the bits up. I rigged a starter battery and turned it over.... I have a nice fat spark! There is no fuel in the tank so I need to take mrs Rog out shopping later... I will get some fuel and video my first try at a start up, I will be back 2 Share this post Link to post Share on other sites
rog 8811 33 #2 Posted June 20, 2015 I bought fuel put some in.....filmed it starting after a couple of turns, or at least I thought I had filmed it...Camera was on pause, I filmed the bit where the carb flooded and it would not restart. I think I need to have a look at the float chamber.The main thing is that my horse lives! 5 Share this post Link to post Share on other sites
neil 2,408 #3 Posted June 20, 2015 Congratulations on getting her going . Now you can start having some real fun driving her around and doing some work . Share this post Link to post Share on other sites
muz123 1,191 #4 Posted June 21, 2015 Another one saved! congrats on getting it going! Share this post Link to post Share on other sites
rog 8811 33 #5 Posted June 21, 2015 Today I had time to clean the engine and take the carb off for a check over.I couldn't find anything that stood out other than the float seemed a bit high, reset it lower and reassembled it all.It now runs beautifully, no flooding, knocks or phuts. I ran it backward and forward just fine, gears, clutch and brake all seem to work as they should.I have a couple of questions:The engine is grey and looks as though it has always been grey, is this usual?The seat is a bit too close to the steering wheel, I had a look but there don't seem to be any holes at the correct centers further back, were there adapter feet available in the past? 1 Share this post Link to post Share on other sites
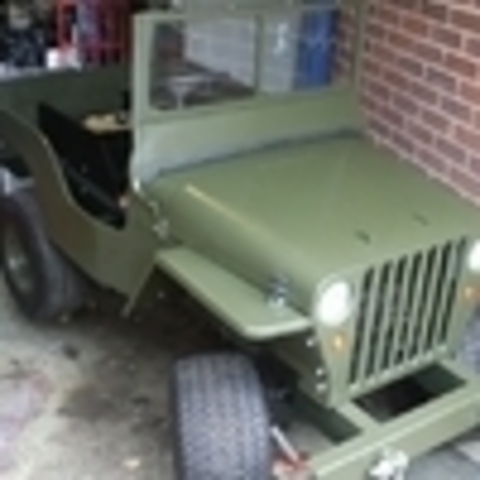
Anglo Traction 761 #6 Posted June 23, 2015 I have a couple of questions: The engine is grey and looks as though it has always been grey, is this usual?The seat is a bit too close to the steering wheel, I had a look but there don't seem to be any holes at the correct centers further back, were there adapter feet available in the past? Glad you have sorted the running issues. As for the Engine colour, it is probably not the original Engine, as in 1972 they sprayed the Tractor partially assembled. So the Engine would have had red paint all over it and the wiring probably (like mine was). If you have an Engine I.D Label on the Shrouds and you can post the Model, Spec and Serial numbers on here, we can give you some info on it.As for Seat adjustment. The Seat was supplied from UK to the WH Belgium Assembly Plant, rather than Import many Seats from the U.S.(some were imported and fitted) .This meant the Pre drilled Fender Seat Pan spacing (for U.S. seat pattern) did not match the UK Bostrum Seat bolt pattern, so were just drilled to fit (a Belgium Bodge).This results in excessive perforation of the Seat panel area and weakens it considerably. You can drill more holes if you wish, but I would advise adding a strengthening plate of 2 or 3 mm on the area as I have done on both of mine. After late 1973, they added Springs between the higher seat position and Fender Panel, as well as increasing the length of the upper Steering Column to compensate for the need for leg room.Just one observation, and you may have already sorted it, but I see a possible trapped leaf under the Cylinder Head Shroud?. Will be worth taking the Shrouds off and ensuring the Cooling Fins are all clear. Regards. 1 Share this post Link to post Share on other sites
C-101plowerpower 1,605 #7 Posted June 23, 2015 looking at the engine collour i'd say it's an kohler service engine(replacement) the gray is the factory primer so you could rattle can it the collour of choice when you put it in the machine 1 Share this post Link to post Share on other sites
rog 8811 33 #8 Posted June 23, 2015 (edited) Thanks for the engine info, I guessed it must be something like a replacement engine, there is a label on it that is a bit worn, this is what I can pick out:Model No: K18..... (the rest is gone)Spec No: 30538 (the 8 could be a 6 or a 3)Ser No: 1716403*72 (* unreadable)I hope there is enough left to get a year out of it as it is all part of the history.I will probably knock up some adaptor plates to move the seat back a bit...I fitted better when i was a kid! Edited June 23, 2015 by rog 8811 Share this post Link to post Share on other sites
meadowfield 2,570 #9 Posted June 23, 2015 I can't see it clearly, but that decal style is from around 1982 onwards. Before then the serial number was separate and a few less digits.I'll go with it being a replacement too... Share this post Link to post Share on other sites
gwest_ca-(File Mod) 10,912 #10 Posted June 25, 2015 (edited) 10-digit Kohler serial numbers beginning with 17 were made in 1987.This info is near the front of the Kohler service manualshttp://www.wheelhorseforum.com/files/file/1108-engine-kohler-dating-engines-by-serial-number-1965-95pdf/30533http://www.partstree.com/parts/kohler-engines/engines-horizontal/k181-30533-kohler-k181-engine-k-series-barton-earle-ind-8hp-6kw-specs-30100-30848/30536http://www.partstree.com/parts/kohler-engines/engines-horizontal/k181-30536-kohler-k181-engine-k-series-service-engine-8hp-6kw-specs-30100-30848/30538http://www.partstree.com/parts/kohler-engines/engines-horizontal/k181-30538-kohler-k181-engine-k-series-service-engine-8hp-6kw-specs-30100-30848/Garry Edited June 25, 2015 by gwest_ca 1 Share this post Link to post Share on other sites
rog 8811 33 #11 Posted June 25, 2015 Thanks for the links and the info, very useful.I will keep you all posted with any progress in the coming weeks Share this post Link to post Share on other sites
rog 8811 33 #12 Posted June 28, 2015 (edited) I decided to throw some paint at the fan shroud, I had read that Ford engine red was a good choice...... I think UK engine red is different to US engine red....It is a bit garish!Better than the rusty flaking grey though .Replaced points, condenser, plug, fuel filter and battery. Then it rained, with all my freshly painted tins and tools outside :(. Which stopped me from removing the front wheels for repainting and tyre replacement, oh well next week maybe.Rain stopped, sun came out, tins went back on! Edited July 5, 2015 by rog 8811 sp 1 Share this post Link to post Share on other sites
rog 8811 33 #13 Posted July 5, 2015 As the front tyres are shot, one has split through, I took the wheels off...New bearings on order.I struggled to break the bead on both of them and once the tyres were off I could see why, the rims are crusty as hell, I am guessing that I will need tubes in both of them.I would post pictures but for some reason I am limited to 0.24MB..... is there a limit to uploads on the forum? I don't really want to use a hosting site if I can avoid it. Share this post Link to post Share on other sites
WNYPCRepair 1,875 #14 Posted July 5, 2015 As the front tyres are shot, one has split through, I took the wheels off...New bearings on order.I struggled to break the bead on both of them and once the tyres were off I could see why, the rims are crusty as hell, I am guessing that I will need tubes in both of them.I would post pictures but for some reason I am limited to 0.24MB..... is there a limit to uploads on the forum? I don't really want to use a hosting site if I can avoid it. There is a limit for non-supporters. Being a supporter is not expensive, and helps pay the bills. http://www.wheelhorseforum.com/store/ Share this post Link to post Share on other sites
rog 8811 33 #15 Posted July 5, 2015 (edited) It seems churlish not to share photo's as I know they attract visitors far better than words alone, support fee paid!Tyre removal with none of the correct tools Pictures of: 1) Torn tyre2,3,4 and 5) My bead splitting rig6) Crusty rim after a bit of grindingI have a shot blasting cabinet but the actual gun appears to still be in storage with the majority of my engineering gear so I will try and find a local blaster who can clean them up ready for painting.... I think I will take them to a tyre place to put the new tyres on Edited July 5, 2015 by rog 8811 1 Share this post Link to post Share on other sites
rog 8811 33 #16 Posted July 5, 2015 (edited) The seat has a split right along the top edge, the first time I sat on it I got a soggy back so I took the seat apart and set the squab out in the sun for a few days until the foam had dried.I treated the rust on the pan then set too on a quick fix of the split, I know up front it will not last forever but it will do for now.Pictures:1) Wet split seat, yuck2) In bits3) Mastic tape for the inside of the split4) Mastic tape cut to shapeOnce I had got the tape stuck in place I used a spray glue to reattach the foam to the seat skin.5) Super glue used to stitch the outside of the split6) Black gaffer tape over the topthis extends right to the edge of the seat skin, under where the trim will hold it in place when I have repainted the pan.7) A quick rub over with boot polish Edited July 6, 2015 by rog 8811 better photo loaded 2 Share this post Link to post Share on other sites
rog 8811 33 #17 Posted July 11, 2015 (edited) Another week end another update.First the wheels, I had them shot blasted and undercoated, gave them a couple of coats of paint....then scratched it all wrestling the new tyres on.Not a job I would like to do on a regular basis. I am just waiting for the new bearings then i can have a proper drive around I also got the seat finished, back on the metal pan, looks pretty good, only time will tell how it will last. Edited July 11, 2015 by rog 8811 1 Share this post Link to post Share on other sites
953 nut 54,314 #18 Posted July 11, 2015 You are doing an amazing job, thanks for sharing your story with us, Share this post Link to post Share on other sites
WNYPCRepair 1,875 #19 Posted July 11, 2015 Looks great! Share this post Link to post Share on other sites
meadowfield 2,570 #20 Posted July 11, 2015 Looking good! Share this post Link to post Share on other sites
wheeledhorseman 574 #21 Posted July 14, 2015 Nice work and pics. Share this post Link to post Share on other sites
Stigian 1,234 #22 Posted July 16, 2015 Nice work Rog, I like your ghetto way of getting the tyres off Welcome to RS by the way. Share this post Link to post Share on other sites
rog 8811 33 #23 Posted July 17, 2015 ....I am looking for lights, I have found these and am thinking they might do the trick.I am off on holiday for 2 weeks so no updates for a while, I will show you how it looks after my return 1 Share this post Link to post Share on other sites
rog 8811 33 #24 Posted August 9, 2015 (edited) Back from holidays, back to the workshop, The wheel bearings arrived whilst I was away so first....The bearing tubes were a bit bell mouthed, bearings were a light press fit but I could see that grease would probably find a way out so I sealed around the bearings with some silicone sealant. Now back on and looking nice. Next up my head lamps, now I know they are a bit exposed sticking out like they are but I am not going to be driving through any scrub in the foreseeable future but I do return to base in the dark at times. No hood was drilled in the making of this product so return to original is always possible!The horse will need to be put on the back burner for a while now as I have promised Mrs rog that I will get the garden sorted out, I will update the thread when I am able to get on again. Wheels on (1).JPG Lamp plate (4).JPG Lamp plate (5).JPG Lamps on (1).JPG Lamps on (2).JPG Edited August 9, 2015 by rog 8811 1 Share this post Link to post Share on other sites
Pullstart 62,149 #25 Posted August 10, 2015 looks like good headway Rog! nice work saving one from scrap too Share this post Link to post Share on other sites