davem 12 #1 Posted December 25, 2014 hello and merry Christmas maybe someone on hear has run into this with a long frame tractor. I bought a brand new set of hl-5 lights they are pm 401 in the boxes . I then later purchased the light bar from earl up in Indiana thanks to one of the members on hear who turned me on to him . I have a brand new cole hersee switch for this. now my question is this I am either going to have to drill the dash panel and take a chance of screwing up the paint and new decal which I rather not chance this tractor is almost done . the other thing I was considering was to drill the hood stand but it would have to be offset so the upper steering shaft would not interfere. now I have seen the original bracket and one on hear that a member shows how to build question is what would you guys do and will that bracket bolt up to the 1056 or am I goanna have drill holes thanks dave 1 Share this post Link to post Share on other sites
formariz 12,354 #2 Posted December 25, 2014 I am not familiar with your model but would this work for you? 1 Share this post Link to post Share on other sites
davem 12 #3 Posted December 25, 2014 well that looks to me like the original switch bracket from the original light kit or you did a nice job of of making that one. problem with mine is its 1966 1056 and the pto bracket is mounted on the right side of the hood stand I guess you would call this a long frame tractor with the square hood just was curious what other guys did with there tractors like this or just bite the bullet and drill the dash. I hate to do this but I may have too will see maybe someone else will chime in that devised a better way Share this post Link to post Share on other sites
520HC 208 #4 Posted December 25, 2014 There is a hole in the pto bracket that's bolts to the side of the hoodstand. I have used it several times for the light switch location. Share this post Link to post Share on other sites
AMC RULES 37,254 #5 Posted December 25, 2014 No drilling... fab up a bracket. 1 Share this post Link to post Share on other sites
55rj35jr 626 #7 Posted December 26, 2014 this is the bracket I made for my 701 IMO I would not drill any holes Share this post Link to post Share on other sites
TT-(Moderator) 1,169 #8 Posted December 26, 2014 There is a hole in the pto bracket that's bolts to the side of the hoodstand. I have used it several times for the light switch location. Exactly! 1 1 Share this post Link to post Share on other sites
davem 12 #9 Posted December 26, 2014 TT, on 25 Dec 2014 - 7:27 PM, said: Exactly! hlswitch.png i think I like that looks clean and no more holes I will check this out in the morning thank you dave sr 2 Share this post Link to post Share on other sites
davem 12 #10 Posted December 27, 2014 tt I went out this morning and looked at the pto bracket . well the hole that I thought I could use that you pointed out to me, I can not seems on this 1056 the throttle cable goes right threw that hole. but I believe I can make a bracket to fit in there may have to take the pto loose or off to get the bolt pattern I got some stainless steel laying around will see what happens I think that's about the only option I have at this point Share this post Link to post Share on other sites
TT-(Moderator) 1,169 #11 Posted December 27, 2014 I'd recommend moving the the throttle cable..... it's not supposed to be routed through that hole. I can get pictures of the correct cable routing on my 1056 if no one beats me to it. 2 Share this post Link to post Share on other sites
davem 12 #12 Posted December 27, 2014 tt I have the manual for my tractor . however it does not include the pto set up as we all know this was an option however when I pulled this tractor apart that's the way they had it routed so I just put it back together the same way I took it apart assuming it was correct I guess were going to pull the dash again and fix that thanks for the tip 1 Share this post Link to post Share on other sites
davem 12 #13 Posted December 27, 2014 tt well I did not have to pull the dash pulled the 2 bolts from the pto bracket unhooked the throttle cable slid the bracket of the throttle cable. installed the switch in that hole tt pointed out, oh had to disconnect the pto rod no big deal installed the wiring put her back together and whala bug eyes well thanks to you tt no more holes and looks really good thanks to all who gave me suggestions I really appreciate your help dave sr happy new year to all you guys 2 Share this post Link to post Share on other sites
KC9KAS 4,746 #14 Posted December 27, 2014 tt well I did not have to pull the dash pulled the 2 bolts from the pto bracket unhooked the throttle cable slid the bracket of the throttle cable. installed the switch in that hole tt pointed out, oh had to disconnect the pto rod no big deal installed the wiring put her back together and whala bug eyes well thanks to you tt no more holes and looks really good thanks to all who gave me suggestions I really appreciate your help dave sr happy new year to all you guys Now we need photos! 1 Share this post Link to post Share on other sites
davem 12 #15 Posted December 28, 2014 i will try and get them on hear as soon as my son stops in . i have no clue on how to do it on red square but he will show me how besides i only got two more pieces to go hood and seat pan and she's done. i will keep you posted thanks again for all your help , we will get them on hear dave sr 1 Share this post Link to post Share on other sites
davem 12 #16 Posted December 30, 2014 (edited) hi again this is just a test photo to see if I have it right please bear with me first time I ever did this I warn you she is not fully dressed missing some of her clothes I will get a shot of the light switch install in the morning Edited December 30, 2014 by TT 1 Share this post Link to post Share on other sites
TT-(Moderator) 1,169 #17 Posted December 30, 2014 Sure looks good from here! Share this post Link to post Share on other sites
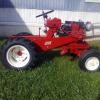
davem 12 #18 Posted December 30, 2014 (edited) hello photos of the switch and bug eyes Edited December 30, 2014 by TT 3 Share this post Link to post Share on other sites
TT-(Moderator) 1,169 #19 Posted December 30, 2014 Looks great! Hold your cursor over the "IMG" box next to the Photobucket image you wish to display here in your post. Left-click the mouse once and the box should turn yellow and the word "Copied" should be visible. Return to your new post window here and paste the saved link into the post window by right-clicking once and selecting "paste" from the drop-down menu. You can practice with a few more images. I'll fix it up if you have problems. Share this post Link to post Share on other sites
AMC RULES 37,254 #20 Posted December 30, 2014 Dig the new lights man. Share this post Link to post Share on other sites
davem 12 #21 Posted December 31, 2014 thanks guys can't wait till I get her fully dressed and done I do have the original deck for this tractor its almost mint no holes no rust I am looking for a ribbon with this tractor when its done I have a ton of money into it and allot of time I hope I have a chance at one . I would like to put a stainless steel stack on her but everything is original except the tires I was not going to put those dry rotted things back on even though they still held air going back to the stack I seen a post on hear show me your stacks there's a guy on there I believe to be an old rj but anyway that stack is so cool I like it how ever now I am going away from original. what do you guys think stay stock or put a stack on her? if I went to the stack I would want polished stainless I have been all over the net I can't find one I know I am rambling heck I am excited will that effect the engine no back pressure and all dave.sr Share this post Link to post Share on other sites
davem 12 #22 Posted December 31, 2014 (edited) a few more terry I did what you said with these photos I don't know if I have something set wrong or what's going on the pics I just posted I don't know if they'll post or not my son hasn't stopped over as of yet but when he does I will have him take a look at it hope I didn't use all my photo privileges up if I did please delete these thanks dave sr Edited December 31, 2014 by TT 1 Share this post Link to post Share on other sites
AMC RULES 37,254 #23 Posted December 31, 2014 Your restoration is very clean... I'd keep the exhaust factory original. Share this post Link to post Share on other sites
JC 1965 1,543 #24 Posted December 31, 2014 Looks very nice, great job. Thanks for sharing. Share this post Link to post Share on other sites
davem 12 #25 Posted January 1, 2015 hi again happy new year too everyone on hear and god bless you all Share this post Link to post Share on other sites