jdleach 525 #1 Posted May 5, 2014 (edited) As the title states, I keep doing small things to my 312 to improve appearance, and make it run a little better. In the first photo, You can see how scratched up the instrument panel is. Not going to do much about that now, as I am using the tractor frequently, but there were things that could be done. All the screws have now been replaced with stainless steel ones, the steering column has been replaced with a new one (old one was already gone when I bought the tractor) and, courtesy of Glen Pettit, I have installed a new throttle knob. Still haven't installed a steering button, but that is coming. The column I thought would be a bear, having read numerous posts where forum members struggled to get their steering wheels off. This one came off very easily, no doubt due to the tractor always being kept indoors. Another surprise was the fit of the column. I recently looked at a rather pristine 312-8 in a local mower shop, and noticed that there was a flat washer and a wavy washer at the top of the column to keep tension on it, and in place against the dash. When I put my column in, there is only about 1/32" space between the wheel and column, therefore there was no need to use washers. The column doesn't bind or rattle, and stays put. Still need to replace the range shift knob. Edited May 5, 2014 by jdleach Share this post Link to post Share on other sites
jdleach 525 #2 Posted May 5, 2014 In this next photo, you see my new axle caps, again courtesy of Glen. Took the front wheels off last weekend and checked the bearings. They were nice and tight, and had no dirt in them. Cleaned the built up tarry grease from the wheels, and reinstalled them with new cotters, replacing the nails that were in there. Share this post Link to post Share on other sites
Sparky-(Admin) 25,964 #3 Posted May 5, 2014 Keep it up and she'll be like brand new soon! Mike........ Share this post Link to post Share on other sites
jdleach 525 #4 Posted May 5, 2014 Here is a shot of the hood hinge rebuild I had to do. When I first got the tractor, the hinge would open almost to the ground, and flopped around like a rag. The hinge pin was worn nearly through on the ends, and the hinge brackets had 7/8" long slots cut into them where the 3/8" holes should have been. Making a new pin in the lathe was not much of a problem. The worn 3/8" bracket holes were a little more difficult. I had to carefully weld up the holes with the TIG, then carefully die grind them back to round so as to maintain hole alignment. Then I reamed the holes larger, made bronze bushings, and pressed them into the brackets. I then assembled the hinge using new fasteners. The mule drive bracket holes are a little worn, but not severely at this point. Will bush them at a later date. Although the hinge was now reasonably tight, the hood would still drop down and hit the mule drive. You can see where it has hit numerous times, and now sports a dent. The original hood stop rod was gone when I got the machine, so I fashioned a new one from 4140 pre-hardened rod. In this case, I used 5/16" rod instead of the original 1/4". This necessitated drilling the mule drive holes out slightly. I also deviated from the factory method of holding the pin in by drilling the cross holes at the very ends of the pin, and making the pin about 1/8" longer. This puts the cotters on the outside of the mule bracket so that the cotters cannot interfere with the hood hinge brackets. Also, instead of using cotter pins, I employed spring cotters. Just looked better to me. 1 Share this post Link to post Share on other sites
jdleach 525 #5 Posted May 5, 2014 (edited) Here is another shot of the hinge assembly. You can see the new carriage bolts, nuts, and washers. Originally, Wheel Horse used Loc-tite on the bolts. Here, I used split-lock washers along with flat washers. Seemed a better repair. You can also see how I bushed the hinge pin. To "capture" the bushing in case it ever got loose in the bracket, I placed the head toward the inside of the bracket (there was no space between the hinge bracket and mule drive bracket any way), and cut the "E" clip grooves about .100" closer to the middle of the pin to accommodate for the bushing head length. Also note that since there is no cotter on the inside of the stop pin, the hinge bracket can never strike the cotter regardless of pin rotation. The only thing I want to do now to the hinge, is to somehow fabricate rubber bumpers to completely take out any play in the hinge. As it stands, I could bush and tighten the hinge all I want, but given time, it will still wear out the pin, bushings and brackets. The only way to prevent such wear, is to apply rubber bumpers that cushion the hood, and keep slight tension on the hinge so as to prevent unwanted movement. Edited May 5, 2014 by jdleach 1 Share this post Link to post Share on other sites
jdleach 525 #6 Posted May 5, 2014 Sorry about the last, I somehow double posted the photo. And thanks Sparky. At some point, I would like to fix the tractor to like new condition. Right now, I just need to use it, and prevent it from wearing more than it already has. Share this post Link to post Share on other sites
jdleach 525 #7 Posted May 5, 2014 Not much going on in this photo. There is a new gas cap, as the old one was beat all to hell, and the crystal was broken out, thus allowing water and dirt to get into the tank. I ordered a new Kelch cap with gauge, but it hasn't come in yet. The seat springs had the nails removed, and new spring cotters and flat washers installed. I just love spring cotters, they look more professional. The flat washers are not original, but do tighten the springs somewhat and, when I ever get a chance to repaint the seat bracket, will prevent paint scarring by the spring cotters. Although you can't see it, I have also replaced the tranny oil with new, and cleaned about a bale of dead grass from the top of the transmission. Share this post Link to post Share on other sites
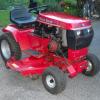
jdleach 525 #8 Posted May 5, 2014 (edited) Here is a frontal view of the tractor taken this evening. She now sports new headlights, new headlight bezels, and most of the dents in the grille have been beaten out. There was a sizable dent in the center of the lights, no doubt that this caused the original bezels to get scragged. Fortunately, the sheet metal had not been creased, and the dent was pounded almost completely into submission, thus allowing installation of the NOS bezels. Not seen are the oil change, new air and pre-air filters, new mower blades, and a lot of grease and oil applied to anything that moves. Given the pretty serious wear on the grille paint, I suspect this machine mowed a lot of brush and multi-flora rose bushes. Edited May 5, 2014 by jdleach Share this post Link to post Share on other sites
jdleach 525 #9 Posted May 5, 2014 And, here is a side view taken this evening. Yeah, I know, it has a lot of scratches, but it looks considerably better than when I got her. One of the obvious items needing attention in this photo, is the mis-routed throttle cable. The cable appears to be original, yet also appears to be too short. It is possible that in the past, the end had broken, and the PO had just shortened the cable. If such is the case, I will be in the market for a new one. The choke cable is properly routed, and still works smoothly. The wiring also doesn't look to have been molested, but is rather messy and tangled. Too, the fuses had to be re-clipped into their proper places, as they were just dangling when I purchased the tractor. Will try to tidy up the wiring with ties and loom in the near future. All in all, I am ecstatic with the 312. She smokes a bit, and has a faint rod knock. Still, she mows beautifully, has plenty of pep yet, and really doesn't look all that bad considering it is almost 30 years old. 1 Share this post Link to post Share on other sites
AMC RULES 37,259 #10 Posted May 5, 2014 Easy to see... you're going to have that ol' looking brand new in no time at all. Looks great so far, keep up the good work. Share this post Link to post Share on other sites
jdleach 525 #11 Posted May 7, 2014 Thanks Craig. Eventually, perhaps this winter, I will try to repaint all the sheet metal. An engine overhaul is definitely in the very near future. I noticed that it is using about 1/4 quart of oil after about 4 hours of operation. Thickened the oil with Lucas (don't like doing it) to try to slow down consumption. If I can just limp her through the summer, I will be happy. That is the thing about Wheel Horses, and other quality tractors like Cubs, Deeres, etc. from years ago for that matter. They can have issues and be sick, yet still run. Too, when you do have to work on them, you have something to work with, you repair and rebuild, and you have a tractor that will last another 30 years with proper care. 1 Share this post Link to post Share on other sites
jdleach 525 #12 Posted June 2, 2014 (edited) Moving right along with the 312-8 improvements over the past month. The mower deck received special attention this time. When I purchased the tractor, I was informed that the deck was just a few years old. Examination of the serial and model number revealed it is actually a 1994-5 model. Still, it is in fantastic shape, regardless of the age. There were several problems though, one of which, the worn out blades, I have already attended to. The other items were the leveler rod had been replaced with a length of all-thread, and the deck wheels had been replaced with two goofy looking black, ball shaped plastic wheels which were a good 1" smaller in diameter than the originals. The leveler rod was an easy fix, I just shot a PM to Kelly, and had a good used one here by last week. A trip to the wire wheel, a coat of primer and IH Red paint, and voila!, I had the correct rod. The goofy wheels were another matter. After poking around the internet, I settled on a fair priced pair of new, original-type wheels and sent off for them. The seller got them to me in jig time, and they are exactly what I needed, right down to the grease zerk and red paint. On Thurasday of last week, I came home from work prepared to install the rod and wheels. Rod went in just fine, but I found that the deck wheel spindles were about 11/16" too long. Apparently when the PO had replaced the original wheels for the goofy ones, he had to replace the spindles too. Figuring that I would most likely have to order the correct length spindles, and not wanting to wait any longer, I decided to shorten the ones I had in hand. The only nice thing about the plastic wheels, was that the hole size was the same as the proper wheel, and that the plastic wore the spindle hardly at all. A quick few minutes at the lathe to turn back the shoulder of the spindle, a spin of a 3/8" die to rethread, whack off the extra length in the saw, and I had two ready to install spindles. I installed the wheels Friday night after work, and couldn't be more pleased. The deck finally looks correct in all respects, and mowed well Saturday. The real issue with the plastic wheels, other than they were ugly, was the smaller diameter. This necessitated operating the deck at nearly the highest setting, and even then it would scalp in some areas of my lawn. The new wheels corrected that issue. On the tractor itself, I just could not resist. I found a set of very nice sidemarker lights at a local auto jobber, and got them installed and wired as taillights. Used stainless steel fasteners to prevent corrosion. Was hoping that Wheel Horse had left some connectors/wiring in the harness for just such an upgrade, but no, I had to cut one of the connectors to the switch, bundle the rear light wire with the headlight wire, and re-crimp. Used wire that I had lying around, which is not the correct gauge (bigger), but figured it will work till I get ready to paint the fender pan. At that time I will get the proper wire. The last thing I have done, is to install an hourmeter. Looked for several weeks untill I finally found a Datcon meter that looked almost identical to original equipment. Black face and trim, correct diameter, and proper specs. (12-24 VDC). The unit was new in the box, and only cost me $11 sans shipping, which was reasonable, less than $20 total. When I got the meter, I found out why the low price. Apparently it is a second. The meter housing is cocked about 30 degrees from the perpendicular. Made it a little tough to connect the leads when installed, but otherwise doesn't affect the appearance, or operation on the unit. To install the meter, I had to remove the dash and take it to work to punch a 2.062" hole for installation. Thought about just hole-sawing it, but ended up putting it in one of the CNC mills, and circle milling the hole. Got the location spot-on, and had a hole that was very clean and not ragged. After a trip to the sand-blast cabinet, and a coat of primer and semi-gloss black Rustoleum, the panel was done. Installed the new meter and panel the weekend before last. Outside of the now missing decals, it looks factory. In the case of the hourmeter, WH did have the connectors already in place, just had to clean them up a bit, and plug them in. Will post photos in the next day or two of the improvements. I am thinking of removing the seat springs and seat frame this afternoon, taking them to work tonight, and sandblasting/repainting them as I have time this week. The surface rust is really beginning to bug me. Edited June 2, 2014 by jdleach Share this post Link to post Share on other sites