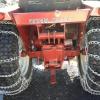
Machria 78 #1 Posted August 21, 2013 (edited) So their has been a small puddle of hydro fluid under my GT14 since I got it last winter. I removed the cover of the hydro controls and found the leak at the top of this lift control. Can this be fixed or do I have to replace the enitire part? If it can be fixed, how do you get it off? I tried turning the nuts on the bolts on the front of it (left side of first pic below) which go thru the frame of the tracker to the L bracket the lift control is on, the nuts turn but so do the bolts they are on. I can't figure out how to get to the other side of those bolts? Any help would be appreciated.... pics attached. Green arrow shows where it is leaking.... Edited August 21, 2013 by Machria Share this post Link to post Share on other sites
KC9KAS 4,746 #2 Posted August 21, 2013 Use a 1/4" drive ratchet, long extention, and a 7/16" socket to reach along side the frame to get to the bold head...Then use another ratchet/socket to get the nut offf. I know this is a real PIA, but it can be done....I actually made a plate with angle bracket on both sides of the tunnel and mounted 2 hydraulic valves onto the plate. 1 for the 3 pt lift, and the other for the mid mount cylinder. Disassembly of the valve is very simple, but I would guess you will have to go to a hydraulic repair shop for the "O" rings... Share this post Link to post Share on other sites
gwest_ca-(File Mod) 12,167 #3 Posted August 21, 2013 Service manual Last time I checked the part numbers had changed but still available from Toro. Garry Share this post Link to post Share on other sites
Machria 78 #4 Posted August 22, 2013 Use a 1/4" drive ratchet, long extention, and a 7/16" socket to reach along side the frame to get to the bold head...Then use another ratchet/socket to get the nut offf. I know this is a real PIA, but it can be done....I actually made a plate with angle bracket on both sides of the tunnel and mounted 2 hydraulic valves onto the plate. 1 for the 3 pt lift, and the other for the mid mount cylinder. Disassembly of the valve is very simple, but I would guess you will have to go to a hydraulic repair shop for the "O" rings... Hmmm... I can't figure out where your referring to put the ratchet onto the bolt head. It seems to be inside / between two panels separated by about 1", with no access to inside them, that I could find anyway? I couldn't even figure out how to get the outside panel off, if I wanted to just remove the whole panel to get at it. Service manual Last time I checked the part numbers had changed but still available from Toro. Garry Thanks for the link, I'll have a close look at it tomorrow, but at first glance I'm pretty sure it was written in Chinese, no? ;) Share this post Link to post Share on other sites
KC9KAS 4,746 #5 Posted August 22, 2013 (edited) I know it it tough, but it can be done....had mine off/on several times! On the file that Garry sent....I think this valve is the single Victor and takes the 109081 repair kit. It is not difficult to repair, just make sure nothing goes flying across the room when you disassemble it. Edited August 22, 2013 by KC9KAS Share this post Link to post Share on other sites
chazm 413 #6 Posted August 22, 2013 Before you remove the valve , be sure to mark the lines as to their position ( I use a paint pen & ID them line1- port 1, 2-2 & so forth). It will save the harassment when going back together. Then break the lines loose , may need a line wench to avoid rounding the heads if their tight. Then unbolt the valve. Just remember that when going back together with the valve. clean...clean ...clean Chasm Share this post Link to post Share on other sites
Machria 78 #7 Posted August 22, 2013 Before you remove the valve , be sure to mark the lines as to their position ( I use a paint pen & ID them line1- port 1, 2-2 & so forth). It will save the harassment when going back together. Then break the lines loose , may need a line wench to avoid rounding the heads if their tight. Then unbolt the valve. Just remember that when going back together with the valve. clean...clean ...clean Chasm Thanks. I did already think about marking them, and I cracked them already so they can all come off easy enough. I just need to figure out how to get to those two bolts... will have to look at it again. Share this post Link to post Share on other sites
Machria 78 #8 Posted August 22, 2013 I think this valve is the single Victor and takes the 109081 repair kit. I don't see that "repair kit" anywhwere.... do you guys have a source? (tried google, toro....) Share this post Link to post Share on other sites
Jeff-C175 7,207 #9 Posted August 22, 2013 (edited) Before dropping the big bucks on the Toro kit, check to see if our friend (and fellow RS member) has a kit that will fit your valve. I'm not sure that you have the same valve as the kit he has put together though... Hmmm... for some reason I'm unable to 'paste' the URL in here? Go to http://www.classickitchensandmore.com down on the left hand categories column all the way at the bottom, click on Wheel Horse Parts Edited August 22, 2013 by Jeffpicks Share this post Link to post Share on other sites
KC9KAS 4,746 #10 Posted August 22, 2013 I just checked this site: http://www.classickitchensandmore.com, and it plainly says the "O" ring kit WILL NOT fit the older style cast iron valves.....And that is what is on this GT-14. Sorry! Share this post Link to post Share on other sites
Jeff-C175 7,207 #11 Posted August 22, 2013 (edited) Darn... sure would save a bundle of cash! I was able to find that kit by googling... Try using 109081 TORO for your search. This is one that came up as example: http://www.rcpw.com/toro-parts/genuine/109081.html I've found RCPW to be among the best price-wise. Edited August 22, 2013 by Jeffpicks Share this post Link to post Share on other sites
KC9KAS 4,746 #12 Posted August 23, 2013 Just thought of something.......In the picture, it looks like your drive belt cover is still in place....Remove the belt cover to get to the bolts that hold the angle-iron bracket that the valve is mounted to. That explains why you couldn't figure out my 1st post...I thought you were trying to remove the valve from the bracket, but you can remove the bracket from the frame easier. Share this post Link to post Share on other sites
Machria 78 #13 Posted August 26, 2013 Thanks a million guys. BUT, still can't get the angle-iron bracket off the frame! So I'm trying to get the "belt cover" off, so I can get to the bolt heads of the angle-iron. I removed all the bolts on the cover, except for one. The top rear (closest to seat) bolt I can not get off. The bolt head again in on the inside (where the belt is), so I need to get a wrench or socket on it in the inside. I'm having a difficult time getting something in there, there is just no space to get a wrench or socket onto it. So is that the correct O ring kit? I'm not too worried about the $, just need to get this fixed so I don't ruin my driveway with hydro fluid, and so I can have the tracter up and running for the fall to get firewood and winter to snowthrow. http://www.rcpw.com/...ine/109081.html Thanks for help... Share this post Link to post Share on other sites
KC9KAS 4,746 #14 Posted August 26, 2013 Just thought of something.......In the picture, it looks like your drive belt cover is still in place....Remove the belt cover to get to the bolts that hold the angle-iron bracket that the valve is mounted to. That explains why you couldn't figure out my 1st post...I thought you were trying to remove the valve from the bracket, but you can remove the bracket from the frame easier. Share this post Link to post Share on other sites
Machria 78 #15 Posted August 27, 2013 (edited) Just thought of something.......In the picture, it looks like your drive belt cover is still in place....Remove the belt cover to get to the bolts that hold the angle-iron bracket that the valve is mounted to. That explains why you couldn't figure out my 1st post...I thought you were trying to remove the valve from the bracket, but you can remove the bracket from the frame easier. Yes, he was correct. BUT, the question is, how do I get the cover off? Specifically, how do I get the bolt that the yellow arrow is pointing to off? I can not get a tool onto the bolt head on the other side of this panel, nothing fits into there..... is there a trick to this? I have all the rest of the bolts off, if I could get this bolt off, the cover would slide off and I could remove the angle iron holding the lift valve and get this USA oil reserve killer fixed! Edited August 27, 2013 by Machria Share this post Link to post Share on other sites
Machria 78 #16 Posted August 27, 2013 Anyone on or around LI work on Wheelhorses? Share this post Link to post Share on other sites
KC9KAS 4,746 #17 Posted August 27, 2013 (edited) I think the belt cover is put on incorrectly right now (from what I can see in the photo). There is a threaded tab...actually 2 of them, and the belt cover should be on the outside with the bolts going through the belt cover and thread into the tab.....Therefore the bolt heads would be on the outside of the belt cover. How in the world someone got that screwed up is unknown to me, but if they got those bolts in there, someone should be able to get them back out! I will have to go to the horse barn to check out mine to see what else may have to be removed to get to these 2 PIA bolts. Machria, I am try my best to help you out! Edited August 27, 2013 by KC9KAS Share this post Link to post Share on other sites
Machria 78 #18 Posted August 27, 2013 ahhhhwww Krykeeee!!! No wonder I'm having such and issue with it! I was thinking, it can't be that hard, what the heck! I'm not a mechanic by any stretch, but I do know how to crank a wrench or two. Thanks for the help KC9, at least when and if I do get it off, I will know how to put it back together PROPERLY! By the way, is KC9 what you used to fly? Or your radio call sign? If KC9 plane, my father flew those many moons ago for the USAF and was in the air in the carabean area refueling bombers circling duing the Cuban missle crisis. If it's your call sign, I used to DX with lots of "Indiana" folks via skip on 27.xxx mghtz from Long Island. For some reason LI to Indiana is a perfect distance for skip. Share this post Link to post Share on other sites
DoctorHfuhruhurr 137 #19 Posted August 27, 2013 Have you considered using transmission sealer until you can get to fixing it properly? That may at least stop it from dripping on your driveway. I used a similar sealer on my Jeep power steering and it's worked great for a decade. Share this post Link to post Share on other sites
Machria 78 #20 Posted August 28, 2013 Thanks, if I can't get it off in short order I'll try that. But I really want it fixed properly. Tryin to get this GT14 in good order so I can use it reularly to get firewood out of the woods, and snowblow. This thing is going to be a workhorse for me. Share this post Link to post Share on other sites
Machria 78 #21 Posted September 19, 2013 Halajulea (how ever you spell it! )!! Got that reversed bolt off finally, and got the lift valve off as easy as pie (once the belt cover was off). One thing for sure, that bolt is going back on the CORRECT direction! So, now what? I have the lift valve in hand, cleaned off and fluid out. Can anyone rebuild this for me? Looking at it, not sure I want to take apart..... I see small sprins and things in there. When I take tings like this apart, parts go flying around and I never get them back together. Who wants it? Share this post Link to post Share on other sites
Machria 78 #22 Posted September 25, 2013 So, now what? I have the lift valve in hand, cleaned off and fluid out. Can anyone rebuild this for me? Looking at it, not sure I want to take apart..... I see small sprins and things in there. When I take tings like this apart, parts go flying around and I never get them back together. Who wants it? So now what? Share this post Link to post Share on other sites
Machria 78 #23 Posted September 30, 2013 Can anyone tell me if this is the correct "service kit" for my valve? http://www.rcpw.com/toro-parts/genuine/109081.html I need to get this fixed and back together before it starts snowing! HELP!!!! Share this post Link to post Share on other sites