roscoemi 245 #1 Posted March 10, 2013 P'Chop's Ranger never started easily, sometimes with a few hits of the key but most often more and getting worse. Tried to fire it on Thurs to remove slush from the end of the drive and it took 20 min to get it to fire and stay running, but it didn't run that well and seemed down on power. I got a set of points and a condensor from a small engine shop, the Toro dealer was clueless, and put them in. Now I have no spark at all. The 6a fuse on the small circuit board on the right side of the engine was blown. I found a assortment at the gas station and after checking the wiring and connections, put a new fuse in that blew. Rechecked everything and put a bigger fuse in, all that I had, resulted in letting the smoke out of the black can above and right of the crank. Having zero experience with these motors, I assume that this is part of the charging system and it is now toast. The problem is I can't find a part number on parts tree and the manual I downloaded here only shows a magneto pn 610689a. Is it possible for it to have a dead short? I can hear something rubbing slightly on the fly wheel, sounds like the tin cover over the points. After the smoke came out, the fuse doesn't blow and there is no spark either. I'm not sure where to go from here. Share this post Link to post Share on other sites
1054josh 25 #2 Posted March 11, 2013 The black can you are talking about is the ignition coil. It sound like the coil is shorted and needs replaced. Just my Share this post Link to post Share on other sites
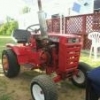
groundhog47 448 #3 Posted March 11, 2013 (edited) Obviously, somewhere in the process did you set the point gap, did you check underside of flywheel fo a "rub", this appaers to be a magneto-adjustable timing engine, and as above black unit is coil. All I've ever worked with had no fuse on mag ignition, but if has a charge stator (see it now), may have fusing. Make sure your wires off stator (bottom of timing ignition box) aren't bare along route and wher appears fastened at ign box, check stator magnets to make ceratin they didn't get loosened during removal. Anything shiny ( appears fro scrape) on flywheel try to fig where it/what touches and go from there. Did you remove ign box, if not should not rub as long as cover is seated and I see retainer spring. Did you replace crank timing lobe in ign box in same manner as removed (don't rem if it will counter/opp fit) and other than that key should be standard on crank to flywheel. At any rate smpke prob came from stator, but closer inspection should show a burn/fry condition on visible wraps/windings. Hope you get it fig'd out. Looks like possibility of "pinch" on stator leads wire under condenser tab and a possibility of bareing/short where wires wrap over and exit by starting motor above black coil. Please let us know what you find/found! Edited March 11, 2013 by groundhog47 Share this post Link to post Share on other sites
roscoemi 245 #4 Posted March 11, 2013 I removed the flywheel, and then the cover over the points. Changed the points and condenser, put the cover back on and then the flywheel. Could not locate the rub positively, sounded lit light sheet metal which would be the points cover. Did see smoke coming from the black can, aka the coil. The wire below the crank conecting the coils(?) seems to be loose, rotates very easily but will not come off like it's broke. If smoke came out of the coil, it's probably smoked. Any ideas on a part number? I've had no luck in my searches. Share this post Link to post Share on other sites
Terry M-(Moderator) 2,295 #5 Posted March 11, 2013 By chance did you loosen the bolts that hole the ignition stator in place? (located top @ 11:00 and bottom @ 5:00 from the crank.) that I believe would throw off the timing and could cause a rub. any oil or dirt on the contact surfaces of the points could cause no spark. any grounds or shorts of any wire can cause a problem. I pretty sure that the fuse your talking about is for the charging system only and I believe thats the same for those two coils on the bottom....they're for the charging system and shouldn't be a problem when it comes to spark. I'm not sure what would cause the ignition coil to smoke unless some wires are crossed sending current from the charging coils into your ignition coil. I'm far from being an expert but just make sure every thing looks good . maybe someone else with more smarts than me will chime in. Groundhog47 already gave you some good info. Hope I made some sense. although a little expensive, you can find a good coil that should work on your tecumseh H60. look on Ebay, item #390068845541 . just make sure you pop off the wire retainer with a screwdriver or something before trying to take off the coil. hope I helped you some, Share this post Link to post Share on other sites
wheeledhorseman 579 #6 Posted March 11, 2013 There are indeed two quite separate circuits here. The fuse that had blown and that you replaced relates to the charging system and the two coils at the bottom of your photo. The fact that it had blown tends to indicate that one or other, perhaps both, of the diodes on the same panel are short circuit. If they were good and installed the correct way round then there's no way the fuse could blow. The fact that it had blown only affects the charge circuit, not the ignition. Although you saw smoke rise from the black ignition coil I suspect it may have risen from the charging coil below which may or may not have been permanently cooked as a result. If it did originate from the ignition coil then the diodes must be short circuit and a wiring fault under the flywheel (possible but unlikely). The lack of, or weak, spark is in theory at least unrelated to the fuse and hopefully the smoke. I have had an ignition issue with a VM-80 with pretty similar arrangement under the flywheel. In my case the reluctant to start / run was partly points but also a fault that had developed in the ignition switch. When you turn the ignition switch to the off postion a contact is made which effectively shorts out the points to kill the ignition and stop the engine. This is standard on a magneto ignition. This part of the ignition switch was grounding inside the switch somewhere preventing the engine from running. To test this possibility it is a matter of disconnecting the stop wire from the ignition switch to the points. On the VM-80 the wire from the ignition switch is connected to the wire from the points at a terminal post between the two alternator connections on the diode / fuse board. Removing the wire from the ignition switch made the engine run again but be warned, to stop it you have to pull the lead off the spark plug or ground it. Whatever you do, dont be tempted to loosen and adjust the coil assembly at this point or has been mentioned you will put the timing out and it won't run until the timing's right again. Sorry about the long reply - hope it makes some sense. Worth checking out the above before investing in a replacement ignition coil. (please don't assume the diodes are the correct way round in the above photo as PO played about with them and I haven't got round to checking them yet) Andy 2 Share this post Link to post Share on other sites
groundhog47 448 #7 Posted March 11, 2013 (edited) Do you have any chalk or something to lightly cover/coat some close/interfering spots on flywheel. If so mark, reinstall flywheel and get idea of depth after turning, removing flywheel and eyeballing depth, then do same to any suspect part protrusions. Smell stator coil 6:00 location right of yellow tape appears a char/overheat on stator winding also one above on left sie of yelow tape. Wheeledhorseman had excellent observation about possibility of ignition "run" circuit fault to ground possibility. Basically you have two problems: charging and ignition firing9Which you already knew), solve each separately. I would bet stator charging coils "fried". Was unable to locate any NEW parts. Unless your ignition got stray voltage induced for a long period I would bet it is ok. I've not done a adj ign in so long forget where to check continuity variances. Prob in manuals if not will look in my old manual. By the way is that same style of condenser as one removed ?height, position? pertaining to poss "rub" point! In manuals>engines>other>page 2 Engine Tecumseh 1965 H60-75117D H60-75118D.pdf Magnetto #610681: #13=coil part 30546, #17=stator(gen coils and leads) part 30385 Edited March 11, 2013 by groundhog47 Share this post Link to post Share on other sites
roscoemi 245 #8 Posted March 12, 2013 Terry, I did not remove anything other than the points cover, points and the wires connected to them. Everything was reinstalled as it came off. Andy, lots of good info there. Thank you. I did not remove the diodes, but did ohm check them on the board. They are not shorted and read within a fraction of each other, but the ends are different on each end of them. The ignition switch has one pole for the negative batt cable, one pole with a green wire going to the center pole on the circuit board and labeled mag, and a third pole with the positive batt cable and a white wire that goes to the fuse on the circuit board labeled batt. So if I remove the mag wire at either the switch or the board, it should give me a constant running situation? I kind of suspect the switch as the starter labors pretty hard with a new 350cca battery, but I can turn the motor by hand with the drive pully with the plug in and all the connections are clean. Gerry, I have the same idea of how to identify the location of the rub. On the finger pack to the left of the coil, the finger closest to the camera was bent out a bit and would not stay tight to the rest, so I removed part of it. Still have to do the rub test. On wires that connect at 6 o'clock, the one arching up to the other stator coil can be bent around at the bottom with little resistance but is still attached. Will check on this also. The condensor is the same, don't think there is a rub there. Guys, thanks for the info and the time you invested helping me. I think my first step is to check for the rub and double check wiring connections. Will eyeball the stator coil at the same time for future referance. Next will be the key switch. I have a hard time believing that battery needs a 50 amp boost to consistantly crank the motor around with any kind of gumptshun. There is no pressure in life quit like having a 9 year old with a pouty mouth tapping his foot , waiting to hear that his tractor is ok. Share this post Link to post Share on other sites
puddlejumper 67 #9 Posted March 12, 2013 If its turning over that hard, Your starter may be dragging, A good internal cleaning may fix if the bearings and all are good in it. You could probably find a set of new brushes for it at a better auto parts store, they will have a assortment kit you can look through and match yours to what you need. Share this post Link to post Share on other sites
wheeledhorseman 579 #10 Posted March 12, 2013 (edited) Looks like there's three faults the to solve as the ign switch only activates the low current solenoid circuit so the poor turning over means checking through all the usual suspects i.e. battery, the heavy duty cables and connections including the earth to the engine, solenoid and starter. Good to know the diodes are good - here's the correct orientation shown in the Tech service manual. It's important that they are the right way round - just one wrong will blow the fuse immediately even if the engine isn't running. Provided the clips they fit into haven't been abused the diodes will actually only fit in the correct orientation.They are both the same way round with the end with a groove machined into it towards the fuse. So, assuming that they are the correct way round and one of them is not short circuit (conducts in both directions) it is a mystery how +12 volts from the battery made its way to the stator coils behind the flywheel. The fuse should be 6 amp (based on what it says on the board) and certainly no higher. The alternator is rated 3 amps max output so a 5 amp fuse would be fine (6 amp being a bit of an unusual rating) Hope you are making progress. Andy Edited March 12, 2013 by wheeledhorseman Share this post Link to post Share on other sites
roscoemi 245 #11 Posted March 14, 2013 Puddlejumper, starter look n see is on the list. We have a couple of good parts places and old time hardware stores that carry brushes in driving distance. Andy, again good info. This being my first go around with this kind of system, I'll explain how I'm seeing it and tell me where I'm going wrong. A wire from the battery connects to the fuse on the circuit board which is connected to the diodes which go to the charging coil. They are always hot as long as a battery is connected, and will send juice back to the battery to charge it if the engine is running. The diodes are in correctly, but after continuity checking them again one is good and the other is suspect. I will change both just because after I figure out where to get them. For the other curcuit, a wire goes from the ignition switch to the board and then to the pole on the points. Also connecting on that pole is a wire from the condensor and a wire to the coil. As the flywheel spins, it generates juice for the coil to fire the spark plug on direction from the points.The ignition switch shorts the circuit preventing fire to the plug. Removing the wire from the ignition switch did nothing, still no fire. The magnets in the flywheel still pull steel tools pretty good. So the only thing left is the ignition coil is bad? The plug tests good and only has less than 20hrs on it. Gerry, there is no burn at the stator coil. Looked close and didn't smell burn anywhere under the flywheel. After removing the bent finger, i could not find or hear a rub. I used a black sharpy as tooling die and found nothing on the flywheel, but some was gone along the inner edges on a couple of the charging coils. Are they trying to work? Share this post Link to post Share on other sites
wheeledhorseman 579 #12 Posted March 14, 2013 Charging circuit - there's a simple test you can do with a small 12 volt indicator bulb - (3 to 5 watt). Remove the fuse and both diodes. Connect the indicator lamp where the fuse fits - one wire to each clip. The lamp shouldn't light - if it does then there must be a path to ground behind the circuit board shorting to the engine tin. Now install one diode (the right way round). The lamp shouldn't light as the diode should block the flow. If the lamp lights the diode is faulty. Install the second diode, again the bulb shouldn't light - if it does then this diode is faulty. These diodes date back to the 60s and are obsolete though I have seen them for sale in the US. I think I googled Tecumseh diode. They weren't Tecumseh specific in that they were used in vintage radios and the like and known as a 1N1081 diode. Most people replace them by soldering in a couple of 3 amp diodes from Radio Shack or similar store. This is the overall charge circuit. (photos borrowed from another site) Actually a 1N5402 would do fine. Ignition - The battery plays no part in the magneto ignition system and there should be no wire connecting it to the coil or points. Current is induced into the primary coil as the magnet in the flywheel passes by. When the points open the primary circuit breaks (like a battery operated ignition) and a high voltage pulse is created in the secondary coil which makes the spark at the plug. That's why you have to have the engine stop wire from the ignition switch (which effectively shorts out the points) as disconnecting the battery won't stop a magneto producing a spark at the plug. Hope this makes some sense. Bedtime now - its almost 2am here. Andy Share this post Link to post Share on other sites
roscoemi 245 #13 Posted March 14, 2013 Andy, 2am? Really? Go to bed!! LOL!! Got a roadtrip to repair a hickory top tommorrow, my guess is 7hrs total, so I should have some time to test tomm. If not it will be on Sat. Thank you for the info and will post what I find. Share this post Link to post Share on other sites
groundhog47 448 #14 Posted March 14, 2013 Puddlejumper, starter look n see is on the list. We have a couple of good parts places and old time hardware stores that carry brushes in driving distance. Andy, again good info. This being my first go around with this kind of system, I'll explain how I'm seeing it and tell me where I'm going wrong. A wire from the battery connects to the fuse on the circuit board which is connected to the diodes which go to the charging coil. They are always hot as long as a battery is connected, and will send juice back to the battery to charge it if the engine is running. The diodes are in correctly, but after continuity checking them again one is good and the other is suspect. I will change both just because after I figure out where to get them. For the other curcuit, a wire goes from the ignition switch to the board and then to the pole on the points. Also connecting on that pole is a wire from the condensor and a wire to the coil. As the flywheel spins, it generates juice for the coil to fire the spark plug on direction from the points.The ignition switch shorts the circuit preventing fire to the plug. Removing the wire from the ignition switch did nothing, still no fire. The magnets in the flywheel still pull steel tools pretty good. So the only thing left is the ignition coil is bad? The plug tests good and only has less than 20hrs on it. Gerry, there is no burn at the stator coil. Looked close and didn't smell burn anywhere under the flywheel. After removing the bent finger, i could not find or hear a rub. I used a black sharpy as tooling die and found nothing on the flywheel, but some was gone along the inner edges on a couple of the charging coils. Are they trying to work? The wire from ign switch to points should be kill wire (grounds circuit out when key off if that position exists) as you've determined. If I remember correctly, my book says follow coil check inst) do a continuity check from wire connected to ground and end of spark plug wire, guessing will be low ohmage 6-7, so check on lowest value digital or ohms X1 analogue. Repeat with removed point connection wire and ground, don't rem value/res but should be low, don't forget to zero out scale if analogue meter. If you read an open , increase ohms value and check again, neither primary or secondary circuit/winding should be a zero ohms reading, nor infinite or entirely open. Also for charge stator check if may have slipped outward if possible causing the scrape, attempt at "charge" shouldn't renove sharpy mark. Wheeledhorseman did an excellent diagramatical explanation and repair scenario Share this post Link to post Share on other sites
groundhog47 448 #15 Posted March 14, 2013 Correction, looked on line , found secondary circuit should be in 8kohm range instead of less than 10 and primary should be less tha 1ohm. Share this post Link to post Share on other sites
roscoemi 245 #16 Posted March 16, 2013 Andy, I looked at a couple pics I took with my phone before I started messing with anything on the circuit board and both diodes were in backwards. Now with them in correctly and with the fuse plugged in, I have juice to the fuse side of them but not at the other end of them. I assume they are a one way valve for electricity and everything is as it should be? Gerry, took the coil off and brought it inside. With my meter set at 20m, either wire to the plug wire read .20. Between the two wires showed straight thru, no resistance. California Turf Equipment and Supply has the magneto in stock for $41.55, part #610681a. Share this post Link to post Share on other sites
groundhog47 448 #17 Posted March 16, 2013 (edited) Andy, I looked at a couple pics I took with my phone before I started messing with anything on the circuit board and both diodes were in backwards. Now with them in correctly and with the fuse plugged in, I have juice to the fuse side of them but not at the other end of them. I assume they are a one way valve for electricity and everything is as it should be? Gerry, took the coil off and brought it inside. With my meter set at 20m, either wire to the plug wire read .20. Between the two wires showed straight thru, no resistance. California Turf Equipment and Supply has the magneto in stock for $41.55, part #610681a. Man, hate to hear you had to pay that much, but ya know you had it right sayin' coil didn't ya. When yo get'er started up see if that voltage you read on the input of board increases, can't say how much. Good description one way valve, ha. Now, question: what fried coil and what resistance did you read across spark plug lead and each of other wires. I used to almost pull out my hair on these under flywheel jobs. Edited March 16, 2013 by groundhog47 Share this post Link to post Share on other sites
wheeledhorseman 579 #18 Posted March 17, 2013 So, if I'm following this correctly.. with the diodes in the right way round now they are now blocking the battery from sending current through the alternator coils and the fuse doesn't blow. That's good and as Gerry said the question is what fried the coil. We know the diodes being the wrong way may have played a part in this but there should be no connection between them and the magneto coil and points. It's why I suggested the smoke may have come from the alternator coil but seems you were correct. So how did the current from the battery get to the primary coil of the magneto? These are the things I'd be double checking: One thing that comes to mind to check is the three connections on the non-fuse end of the little circuit board. Its essentill that these are correct. In theory they should be as the connector lugs are different sizes but worth checking anyhow that the outer two are the wires going to the stator, the middle one goes to the points. On mine the stator wires have yellow connectors, the leads are black, the magneto wire is red and the wire from the ign switch it connects to is green. I think Tecumseh changed the colors of some wires but I'm just wondering if the mag wire (red in my case) was connected to a stator 'GEN' connector when the magneto coil fried as with the diodes backwards 12 volts would certainly get to and fry the mag coil. Also wondering if the wiring on the back of the ign switch got altered in any way. The connections to the switch are different on a magneto engine to a conventional coil ign engine. In the off position the switch should effectively connect the magneto wire (geen on mine) to ground. The first ign swhitch position (engine run) does nothing on these simple magneto engine circuits and the connection isn't used. The start position is the same for coil or magneto it sends 12 volts to the solenoid. If the switch were to send 12 volts down the magneto wire in the run postion then that would fry the magneto coil. If it's neither of these then the fault is under the flywheel and you're looking for how 12 volts got from the alternator stator wires across to the points / magneto coil. Not sure how helpful I'm being here but it's my best shot for the moment. An early nite tonite - looks like I'll get to bed before 1 am. Good luck Andy Share this post Link to post Share on other sites
roscoemi 245 #19 Posted March 17, 2013 Gerry, the readings are in my last post. Not sure what they mean or if the coil really is bad. The original problem was hard starting turned into really hard starting and running rough. I found the blown fuse while troubleshooting, it had to be this way since I bought the tractor as I didn't know there was a board on it. When I put the flywheel back on is when I noticed the rub, a metal finger from the stator touching the flywheel and the smoke. I found the board while tracing wires to figure that out. Now that the diodes are in correctly and the rubbing finger is removed, I guess I can put the coil and flywheel back on and see if I have spark. Share this post Link to post Share on other sites
roscoemi 245 #20 Posted March 18, 2013 Ok guys, I have spark. But no fire in the hole. The diodes were in bassackwards, causing blown fuses and no charging. Fixed A finger on the stator dragging and shorting causing no spark and a very slow starter. Fixed. Have spark and the starter cranks like a champ. Have fuel, but no fire. Had a couple poofs that may have tried to be a backfire, but came out the head gasket instead. So I guess it's time for a head gasket and then check the timing. If any one has tips on doing that please let me know, I will have the manual handy for this. P'Chop will make sure I get it running even if it kills me! LOL 1 Share this post Link to post Share on other sites
groundhog47 448 #21 Posted March 19, 2013 (edited) Timing is correct when timing mark on stator plate Is aligned with timing mark on stator mounting post as shown in Fig. T-46... Found in manuals>engine>other> tech H20 -HH70 Sm.pdf page 3 0f 6 bottom right (says page 281), .020 point gap. I've never seen one with a mark but don't argue with manuals> If no timing marks just abot need a dial indicator with head off. Hope you have marks. Edited March 19, 2013 by groundhog47 Share this post Link to post Share on other sites
sorekiwi 761 #22 Posted March 19, 2013 I've never seen a Tecumseh with an ignition timing marl either (mind you I have only looked at about 6 of them, and I avoid them like the plague). The manuals tell you how to time it with a DTI - make sure you remember to set the timing before you bolt the head back on! Share this post Link to post Share on other sites
roscoemi 245 #23 Posted March 19, 2013 I'm gonna give it a shot, and if all else fails there is the c4 option. Blow the damn tecky into the next county and put a Kohler in it! Share this post Link to post Share on other sites
puddlejumper 67 #24 Posted March 19, 2013 And another tidbit when you do time it put a mark on flywheel and case for future reference. Also this gives you a reference so when you do it by the book and it doesnt run you can start fudging to one side of the mark or the other looking for that magic spot. Right before you break out the c4 Share this post Link to post Share on other sites
groundhog47 448 #25 Posted March 19, 2013 I'm gonna give it a shot, and if all else fails there is the c4 option. Blow the damn tecky into the next county and put a Kohler in it! Man you've almost got it wipped, I know how you feel, one beat me and embarased me at the same time. I finally phased em out of my work list unless external mag or electronic. And as a last resort they used to make a under flywheel external module that allowed doin' away with points/condenser. Some of the big outfitters prob still have/sell them. They made them for B&S, Tecumseh, and Kohler. Never used one, too bull headed I guess, but stocked 3 or 4 back then, when I finally went to try one had the wrong one, so stuck with points/conderser... Share this post Link to post Share on other sites