Jump to content
Sign in to follow this  
John T

1974 C-120 hydro buildup

Recommended Posts

John T

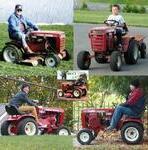
Hello everyone - really glad this group exists. It's hard to get other people to understand how well built the Wheelhorses are isn't it?. My dad bought this machine new in 1974, and I was 8. I mowed about 1/2 acre with this every week, plus in between his large stand of spruce seedlings for several years. He upgraded to a two cylinder and I don't remember the model number. It was a Wheelhorse though. That was in the mid 90's, which is when this one went into storage. I pulled it out of storage in about 2004, and pressed it into snowblowing. It has been real rough for me to see the surface rust go deeper each year, and I finally pulled the trigger for a full pro restoration, as it seemed the piston rod had failed. You may have read some of my other posts, but the jist is a full engine rebuild ~$500, and full paint at a car shop ~$1100. They matched the New Toro Red I supplied in spray can. They did some great sheet metal work on the hood and fender. I have the 'before' pix if anyone's interested. The white: I had them use the Oldsmobile White someone pointed out earlier. I had the exact year but I can't remember it now. Anyway ... I'll post the photos here. I am sure I'll be asking a lot of questions too.

post-723-0-86539700-1349805688_thumb.jpg

post-723-0-23615000-1349806076.jpg

  • Like 3

Share this post


Link to post
Share on other sites
 
AMC RULES

The vintage photo is very cool, being in the family all those years...easy to see why you want to save it.

Now...let's see those before picts, so we have something to compare it to once completed. :popcorn:

Share this post


Link to post
Share on other sites
 
John T

Here are a few

...

..

post-723-0-68112800-1349812690_thumb.jpg

post-723-0-62919100-1349812693_thumb.jpg

post-723-0-06566400-1349812697_thumb.jpg

post-723-0-29558700-1349812767_thumb.jpg

post-723-0-35857400-1349812771_thumb.jpg

post-723-0-59355000-1349812779_thumb.jpg

post-723-0-56754100-1349812808_thumb.jpg

Share this post


Link to post
Share on other sites
 
John T

Very little progress but I have begun. I found a supplier of odd size bolts locally, and got my first set which would get the chassis together. Right off the bat 4 bolts were 1/8" short (frame to trans) so I used my originals which are sandblasted and primed.anyway. Ran into some kind of resistence that I can only guess was dirt in the transmission hole on one bolt, yet it was acting like the holes were misaligned which was very hard for me to believe. I was able to convince it to go in straight and it didn't turn hard enough for concern. The only other thing was the front Tach-a-Matic was installed. My goal today was to get it up on it's wheels. The hole for the pin in the front end is dirty and painted (never did get my hands on emery cloth yesterday) and the wheels lugs are all paint. Charging my dremel tonight I have a brush for it. Also gonna work up a bolt list from the service manual, and go out and order the rest of my bolts.

post-723-0-39782200-1349817131_thumb.jpg

post-723-0-61123100-1349817134_thumb.jpg

Share this post


Link to post
Share on other sites
 
John T

Well, I have begun to review the service manual for my bolts and I need to slow down. I have 7 bolts tightened and have already made at least 5 mistakes. I didn't catch the "Eslok" (have read we're using Loctite 220 blue now) requirement, and even though I have my original bolts from the frame to transmission, I made no note of them being 3/4 and 7/8! I think they may be right, but I didn't notice a difference today. I need to stop turning the wrench till I get up to speed.

Share this post


Link to post
Share on other sites
 
HorseFixer

Looks Good! Yer doing a great job. :tools-wrench:

Duke

Share this post


Link to post
Share on other sites
 
Martin

looks good so far.....

one thing that really helps them go together easy is chasing all the threaded holes. youve already experienced putting the transmission/frame together.......

ive found they bolt together real easy if you chase those holes in the transmission and use two longer bolts ( say 2" long) that have had the heads cut off as a guide. screw them in two of the transmission holes first then guide the frame over them. now you can install the other two bolts. then remove the cut off guide bolts and install the remaining 2 bolts to the transmission.

chasing the threads gets the whole thread clean right down to the bottom and makes putting these tractors together a breeze. common tap sizes you will use are 1/4-20, 5/16-18, 3/8-16, 7/16-14, and 7/16-20 for the lug nut threads on the back wheels..... maybe a 3/8-24 as well.

as far as fasteners go, i find the cheapest way to go is to order in bulk from mcmastercarr.com http://www.mcmastercarr.com most of the common sizes you will get in bags of 25 to 50 and for about the same price as less that half that amount at the 'hardware stores'. they have all the different nuts and washers you will need too and the square head set screws for the rear hubs.

Share this post


Link to post
Share on other sites
 
Jake Kuhn

Its looking very nice! :handgestures-thumbup:

Share this post


Link to post
Share on other sites
 
dclarke

I'm looking forward to watching this go back together, please keep the pics coming. Nice job! :thumbs:

Share this post


Link to post
Share on other sites
 
John T

I was thinking about buying a tap when I woke up this morning. Headed out for a few taps, emery cloth, primer, and Loctite 220 and hopefully get some serious work done. Camera will be with me in the shed.

Martin the guide bolt idea makes a lot of sense,

Share this post


Link to post
Share on other sites
 
John T

Thank you guys for the comments it helps

Share this post


Link to post
Share on other sites
 
John T

Tapped the transmission holes, not much to talk about - it was worth it, but I note much really got cleaned off - problem was more from paint and remaining crud on my sandblasted / primed bolts. Also, as I am beginning to look at things really closely, I am noticing a few things that seem strange. One of my wheel hubs is significantly thicker than the other one. I am going to document every serial # I can find. This tracto did go into the shop one time, for new piston rings. I don't know what else they touched. For example, the transmission bolts are supposed to be 3/4 and 7/8 both, and all I have is 3/4.

  • Like 1

Share this post


Link to post
Share on other sites
 
SousaKerry

I wouldn't fret over an 1/8 inch as long as you have at least 3 threads of engagement that is all you need for full yield strength of the bolt, anything more is just better. And better yet not even the most worst rivet counter will not be able to tell, unless he takes out the bolt.

As far as the hubs being different thicknesses this is a result of machining rough castings. The Machinist will adjust the machine until the casing is completely cleaned up he may have to remove .100" - .250" , Sand casting iron is not an exact process an often time the parts can very up to a 1/4" and this is allowed in the prints as an acceptable tolerance. The designer or engineer will specify a certain minimum thickness on the final part and as long as that is met it is a good part.

The more you work on these tractors the more you will notice little things are different between tractors of the same year and model, One day they may run out of 3/4 long transmission bolts and someone grabs 7/8 to finish the run. It happens, lord knows I see it everyday, cause I am the one who has to approve it where I work.

This is one of the traps to our hobby, we want everything perfect and back to factory spec as close as possible to the day it rolled off the line. But in actuality we often overshoot that line by quite a bit and what we build are far superior to the build quality that the machines started with.

Share this post


Link to post
Share on other sites
 
John T

Well, I got the Tacha-matic on front, and the top two bolts in the transmission, plus a temporary in one bottom hole. Got some Loctite Blue (equivalent) and it's not cheap. Got the pin thru the front end. Got my lug bolts cleaned up and about to install the rear tires, but forgot about a spot the painter missed on a hub. Just brushed and primed and came in for a few minutes. Headed back out to see how far I can get with the front wheels. Taking pix...

Share this post


Link to post
Share on other sites
 
John T

A tale of two hubs

Got it up on it's wheels, now I leave town for a few days.

post-723-0-29082500-1349904990_thumb.jpg

post-723-0-27551900-1349905052_thumb.jpg

Share this post


Link to post
Share on other sites
 
John T

another good 'before' pic

post-723-0-04131500-1350704386.jpg

  • Like 1

Share this post


Link to post
Share on other sites
 
 
John T


45140957_248725922666345_5654470139064614912_o (2).jpg

Edited by John T
  • Like 1
  • Excellent 1

Share this post


Link to post
Share on other sites
 

Create an account or sign in to comment

You need to be a member in order to leave a comment

Create an account

Sign up for a new account in our community. It's easy!

Register a new account

Sign in

Already have an account? Sign in here.

Sign In Now
Sign in to follow this  

×
×
  • Create New...