By
Theroundhousernr
So its been awhile for me to make a formal post. Been taking on more at work and just been so busy but i still check in from time to time. I have been thinking of ways to add electric chute rotation to the blower. Seen it all been done before but not much on the tall chute blowers. So I hope this isnt boring.
I wanted three things,
-relability( no need to make a simple design turn into a failure , specially when your out blowing snow)
-symplicity
-little to no modification to the blower itself
Came across a surplus supply of gmc electric seat motors on Amazon for $15.00. Read reviews. Motor is reversable, can be taken apart to switch output shaft orientation (also meant machining of the shaft possible), and had a nice 1/4" hole mounting fixture. Figured if it lifts someones fat rump then it should be up to the task of spinning my chute. So i ordered it....
Again I didnt want to damage any orignal parts so I went to my local fabricator shop and picked up some 3/8 cold rolled steel. Which is the same thing wheel horse used for the shaft the worm is on. So now I must adapt this wierd non standard worm thread shaft from the seat motor to the 3/8 rod used for the worm drive on the blower. This envovled a good friend of mine and his lathe. Took a 3" by 1" round stock stainless and but it in his 3 jaw chuck. First drilled the 3/8 hole all the way threw. Left the piece in the chuck to hold center and drilled, I believe it was, 29/64 for the seat motor shaft to a depth of 1.5 inches. So now we have an adapter with the 3/8 hole 1.5 inch depth and a 29/64 hole with a 1.5 inch depth. Added a set screw for either side and that piece was done.
Now we put the seat motor shaft in the chuck and turned it to fit the hole with a slip fit of about .002 of an inch plus or minus. The joke was , we are not building a rocket ship to get to the moon but if any garden tractor could , it would be a wheel horse.... Wah WAh
Took my new fancy parts home with me to finish the rest. After careful measuring I cut the 3/8 stock down to size and drilled a hole for the role pin that holds the worm to the shaft. Next I cut my seat motor shaft down to size and ground a flat on the shaft for a firm place for the set screw to grab. Remember this is a threaded shaft not smooth. Shown in pictures below. My seat motor required disasemble anyway to swap the shaft to come out the other side for chute clearance. The motor is offset from the gearbox and it caused the motor to hit the chute when chute was rotated hard right. I assembled everything and all was left was to drill a 1/4" hole for mounting. Measured where I wanted the hole , drilled hole and used 1/4" threaded rod for a fasener and a few bolts..
I think it turned out great. I added a rubber cover out of rubber roofing to protect it from the weather. It has plenty of speed lock to lock on the blower. Should be reliable. Best part of all is it can be returned to a crank in minutes incase of failure and nothing original was damage to the blower itself but a 1/4" hole! Something yet to be determined are some kind of stops so to not tear up anything incase the motor gets stuck in drive or someone else uses it and doesnt realize. I will add pictures of the setup and video if I can to show speed of the chute. Also if anyway wants measurements, amp draw of motor, or any question feel free to ask. Might even make some more adapters if anyone is interested. Next post I will show will be how i wired everything. Hope you enjoy!
https://youtu.be/3Zsim1ihip0
https://youtu.be/9sUim0PQlOo
 By mmmmmdonuts
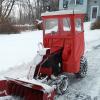 By Theroundhousernr