Horse'n Around 22 #26 Posted June 1, 2011 This is great! Between you and Ian there's a lot to look forward to! There is so much talent on this board !!!! Please keep us updated with lots more pics John Share this post Link to post Share on other sites
jasoncracer 0 #27 Posted June 1, 2011 Massey you do some great work I have to say <_ Share this post Link to post Share on other sites
corn53 4 #28 Posted June 1, 2011 :WRS: That will be awesome!!!! Cant wait for completion!!!! :hide: Share this post Link to post Share on other sites
massey 111 #29 Posted June 13, 2011 Ok, it's been a while since I've updated this post so here we go. Here's finding the crank centerline on a the Kohler low buck way. And it matches up right on for the diesel, I just had to set the depth for the pulley. This is the rear crossmember for the WH frame to the dozer frame. This hole is for securing the two together. This bolt would have gone through and hit the drive belt so I cut a block of 1/2" and threaded it and secured it so the bolt won't go all the way through now. Also had to cut a hole in the belt guard for this crossmember. I also trimmed the plow down and started locating it to the plow frame. Slowly but surely, it's coming along. Share this post Link to post Share on other sites
312Hydro 473 #30 Posted June 13, 2011 Starting to shape up! Those tracks look great. Are those anti theft screws in your cross member? Share this post Link to post Share on other sites
whlpny 201 #31 Posted June 13, 2011 Very nice work Ed- your a man of patience. The first time you take it for a ride all them hours will be worth it! Share this post Link to post Share on other sites
rexman72 210 #32 Posted June 14, 2011 unbelievable work that you are doing.cant wait to see moe pics. Share this post Link to post Share on other sites
massey 111 #33 Posted June 14, 2011 The bolts are called tri-wings, I believe Douglas aircraft came up with them. Yeah, I can't wait to drive this thing , it keeps getting that much closer. Share this post Link to post Share on other sites
Horse'n Around 22 #34 Posted June 14, 2011 Wow every time I see the pictures of your progress , I get more and more impressed. This is going to be really incredible when its done. I cant even imagine how gratifying and fun its going to be to actually take it for its first spin. You really need to get preserved that on video for sure! John Share this post Link to post Share on other sites
Stigian 1,234 #35 Posted June 15, 2011 Ok, it's been a while since I've updated this post so here we go. Here's finding the crank centerline on a the Kohler low buck way. Love the "low tech" crank centering, your welding skills are very impressive too Ed Good to see your build moving on Thanks Ian, but you are the man. The work you are doing and your posts are excellent and entertaining. The tracks were definitely a process. Ed Thanks Ed My hat is off to both of you guys. whtractor/thumbsup.gif You BOTH have displayed incredible fabricating skills. whtractor/not_worthy.gif whtractor/not_worthy.gif whtractor/not_worthy.gif All I can say is thanks so much to you BOTH for sharing your projects with us here on the forum. thankyousign.gif thankyousign.gif thankyousign.gif This is great! Between you and Ian there's a lot to look forward to! There is so much talent on this board !!!! Please keep us updated with lots more pics smile.gif Thanks Guy's, very kind of you to say so :disgust: Share this post Link to post Share on other sites
massey 111 #36 Posted July 4, 2011 OK, the back ordered sprockets came in and I finally was able to weld them, good thing because I really wanted to locate everything to the sub frame before I painted. Squaring up the drive sprockets. One track on and runs true. Both tracks on and true. Starting to look like something finally . Also been working on the plow a little. Share this post Link to post Share on other sites
312Hydro 473 #37 Posted July 4, 2011 It's really shaping up nicely! Reminds me of those "Battle bots ' on TV. It looks great just sitting there Did you need to crank in much tension? Share this post Link to post Share on other sites
dclarke 4,011 #38 Posted July 4, 2011 Massey, This is really something to watch. WELL DONE!!! :D Share this post Link to post Share on other sites
wallfish 15,937 #39 Posted July 4, 2011 WOW! that thing looks great. Nice job so far. Share this post Link to post Share on other sites
puddlejumper 67 #40 Posted July 5, 2011 Massey, Are there going to be any chain guides on the bottom to hold the chain in alignment with the sprockets when in a twist? I realize it has a sprocket on both ends instead of a Idler on the front like bigger equipment so the chance of throwing a track should be reduced. I am not downgrading your work in any way because it is awesome. But the alignment rollers under big equipment are there for a reason and it may be something you should consider or at least take a look at. Share this post Link to post Share on other sites
massey 111 #41 Posted July 5, 2011 312Hydro I haven't set the tension yet, I just pulled to get most of the slack out. It all has to come apart again for paint. puddlejumper I should have stated it is upside down right now, the guides will be on the bottom of the tracks. It was easier for me to align the pillow blocks/axles up this way. Share this post Link to post Share on other sites
puddlejumper 67 #42 Posted July 5, 2011 Duh, I should have realized that without being told. Share this post Link to post Share on other sites
massey 111 #43 Posted July 6, 2011 Duh, I should have realized that without being told. Hey, no problem. It's a very good point you brought up. Share this post Link to post Share on other sites
HorseFixer 2,012 #44 Posted July 6, 2011 :ROTF: Sweet! for sharing! Cheers ~Duke :D Share this post Link to post Share on other sites
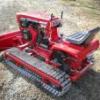
massey 111 #45 Posted July 18, 2011 Here's the latest update, I wanted to get the big parts painted so I could start assembly and make the scattered small piles into a single big pile. Epoxy primer. Shot some red over that. Fitting the axles, sprockets, brakes, etc. I wasn't going to paint the tracks but I picked up a quart of silver hammer finish and hit them with that. Secured the winch for the plow up and down motion and just had to hook it up and try it, works sweet . I pulled the trans apart and it doesn't look bad in there except for one hogged out keyway. I'm going to see if I can have another keyway cut in and weld the bad one up. Share this post Link to post Share on other sites
dennist 139 #46 Posted July 19, 2011 That is Sick! So cool! :woohoo: Share this post Link to post Share on other sites
312Hydro 473 #47 Posted July 19, 2011 I can't help but smile as I look at your dozer, it just puts a big grin on my face! Really nice work and I can't wait to see it under power! :woohoo: Share this post Link to post Share on other sites
Horse'n Around 22 #48 Posted July 19, 2011 Marshall, that just oozes cool!!!!!!!!!! Share this post Link to post Share on other sites
smoreau 658 #49 Posted July 19, 2011 This is just too cool!!! Looks great and would love to see it in person when its finished. Share this post Link to post Share on other sites
Martin 2,130 #50 Posted July 19, 2011 massey, looking incredible hope to see it in person one day when its finished. what an awesome project. Share this post Link to post Share on other sites