chdinct 28 #1 Posted May 25, 2010 Started the tear down about a month or so ago and was promptly delayed by getting the wheels off. The rears were painted onto the hubs. Kept hitting it with PB Blaster and a rubber mallet, then finally a little help from my friend "sledge" did the trick. Still need to remove the engine tins for sanding and painting, but that will wait until I have a rolling chassis back together with new paint. Since the engine and hydro all worked well prior to tear down, this will be basically a clean, sand and re-paint operation, which is good since this is my first restoration. Here are some pic's of the progress so far. Tractor at time of purchase (bought this one from Fireman) Wheels off Half way stripped: Steering tower - can't get the dam* steering wheel off so I'll just paint around it most likely Make shift engine hoist: Bringing the frame outside for cleaning (I ended up taking the front axle off and separating the hydro unit - wanted to minimize tear down but I kept thinking, if I just remove ........) Degreased parts (except engine) sitting back in the garage and ready for sanding: I had the wheels, hood and seat pan sand blasted but forgot to take pics of them. Will try to get for the next update. I have a whole big box of parts down in my basement that still need cleaning - hope to get to those later this week. Also decided to by an air sander and mini needle scaler to help with the sanding, but those haven't arrived yet. Add in an angle grinder with wire wheel and I should have enough firepower to do the rough sanding, he says now never having done a resto before I hesitated to post this thread since I'm worried I'll get sidetracked on some other project and take 5 years to finish this, but then, maybe posting a thread will give me more incentive to finish it by this fall (my rough goal). 1 Share this post Link to post Share on other sites
rickv1957 77 #2 Posted May 25, 2010 Looks like a great start there!,Rick 1 Share this post Link to post Share on other sites
Kelly 1,038 #3 Posted May 26, 2010 Looks like you had a good starting point, some i start with are VERY ruff, and I get off doing other things and have a few half done projects :D 1 Share this post Link to post Share on other sites
chdinct 28 #4 Posted May 31, 2010 OK guys, here's a few more. Finished cleaning and degreasing the rest of the parts last week. Also some pic's of the wheels, hood and seat pan that I had blasted. Still need to remove the rest of the decals that didn't come off from blasting and do some finish sanding before I prime them. I told the blaster to stop at one hour so I guess he did and didn't get the old decals off. They should sand off pretty easy I hope. Only two bolts so far that I forgot to bag and mark where they came from. Guess I'll figure that out on re-assembly. You resto pros must have some trick for keeping all the little parts straight on where they came from, or you've done so many you just know looking at them. I've got maybe 15 baggies with a label on the general area or part they relate to. Hope that works. I hope to start sanding this week, but my wife's got other plans for me, so we'll see how it goes. Thanks for looking. 1 Share this post Link to post Share on other sites
rickv1957 77 #5 Posted May 31, 2010 Coming right along there!,Rick 1 Share this post Link to post Share on other sites
Duff 206 #6 Posted May 31, 2010 I've got maybe 15 baggies with a label on the general area or part they relate to. Hope that works. Yup, that method works great! Also helps if you have the IPL's handy when you start your rebuild. They'll tell you, among other things, which whickus goes onto the whonkas first, and how the whole assembly passes through the gleepus to make it work! Can you tell I'm a primiteve shade tree mechanic? Duff :D 1 Share this post Link to post Share on other sites
chdinct 28 #7 Posted June 3, 2010 I've got maybe 15 baggies with a label on the general area or part they relate to. Hope that works. Yup, that method works great! Also helps if you have the IPL's handy when you start your rebuild. They'll tell you, among other things, which whickus goes onto the whonkas first, and how the whole assembly passes through the gleepus to make it work! Can you tell I'm a primiteve shade tree mechanic? Duff OK Duff, school me - what are IPL's? Sounds like some kind of step-by-step assembly plan. Think I've heard that term before, but I'm not quite sure what it is. Oh, and where would one get one for a 1967 WH? 1 Share this post Link to post Share on other sites
massey 119 #8 Posted June 3, 2010 IPL = illustrated parts list I'm guessing. 1 Share this post Link to post Share on other sites
chdinct 28 #9 Posted June 9, 2010 IPL = illustrated parts list I'm guessing. Thanks massey. I do have the manual with a parts diagram, but back then, they tried to fit almost half the full assembly on one page. Plus the quality of the pdf rendering is not too good. I've looked at it and it's hard to understand the order of assembly or even what goes where. An original paper copy might be OK for that use. 1 Share this post Link to post Share on other sites
chdinct 28 #10 Posted June 9, 2010 Pic of painted rims. They look more yellow in this pic than in reality. I used Krylon Gloss Ivory over Rustoleum Automotive Primer that had curred for about a week. The Krylon went on pretty smoth but it took a lot of coats to cover. In fact, I think they need another coat in places. I usually use Rustoleum products but couldn't find the right off white anywhere near me. I think the Krylon might result in a smoother finish but it seems it takes 2X the paint to do so. Can't say anything about hardness yet. 1 Share this post Link to post Share on other sites
JimD 3,347 #11 Posted June 9, 2010 They look nice. Will you be putting new tires on it, or using the old ones? Just curious because I"m debating this myself. 1 Share this post Link to post Share on other sites
chdinct 28 #12 Posted June 9, 2010 They look nice. Will you be putting new tires on it, or using the old ones? Just curious because I"m debating this myself. I'll be reusing the rears. They're not original but in good shape with plenty of tread. Probably new for the fronts. Fronts are originals with the WH name on them but severely cracked. There were tubes in them when I took them off. As soon as the rims have had time to harden, I'll be shopping for new. I'd like to get sawtooths like the originals, but I know I can't get the exact same size but very close. Other option is ribs which are still made in 16x5.5x8. (I think that's the size from memory). 1 Share this post Link to post Share on other sites
rickv1957 77 #13 Posted June 9, 2010 Chris,the wheels look great!,Rick 1 Share this post Link to post Share on other sites
Coadster32 793 #14 Posted June 9, 2010 Looks really good so far. Any method that works for you on keeping the parts in order is good, no right or wrong. I remember when I painted my rims like that. They looked really good....untill I mounted the tires on. Next time, I'll clean the rims, prime, mount, and then paint. 1 Share this post Link to post Share on other sites
Duff 206 #15 Posted June 10, 2010 Massey's right - Illustrated Parts List. It's a blow-up diagram of the assembly with the parts numbered to reference to a list of part numbers and descriptions. I'm too new at this game to have any idea what's available for a 1967 machine (sorry!). By the mid-80's, for the 300-400-500 series Wheel Horse put out a really nice Parts and Service Manual. The diagrams are clear and with some study you can figure out what goes where and in which order, but not always. The other nice thing about the Manual is it gives the standard hardware measurements for connectors (nuts and bolts and such), whereas the IPL's I've seen at the Toro site only give you a generic description and part number....probably to discourage us from using aftermarket suppliers. Cecil Pond and his folks still had the little guy in mind before Toro glommed onto the company. Others should be able to tell you what's available for your tractor, but one way to get info is to ask here for pictures of specific assemblies you are working on. Folks here are amazingly generous with their time and effort to help us out when we get stuck or confused (which happens to me a lot! LOL) Duff :D 1 Share this post Link to post Share on other sites
PPGman 5 #16 Posted June 10, 2010 Thats a nice looking machine there Chris. Your doing a great job! I'm sure it will look fantastic when your done! I'm fairly new to the forum here myself, but i call tell you hands down the guys on here are a wealth of information. I wish i would have came accross this site yrs ago! Good luck with your resto.....it looks great! 2 Share this post Link to post Share on other sites
chdinct 28 #17 Posted June 11, 2010 Looks really good so far. Any method that works for you on keeping the parts in order is good, no right or wrong. I remember when I painted my rims like that. They looked really good....untill I mounted the tires on. Next time, I'll clean the rims, prime, mount, and then paint. Thanks guys. I will certainly be asking for help when I need it, and I'm sure I will. On painting the rims then mounting the tires, I read where some do the top coat after mounting. If necessary, I'll do some light sanding and recoat them after the tires are mounted. I sort of couldn't help myself once the spray can was in my hand :wh: 1 Share this post Link to post Share on other sites
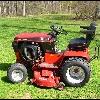
chdinct 28 #18 Posted April 17, 2022 The phoenix rises! Note the dates on my last posting - 2010. Let's just say life got in the way, me and my wife retired then moved to Florida and this project went on hold. She's been in pieces since sometime in 2010. I knew some day I'd have to get back on this project but sorta lost interest. You know how starting back on something from years ago can be tough but I picked it up again last winter (firs pic). I left most of the parts back in CT at my parents summer house. Started taking batches with me to Florida in the winter to prep and paint. We inherited the CT house last fall, so she'll be going back as soon as I get my truck back to Florida. Just have the big tins to redo - hood, seat pan and foot boards - and the decals to apply. She does start, run and move to my surprise. Now, that all said, here are my issues at this point. 1. Have a slight gas leak from the tan pet cock. I'll have to drain the tank and remove the valve to see if I can fix it. 2. Getting some weepage from the tranny tow valve. I screwed up when testing it out and engaged the hydro drive with the valve loosened. I don't think it leaked before that since I tried getting it to move before without noticing a leak. I did pull the valve out to look at the O-ring, but didn't see any damage. 3. The drive belt, which is original to when I bought it in 2010, is shedding whenever engaged. Looked like it was rubbing a bit on the inside of the belt cover. There's a flange on the inside of the belt guard to help track the lower half of the belt. It was rubbing on both ends of the flange so I cut the flange back about 3" on each end and smoothed it out with a grinding wheel but it's still shedding. Could be it's just old and half rotten. Hate to buy a new belt to see it get ruined right off. By the way, can't find the dimensions of the drive belt. Every parts list on line says NLA. If anyone knows the length, etc., I'd appreciate it, otherwise I'll just take it off and bring it to the parts store. 4. I picked up the deck you see separately sometime after I bought the tractor. It's a 36" rear discharge deck - model 5-2136 I think. I need to change the mule pulley to the larger one in the pic I believe, then find the right PTO belt. Again, I can't find any info on that belt either so if anyone knows, again, I'd appreciate it. 5 Both the throttle and choke linkage are balky. I did lube them with WD-40, PB Blaster, etc. and they do work but not smoothly. Not sure what I'll do about them. Anyway, that's it for now. Oh, and Happy Easter. 1 3 Share this post Link to post Share on other sites
chdinct 28 #19 Posted April 17, 2022 OK, can't upload the pic of the bigger pulley do to size limits. Sorry. 1 Share this post Link to post Share on other sites
giddyap 1,574 #20 Posted April 17, 2022 49 minutes ago, chdinct said: Note the dates on my last posting - 2010. I have set aside some of my projects for months at a time but never years! BTW it would take me a decade to create a showroom finish as yours, you made a very nice lookin tractor. I think I have your model as a model in front of a picture of my tractors 1 Share this post Link to post Share on other sites
kpinnc 18,756 #21 Posted April 18, 2022 Great looking tractor! I've taken breaks on machines that lasted years as well. You're right, sometimes life gets in the way. Glad you were able to come back to it! The good news is that these old tractors were built to endure such things. A little love, and she will be back to work for another few decades! 1 Share this post Link to post Share on other sites
Horse Newbie 7,405 #22 Posted April 18, 2022 As long as you have the tractor, you can do it ! Looks great so far ! Share this post Link to post Share on other sites
chdinct 28 #23 Posted April 18, 2022 13 hours ago, kpinnc said: Great looking tractor! I've taken breaks on machines that lasted years as well. You're right, sometimes life gets in the way. Glad you were able to come back to it! The good news is that these old tractors were built to endure such things. A little love, and she will be back to work for another few decades! Giddyap, don't let those pic's fool you. It's just a rattle can paint job. Will probably do some touch up after it's back together. Started out using Farmall Red but couldn't find that color during Covid so I had to change to Rustoleum Regal Red. Close enough I guess. Kpinnc, Horse Newbie, thanks for the encouragement. Probably won't finish the until next year since I'll be heading back to CT in a few weeks while the tractor stays in Florida for now. 1 Share this post Link to post Share on other sites
chdinct 28 #24 Posted April 18, 2022 Put the larger pulley on the deck and now it lines up nice with the PTO. But, not sure this is how the 36" rear discharge deck works with my 1077. Thinking there should be some way to adjust the tension on the PTO to deck pulley like you do with the front mule drive on the later tractors. Again, any help is appreciated. 1 Share this post Link to post Share on other sites
chdinct 28 #25 Posted May 4, 2022 Update: New tranny belt, new PTO to deck belt and idler pulley installed. Fixed the gas tank petcock leak. I jury rigged the PTO to deck idler bracket from other parts so it's not to OEM spec - can't find the correct idler bracket so far, but this looks like it will work. Just need to add a spring and figure out where to secure the tractor side of the spring. Using a bungee cord for now. Having said all that, what I noticed testing the new belts is that with the "break" on (puts slack in the tranny belt), the hydro pump still turns. This did not happen with the old belt. Compared them and the new belt is slightly shorter than the old belt. Wondering if the old belt stretched that much and the new one will do the same with time?? Don't think the hydro pump should be turning when disengaged, no?? Similarly, the PTO turns when I turn over the engine even when not engaged (with or without the PTO to deck belt on). So, the deck will turn whenever the engine runs - that ain't right. Took the PTO pulley off and greased it but it still turns with the engine though I can hold it with my hand and it stops turning. Am I missing something? Is this the original PTO pulley for this model?? Thanks for any help. 1 Share this post Link to post Share on other sites