ebinmaine 79,503 #126 Posted December 6, 2025 13 hours ago, jsoluna said: I'm starting to see why Wheel Horse has such a following. The simplicity and practicality of the design is awesome There are several "Other brands" we like for the looks/features/quality like a Wheelhorse. I was in fact raised on Cub Cadets. Fact is... Trina and I have yet to find a model of any other brand that's built as simply and ruggedly as our 60s and 70s models of Wheelhorse. Ours are considered a permanent addition to the Herd. They are not just a tractor. They're Equipment. Carefully restored and maintained by the two of us to be used for many reasons and many years. Neither of us ever knew Wheelhorse even existed 10 years ago. Now we simply have no desire for any other tractor brand. 2 2 Share this post Link to post Share on other sites
jsoluna 514 #127 Posted December 6, 2025 Just now, ebinmaine said: There are several "Other brands" we like for the looks/features/quality like a Wheelhorse. I was in fact raised on Cub Cadets. Fact is... Trina and I have yet to find a model of any other brand that's built as simply and ruggedly as our 60s and 70s models of Wheelhorse. Ours are considered a permanent addition to the Herd. They are not just a tractor. They're Equipment. Carefully restored and maintained by the two of us to be used for many reasons and many years. Neither of us ever knew Wheelhorse even existed 10 years ago. Now we simply have no desire for any other tractor brand. I can appreciate the different approaches to solve the same problem - I've worked with Cubs primarily for the past 15 years. Also fantastic machines, but more complex - and if you compare both the Wheel Horse and Cub to Deere, I believe Deere has the most complex engineering. 3 Share this post Link to post Share on other sites
ebinmaine 79,503 #128 Posted December 6, 2025 3 minutes ago, jsoluna said: Also fantastic machines, but more complex - and if you compare both the Wheel Horse and Cub to Deere, I believe Deere has the most complex engineering. Seconded. I've liked the round fenders of the 60s Deere for decades. I've had one here many years ago long before I had the knowledge and tools we do now. Given the chance, and gifted the tractor, ... I'd consider one again... but Trina won't touch a green thing with a 39 1/2 foot pole. For Cubs... my maternal Grampa had two. One was yellow and white. Model unknown. The other was a red one from around 1980. 682? 782? I'd get another one for sure... 4 Share this post Link to post Share on other sites
jsoluna 514 #129 Posted December 11, 2025 Blade refresh details: Wear bar, completely pooched. It had almost worn through the bolt on one side of the blade, and has been flipped once before. I'd say a lot of time spent blading concrete driveway, and previous owner probably never adjusted the pivot to eliminate the axial movement. Replacement wear bar is 3/16" x 2" flat bar. 1 2 Share this post Link to post Share on other sites
jsoluna 514 #130 Posted December 11, 2025 Fabbed the lift bar, replaced the lower pivot pin. Adjusted the main pivot bolt. 1 4 Share this post Link to post Share on other sites
Handy Don 16,914 #131 Posted December 11, 2025 12 minutes ago, jsoluna said: Replacement wear bar is 3/16" x 2" flat bar. How did you make the square holes for the carriage bolts? Share this post Link to post Share on other sites
jsoluna 514 #132 Posted December 11, 2025 Skid shoes. Wish I had 3/8" coupling nuts here when I did them, rather than stacking three 3/8-16 nuts, but it will work for now. Welded the nuts to the frame with blade tilted at the factory recommend #2 hole, and on the ground to get the proper orientation. Made some custom shoes out of 3/8-16 bolts and some 1/4" thick washers. All of this is just with stuff I had laying around, so please excuse that it isn't the most elegant solution. Everything is also coated in fluid film and covered in dirt from the recent thaw. They are adjustable and have a jam nut to prevent them from moving once they are set. 3 1 Share this post Link to post Share on other sites
jsoluna 514 #133 Posted December 11, 2025 5 minutes ago, Handy Don said: How did you make the square holes for the carriage bolts? Drilled for interference fit. I believe I used a 7/16" bit. Works great to get the carriage bolt to grab and it is able to be loosened up and tightened again, as the carriage bolts and steel kinda of marry themselves together. 1 1 Share this post Link to post Share on other sites
jsoluna 514 #134 Posted December 11, 2025 (edited) And finally, weight. Rears are loaded. Wanted to try something to add weight at little to no cost. 5 gallon bucket, some old rotors, and some of the hardware I've been meaning to clean out of the shop anyways. I ended up gusseting the hitch bar to make sure it didn't bend at the factory bend point. The base is channel iron, long enough to go back and be notched around the hitch bar so it can't rotate. The channel is welded to a rotor and then guides for the bucket are added. The top is also a rotor, and both rotors have steel plate welded to the centers and 1/2" hole drilled for the all thread to pass through. The top rotor has guides to center it on the bucket. Will have to do some trials to see if I need to remove weight so the steering isn't too light. Brief test run a few minutes ago went well, but that was with the blade up. Edited December 11, 2025 by jsoluna 2 2 Share this post Link to post Share on other sites
702854boy 965 #135 Posted December 11, 2025 8 minutes ago, jsoluna said: And finally, weight. Rears are loaded. Wanted to try something to add weight at little to no cost. 5 gallon bucket, some old rotors, and some of the hardware I've been meaning to clean out of the shop anyways. I ended up gusseting the hitch bar to make sure it didn't bend at the factory bend point. The base is channel iron, long enough to go back and be notched around the hitch bar so it can't rotate. The channel is welded to a rotor and then guides for the bucket are added. The top is also a rotor, and both rotors have steel plate welded to the centers and 1/2" hole drilled for the all thread to pass through. The top rotor has guides to center it on the bucket. Will have to do some trials to see if I need to remove weight so the steering isn't too light. Brief test run a few minutes ago went well, but that was with the blade up. You might want to find a different spot to put that weight because I don't know if the hitch would poke a hole through the transmission over time. 2 Share this post Link to post Share on other sites
jsoluna 514 #136 Posted December 11, 2025 4 minutes ago, 702854boy said: You might want to find a different spot to put that weight because I don't know if the hitch would poke a hole through the transmission over time. I don't expect to keep the weight on year-round. We don't get hammered with snow here typically. Maybe 5 hours or so of run time during the winter. Is the bottom of the transmission case really thin? 1 Share this post Link to post Share on other sites
702854boy 965 #137 Posted December 11, 2025 Just now, jsoluna said: Is the bottom of the transmission case really thin? It's not very thin, but it is cast iron, it might fine to work with and not break, I just wasn't sure it it would break something with all the weight you have. I'm sure someone with a little more knowledge about all of this could chime in and give us both a little more information as I am still kinda new to Wheel Horse. 3 Share this post Link to post Share on other sites
Treepep 1,137 #138 Posted December 11, 2025 On 11/20/2025 at 10:58 AM, jsoluna said: For future reference: These tires are Ocelot P334 23 x 10.50 - 12. \ Nice. And the seat? Mind sharing your source sir? 2 Share this post Link to post Share on other sites
Handy Don 16,914 #139 Posted December 11, 2025 (edited) 13 minutes ago, 702854boy said: You might want to find a different spot to put that weight because I don't know if the hitch would poke a hole through the transmission over time. That is a drawbar intended for pulling and no more than a moderate tongue weight. 7 minutes ago, jsoluna said: Is the bottom of the transmission case really thin? Not especially thin, no, but it is a casting, not forged, and not reinforced for the load you are adding. You’ve created a lever. If there is 50 pounds of downforce centered 12” from the pivot pin and the other end of the drawbars is two points maybe 3” from the pivot then static pressure alone is 100 pound of force on each tiny point. Hit a bump and the pressure could easily double or triple. Edited December 11, 2025 by Handy Don 4 Share this post Link to post Share on other sites
jsoluna 514 #140 Posted December 11, 2025 (edited) 13 minutes ago, Handy Don said: That is a drawbar intended for pulling and no more than a moderate tongue weight. Not especially thin, no, but it is a casting, not forged, and not reinforced for the load you are adding. You’ve created a lever. If there is 50 pounds of downforce centered 12” from the pivot pin. The other end of the drawbars is two points maybe 3” from the pivot. Static pressure alone is 100 pound of force on each tiny point. Hit a bump and the pressure could easily double or triple. Understood. I'll keep the weight to a minimum. I figured this was a non conventional approach and would be getting some critical feedback. Even a little extra weight out back would be good, I don't weigh much myself, but I'll make sure I take it easy on the old rig. Edited December 11, 2025 by jsoluna 2 Share this post Link to post Share on other sites
jsoluna 514 #141 Posted December 11, 2025 4 minutes ago, Treepep said: \ Nice. And the seat? Mind sharing your source sir? That's a Vevor forklift seat. I have used them on other tractors and find them to be great seats for the price. 2 1 Share this post Link to post Share on other sites
Handy Don 16,914 #142 Posted December 11, 2025 (edited) 16 minutes ago, jsoluna said: Understood. I'll keep the weight to minimum. You've put in a lot of effort. You certainly have the skill to revise that rear weight. The bracket that holds the rear end of the plow is attached to the very strong castings around the axles. Extend that. Here’s an example from one member that uses both the axle housings and the drawbar pin and gets a 2” receiver into the bargain. Edited December 11, 2025 by Handy Don 2 1 Share this post Link to post Share on other sites
jsoluna 514 #143 Posted December 11, 2025 Oh, that is sweet. I'll look into revising the design. Thanks for the feedback 🙏 2 Share this post Link to post Share on other sites
ebinmaine 79,503 #144 Posted December 11, 2025 31 minutes ago, jsoluna said: Oh, that is sweet. I'll look into revising the design. Thanks for the feedback 🙏 @76c12091520h sells a very nice hitch that uses the sides and the lower 3/4" hole as bracing. Very strong. 1 1 Share this post Link to post Share on other sites
kpinnc 18,721 #145 Posted December 12, 2025 (edited) 4 hours ago, jsoluna said: bottom of the transmission case really thin? In a twist of "rugged" mentality, it's not thin necessarily- but is the thinnest part of the case. The hitch you are using can pull a great deal of weight, but the tongue weight pushes up on the thin part. Any "bounce" on the hitch can break the case. The case below isn't broken, but you can see the thin part just in front of the hole the hitch pin goes into. Edited December 12, 2025 by kpinnc 3 Share this post Link to post Share on other sites
jsoluna 514 #146 Posted December 12, 2025 1 hour ago, kpinnc said: The case below isn't broken, but you can see the thin part just in front of the hole the hitch pin goes into. Great visual. Thank you. I will relocate and redesign and keep the weight to a minimum on the hitch pin. 1 1 Share this post Link to post Share on other sites
jsoluna 514 #147 Posted December 12, 2025 (edited) Thanks for the suggestions everyone. It was short-sighted of me to assume the case could handle the load. Didn't really investigate thoroughly enough, got caught up trying to make the mount work. It's great, actually when I run into things like this. Reminds me to keep a curious and critical mind when doing fab work. Sometimes I get too comfortable. Edited December 12, 2025 by jsoluna 1 3 Share this post Link to post Share on other sites
Racinbob 13,021 #148 Posted December 12, 2025 I usually welded a piece of bar stock to the drawbar under the case to take up the slack and disperse the weight. But I seldom used that bar for towing. I did the bar stock with a 2" ball stuck in the slot hitch thing. Obviously the weak link there was the cable going to the lift. But you'd be surprised how much that would carry. For years our RV was stored in the barn. I would back it in and pull it out with the 76. The tongue weight would be 5-700# depending on which RV we had at the time. I always kept the RV tongue jack cranked close to the ground and had to mount the snow thrower to keep the front down but it never broke. I wouldn't recommend that though. I just got lucky in my young and even dumber days. Now I have these receivers on two of my tractors. And no longer have an RV to move. 2 1 2 Share this post Link to post Share on other sites
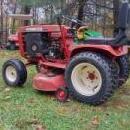
jsoluna 514 #149 Posted December 14, 2025 What a fantastic little machine. 1 5 Share this post Link to post Share on other sites
jsoluna 514 #150 Posted December 17, 2025 (edited) Drove the Raider down the road to one of our friend's place and took care of their lot as well. It was bitter cold, but surprisingly an hour+ on the tractor plowing two days in a row didn't fatigue me too bad. Impressive for a completely gear and mechanical drive unit. Seat position and seat itself help, but it is also just a well engineered machine. I liked mowing with it, but I think it excels at front blade work. Edited December 17, 2025 by jsoluna 4 3 Share this post Link to post Share on other sites