jsoluna 514 #76 Posted October 19, 2025 (edited) Wanted a nice quiet muffler, so I modified a Briggs Vanguard muffler to fit. Again, not final but functional. I'd like to clean it up, install a heat shield, and add possibly some bracing before painting it with some header paint. Took come creative persuasion on one end to fit, but it clears with about 1/16" to spare! Sounds awesome. Whisper quiet at idle. Edited October 20, 2025 by jsoluna 1 3 Share this post Link to post Share on other sites
jsoluna 514 #77 Posted October 19, 2025 (edited) Some of the replaced parts so far - the mule drive pulley bearings were awful, so I replaced those before testing the new engine. For these, I went with common 5/8" ID bearing and installed custom 3/8" reducer bushings. Was able to use our aftermarket supplier for small engine parts to get the bearings quickly and inexpensively. Also found the proper roller for the drive to keep the belt tension. Cross drilled for a cotter pin to make sure the roller didn't fall off like I presume it had before. E-clips must not have kept enough tension on the shaft. Old cables and wiring were a mess. Transmission belt idler/tensioner pulley replaced. Edited October 20, 2025 by jsoluna 4 Share this post Link to post Share on other sites
Moparfanforever 933 #78 Posted October 19, 2025 Heck of a job!!! 1 1 1 Share this post Link to post Share on other sites
jsoluna 514 #79 Posted October 19, 2025 After some hard earned results fiddling with the exhaust and the belt drive, I decided to take some easy jobs and fix the headlights, tailight, and paint the wheels to make it start looking a bit more presentable. Installed all new wheel bearings as well. 5 Share this post Link to post Share on other sites
jsoluna 514 #80 Posted October 19, 2025 (edited) For the Cold War Motors Fans: A quick video of a "My Classic Tire" featuring the Wheel Horse original rears. Paint is the Rust-Oleum Gloss Almond, and is a bit more towards the beige than factory, but I do enjoy the more warm white and I have plenty of the paint around from all the work we do on Cubs. https://youtu.be/HGGczP9Pbis Edited October 19, 2025 by jsoluna 2 1 Share this post Link to post Share on other sites
jsoluna 514 #81 Posted October 19, 2025 15 minutes ago, Moparfanforever said: Heck of a job!!! Thank you! It's starting to come together. 1 Share this post Link to post Share on other sites
ebinmaine 79,503 #82 Posted October 19, 2025 Looks great! Nice work. Complete. Concise. Neatly done. 1 Share this post Link to post Share on other sites
jsoluna 514 #83 Posted October 19, 2025 7 minutes ago, ebinmaine said: Looks great! Nice work. Complete. Concise. Neatly done. Everything is a kind of fresh-fab messy right now but I'm looking forward to it all being nice and clean and tidied up. Thank you 🙏🏼 1 1 Share this post Link to post Share on other sites
jsoluna 514 #84 Posted October 19, 2025 (edited) What difference fresh paint makes. Edited October 19, 2025 by jsoluna 2 6 Share this post Link to post Share on other sites
jsoluna 514 #85 Posted October 25, 2025 (edited) Made some more progress this week. Got the brake shaft seal replaced and cleaned up the oil soaked parts. May try relining the brake band, as it it significantly worn and about at the end of its adjustment (where the parking brake lock still engages and applies enough tension to the band to hold). I've done relining before with some of the Cub brakes, but they are a simple pad replacement, not a flexible band style like this. Gonna give it a shot, have some material ordered from McMaster-Carr on the way. Since the shaft is machined with two slots and not chamfered for seal installation, I used some feeler gauge stock to help guide the seal over the edge and not damage it. Video on this job and the transmission service will post later this month. Edited October 25, 2025 by jsoluna 2 Share this post Link to post Share on other sites
jsoluna 514 #86 Posted October 25, 2025 Also got some more work done on the exhaust, which is now complete. The Vanguard twin muffler needed some bracing to assist in keeping vibration fatigue at a minimum. Since there was no suitable location for bracing to the engine, I decided to gusset from the exhaust flange out to the muffler body, basically turning the exhaust pipe into more of an integrated manifold. Plenty strong enough now. Not pretty, but functional, which generally trends with the theme of the revival. Added a heat shield to help keep heat from the control cabling. Ran the unit under a full load for a half hour to cure the paint. Control cabling is well protected now, cool enough to keep your hand on. The direction of exhaust flow on this tailpipe is really nice. It looks a little complicated because I had to accommodate for the factory outlet angle on the Vanguard Cub, but it keeps exhaust gases from drafting back at you, so you you barely smell anything while you are running at full load. 2 Share this post Link to post Share on other sites
jsoluna 514 #89 Posted October 25, 2025 Control cabling is now good to go as well. Full range of motion for the choke and the throttle. Had to re-position the choke bracket on the CH from the Cub location to its perpendicular location on the air filter housing. Throttle was also flipped around to pull from the opposite side of the engine vs the Cub setup. The CH control bracketry makes this pretty simple to set up and modular for different applications. 4 Share this post Link to post Share on other sites
ebinmaine 79,503 #91 Posted October 25, 2025 Some nice adaptations. 2 Share this post Link to post Share on other sites
jsoluna 514 #92 Posted October 25, 2025 2 minutes ago, ebinmaine said: Some nice adaptations. Thanks - swaps are always a journey... 2 Share this post Link to post Share on other sites
ebinmaine 79,503 #93 Posted October 25, 2025 2 minutes ago, jsoluna said: Thanks - swaps are always a journey... Agreed. Interesting and certainly can be thought provoking. Your particular build showcases a good modern alternative powerplant that can be installed to keep an old Horse working that doesn't involve using cheap copies of good engines. 2 Share this post Link to post Share on other sites
jsoluna 514 #94 Posted October 25, 2025 (edited) 2 hours ago, ebinmaine said: Agreed. Interesting and certainly can be thought provoking. Your particular build showcases a good modern alternative powerplant that can be installed to keep an old Horse working that doesn't involve using cheap copies of good engines. Thanks - and I hope that this thread will help encourage someone else to do the same. It's all pretty straightforward, just requires patience, time, and enthusiasm. The Command didn't change how the machine "feels" either, which I what I really was hoping for. Still no sheet metal or chassis modifications. I have nothing against the Honda clones, but I have a lot of experience with the single cylinder Kohler Command and I really appreciate it as a powerplant. Edited October 25, 2025 by jsoluna 1 2 Share this post Link to post Share on other sites
jsoluna 514 #95 Posted October 25, 2025 (edited) Wiring tidy is complete. Fabricated a new battery tie-down to accommodate the more modern style of battery. Edited October 26, 2025 by jsoluna 3 Share this post Link to post Share on other sites
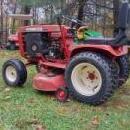
jsoluna 514 #97 Posted October 25, 2025 Some current full unit view pics for posterity. 4 1 Share this post Link to post Share on other sites