
Leaderboard


Popular Content
Showing content with the highest reputation on 10/15/2017 in Posts
-
11 pointsYou guys no how this goes. Well I recently let go of a few only to have a few more take there place. Well I tried guess there's no hope. My grandson even approves one of them.
-
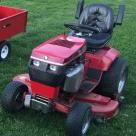
9 pointsWell, I've been so excited about this project that I need to share it. Can't tell my son though-this is going to be his Christmas present this year. He absolutely loves driving the C125 that I got from @oldredrider. I picked this ugly beast up for $50 at the auction in Charlottesville. I only wanted the deck from it. Got the idea to fix it up for Emory for Christmas. Best part is he thinks I'm doing it for me. Can't wait till Christmas morning for him to find out it's his. This is going to get the Vanguard I picked up last week. Got several ideas to make it just his. I'll share more later as I go. I do need to get in touch with @Vinylguy to get him to do a set of his custom decals for it. I'm going to need a little help hooking up the Vanguard. It's got one wire coming from under the tinwork and I'm not sure what I'll need. I'm thinking it will need a regulator, solenoid, and switch, but which do I use? Look at him in the last picture-no idea it is his! Oh well, that's enough for now!
-
8 pointsCraig's video sums up the update. Still have a lot of work to finish it like turning brakes & hydraulic pump and reservoir. Not sure how much I'll be able to work on it this spring. Depends on my potential relocation. Pretty happy with it. Kyle @fast88pu got the predator hooked up for me a few weeks ago. Shout out to him for his assistance!
-
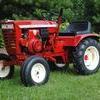
8 pointsJust recently, spied this Horse hauling the male.
-
8 pointsStevebo's manual, and electric start '56 Ride-Away Seniors.
-
6 pointsI have a several Tecumseh engines in service and they run great. They are substantially different from Kohlers specially in the ease of maintenance. I think that is the cause why most people don’t like them, because most of them are not running correctly due to the lack of proper servicing. Carburaters also require slightly different maintenance. Old Kohlers are tanks and they will run well even under the most adverse conditions where a Tecumseh is a bit more sensitive to the same conditions.
-
5 pointsOnly needs about twelve more of 'em to equal that old Chevy.
-
5 pointsLet's bring this back out of hibernation. Rolled her out today and redid the steering rack mount and made it simpler and cleaner than the bracket I had made earlier. Going to redo the way the floor is so I have been changing around a couple of things. Made my battery box and trimmed up the lower front hood hinge to clear it. Also made a L shaped bracket to weld to the firewall frame for support and the remote oil filter mount should bolt up there. Small steps....... I mean I have only started over twice and been working on it for 3 years now
-
5 pointsNot so sure it's original - seems to show signs of being on another machine. Seems ok, has compression and is free. Haven't tried to start it, will probably save it for another project. I hope so. Just hope he doesn't catch on. Gonna get a set of carbon fiber decals from Terry and have him put Emory on the seat pan decal instead of Wheel Horse. Gonna wait till after Emory goes to sleep Christmas Eve to put that on.
-
4 pointsHappy Birthday @Wheelhorsestory, we are all glad you were born!
-
4 pointsYup, Coyote and now Road Runner. Maybe that Briggs will let it live up to its name. No idea what model this is. The serial number is rubbed off the plate, decals telling are missing, and the 10hp Kohler seems to be a replacement. Think I'll just label it a C165 since it will be running the 16hp vanguard. Went down and tore off the tin work and engine. Kind of naked now. Emory is pooped! Look at that left spindle - bet someone took a mighty rough ride to do that!
-
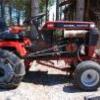
3 pointstraded my bucket truck straight across for an 81 f250 and an 8n Ford tractor...pretty excited about the deal
-
3 pointsLet's review: 1 Chevrolet for 2 Fords. Sounds about right to me!
-
3 pointsI have a hydraulic steering cylinder for an outboard and a power steering valve but I decided to keep it this way. It steers pretty easy anyways. Changed the name also because I had a decal made for the hood.
-
3 pointsThere is check valve's in the fuel pump small rubber discs with a spring. Maybe something has gotten stuck under one of them and not letting it close
-
3 pointsSold a wheel Horse 42 inch sickle bar mower and traded for cash and this older 42 inch sickle bar mower painted yellow. I think this was used by a state or local government for mowing as it has two distinct features not present on other original Wheel Horse Sickle Bar mowers. The lift piece is a chain attached to a welded bar on the frame not present on original mowers. Also the cover for idlers in frame is heavier steel plate welded on to frame with no front cover ( where Wheel Horse head decal would go on originals) . I am going to redo this .
-
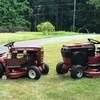
3 pointsHad all three out today, hopefully the c160 is going to a new home tomorrow.
-
3 points"Road Runner"
-
2 pointsThere will (or should be) be a grease zerk on top of all three spindles. The middle spindle has a tendency to rub on the lift rod on a lot of decks, it may have worn off the zerk. There is also a zerk on the base of the shaft that goes to the steering wheel around the geared block. It's sometimes caked in grease and difficult to find but it's there. You can find it referenced on page 22-23 of the owners manuals.
-
2 pointsThe center spindle zerk may be worn off. The tractor deck lift will hit it and wear it off. I remove my center zerk sand replace it with a fine tread set screw. The only time you can grease it is when the deck is removed.
-
2 pointsWon't be long before he grows into that one , Tom..
-
2 pointsJust recently, I have gone to the electric fuel pumps. Unbelievable how much it improves starting times. Makes it so much easier on the battery and starter.
-
2 pointsThe correct filter would be a NAPA 1410. Do not use an automotive oil filter.
-
2 pointsRubber selection is spot on Aldon.
-
2 pointsIf you were to hang a hydraulic pump on the engine you could make that a Power Rack and Pinion.
-
2 pointsI have a 522xi w loader. You're going in the right direction. I wish I'd waited for a nice used SCUT instead of settling on this. I use it at the vacation home so it sees limited use. I can't count the number of times I've had to pull it out of a 6" deep hole. It works ok but nothing like a 4x4. It still beats a wheelbarrow!!!
-
2 pointsSounds like a safety switch. I'm not familiar with the 417-A, but if there is a safety interlock switch on the pedal, it may be slow to close, causing the start circuit to be OPEN, and the Clutch Pedal light to flash.
-
2 pointsThanks for the link Craig. I have the same issue with Elvis.
-
2 pointsI just fixed up a Techy OHV 18 for a friend it was in one of the kit wheel dozers from the 1970s. Hadn't run in years. Did have to replace the flywheel as all the magnets inside had broken free. No worse price or availability wise than ones for Kohlers. Had to replace the ignition module $125 for a used one. Anyone priced the Kohler breakerless parts lately??
-
2 pointsLink to eBay allowed since a direct answer to question. (nylyon)
-
2 pointsIt will be whatever Emory wants it to be! Cool project.
-
2 pointsSomething to keep in mind. An engine can run real nice but lack power if the exhaust is restricted. Had one that I thought was carburetor icing. Same symptom. Let it sit a minute, restart and good for a while. What happened was an internal baffle disintegrated inside the muffler and it would move around until it covered the exhaust outlet. Exhaust pressure would hold it there reducing performance. Shut it off and the baffle would fall away from the outlet. Power restored after a restart. Tapping the muffler with a rubber mallet one could hear the loose baffle. Garry
-
2 pointsIt's hard to stop half way through the process, and go back. Keep going forward, continue using the same process you used on the hood. Then cut and buff the original paint I see lurking there under that patina/greasey hood. That tractors original paint will easily glow again, if you just keep on going.
-
2 pointsMy experiences with tekys are if they run good they are great but ive not had much luck bringing them back from the dead.
-
2 pointsTook my little 400 out for a ride today.
-
2 pointsHi guys, picked up new wheel horse 1055 yesterday as you can see it’s a pulling machine! All origanal except for starter wiring and some fuel hoses. Bought new plug, and new fuel filter cause the gas tank was full of crap. Little 10 Horse will have you in a wheelie in no time with that straight pipe adding lots of power. Had three of my wheel Horses at waters farm days in Sutton Mass (anyone in the area should come) left them for the night took this one home cause it wasn’t running right but got it to run like a top in no time. Very excited to pull with it tomorrow, will update you guys. And one more thing, the throttle only goes out about one cm. and I can’t figure out why I will look into it more though. Will get some better pics too
-
2 pointsVarious ideas were tried out for the seat using bits and pieces lying around and then discarded. A visit to a local upholstery shop with measurements resulted in a lottery win quote. Back to head scratching mode. I had already spent hours looking for something suitable on the internet without luck, trying various search word combinations. Then I spotted some cheap-ish scooter ( Lambretta / Vespa ) back rests. Not exactly what I wanted but worth a try. A pair were bought and after initial, not sure thoughts, the end result was better than expected. The fill in piece behind the seat cushion, made from plastic, still needs finishing off with padding. The first mock up from ply. The alloy frame, ex green house, just cleared the top of the gearbox. Fixing brackets were bolted on. Sheet steel was bent up for the base and back rest. There were two short threaded studs already fitted which made mounting easy. A length of U shaped trim finished off the steel plate and a similar section was fitted to the fuel tank. I finally managed to get my Great grandson Henry to try the tractor for size. Even though he is only 7 : 1/2 months he loved it. Mummy said she had never seen him so excited, squealing and swinging the steering wheel. We had to hold him though as mummy refused to let me cable tie him on.
-
2 pointsYou can check fire by rolling the motor over and using your tongue! I remember working on a ladies car once. Opened the hood and dog food came flying out from the hole on the inside of the hood. Air cleaner box was full of Gravy Train. one of the guys in the shop had a truck with an electric carb heater base. Wouldn't start one day. Heating element cooked a bunch of cat food and melted enough to form a solid mass.
-
2 pointsI did fire the K482 just once with straight pipes - sounded like a cannon on rapid fire at idle...lol . Here it is finished prior to painting... Sarge
-
1 pointI just became the owner of a WH dump cart... for the second time. I bought it five years ago for $40 and it sat around the garage for two years, then I gave it to my friend when he bought my last tractor. He wasn't going to get around to restoring it, so he gave it back to me this week to go with my new 857. Friday I dropped off the tub at my local welding shop to fix the rotted rear lip. Anything Wheel Horse is hard to come by here in Kentucky and this has been the only cart I've come across over the years. I need some help with wheels and tires for this project. What where the original style of tires on these carts, the ribbed wheel barrel style? My wheels are very rusted; one especially around the tube stem hole. Is there a wheel barrel tire/wheel combo out there with the same hub offset? Here's some old pics back from when I first purchased the cart...
-
1 point
-
1 pointIt looks and sounds so good!
-
1 pointOne more tidbit of info....ran the tractor for over an hour and let it cool off, checked the head bolts and EVERY one of em needed to be re-torqued.
-
1 pointI just close the tank petcock on my 312-8. Sometimes it isn't fired up for two or three months.
-
1 pointC-145 should have this transmission. Click on the picture Garry
-
1 pointWhy...once wasn't good enough?
-
1 pointTook off the center "tower" piece today and found the bottom had broken off but still held on by the bolt. Cleaned up both pieces, put a magnet behind it and stuck the other piece to it. Welded them up along with two more cracks and then cleaned it all up. Also welded some small threaded flat "nuts" I made to hold the lever panel to it so I can remove it without taking the tower out. Post office brought me some goodies today..... two 90* mandrel bends in 304 stainless. Now I can build my muffler. 👍
-
1 pointI use a U1 battery in all of my Wheel Horses U1R has the negative terminal on the right as shown below. U1L is just the opposite.
-
1 pointBrian miller mentioned cleaning and re-using the old head gasket and simply spraying it with silver spray paint. I like this idea as the few new head gasket I have used seem to shrink after many hours and require retorquing. Gets really annoying. If you clean them spotless, and the engine does not burn oil, I have not had one leak. I have had them leak on oil burners as I think the oil is not compressible. I retired a Kohler M14 that used 1 qt per hour.
-
1 pointhttp://gardentractorpullingtips.com/cylhead.htm#headboltorque


.thumb.JPG.1b2a1a39cdcedb1e001571713350b32c.JPG)


This leaderboard is set to New York/GMT-04:00