
Leaderboard


Popular Content
Showing content with the highest reputation on 04/13/2017 in Posts
-
14 pointsI really needs to get me another headlight matey's, yar I do. Aarrrrr
-
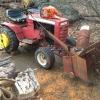
9 pointsAt least that's what I'm calling it til I get time to paint the chassis. It's a '66 106 with a '72 6 H.P. Tecumseh H60. Runs strong. Came with the original deck also. It was heading to the scrap yard a few months ago........ oh hell no!
-
8 pointsWell my new block finally arrived. Broke the old one trying to re tap the grease cert that PO busted out with the lift arm hitting against it. New one is steel and not die cast like the original. I hope it doesnt make a difference. I also left it as a full block and not stepped down as original cause as you can see there isn't really very much meat there where it broke. I will try it and see what happens, heck it didn't cost me anything to have it made due to my brother. Lol! Has anyone else have to re-make one?
-
7 points
-
6 pointsJust put an eye patch over that missing light, and she's good to go.
-
5 pointsI had a nice set of 4 tires off a donor tractor. The fronts went on my work horse project, that tractor has the wide 8.5" wheels and new rubber so I had a spare set of rears. Decided to leave the chains on my 8.50" Firestone Terragrips and swap the 10.5" turf-savers on for the summer, I did put the cast iron back on. Just a shot of the difference. Barely notice in the picture but can tell in person It's the picture. I didn't take it straight on
-
5 pointsMastiffman, Use the following: Onan Coil Test Procedure IGNITION COIL To test primary and secondary windings within the ignition coil first make sure the ignition power is off and coil is at room temperature of 70°F (21 "C). 1. Use a Simpson 260 VOM or equivalent. 2. Place a black lead on negative (-) coil terminal and red lead to positive (+) coil terminal. Primary resistance should read between 2.90-3.60 ohms. 3. Change resistance setting on ohmmeter. Place ohmmeter leads inside of spark plug cable holes (Figure 3). Secondary resistance should read between 14,500 - 19,800 ohms. 4. If either of the above resistances are not within specifications, replace the coil. Hope this helps............................Gary
-
5 pointsEMT JOE,,,,,,,,,,,,,i just realized,,,,,,,I know everyone in the Big Picture,,,,,,,, Now,,,,i know they all appear to all look like adults,,,,,where,,,in fact,,,,,,,your going to think They are a pack of 7th graders on a playground,,,,,,Most of them will be running,,,,jumping,,,not watching where they are going,,,,it seems more like the county Fair,,,,,,,,and yes,,,,,,alot of them will be loose on running tractors without parent supervision,,,,,,,They will even be wearing I,D,badges around their neck..................................I wouldn't want it any other way...... Howard 857 Horse in Va
-
5 pointsMaybe he needs a mascot.
-
4 pointsHi Fellas... Well it's a fix for now. I replaced the hose with the one WheelHorseMan1000 made for me. I was going to replace the other hose as well since I was in there. However, there is a small issue that will need to be dealt with. The threaded opening where one attaches the hose to the pump is countersunk. The wrench size for the original hose is 16mm. I found that odd, but it was. And the new uses are 11/16. So, the countersink on the pump is not big enough to let the hose go all the way in. I realized as I was removing it and just tightened it back up again. I think the fix wouldn't be to bad if you have a drill press to make that pump countersink a little wider. There is an o-ring on the end of the hose that needs to seal. It looks like I was able to do that but you can see I had to tighten so much the it scraped the countersink edges. It's all buttoned up and so far no leaks. 🤞🏻
-
4 pointsBeing splash lubricated it is preferable to mow up and down on steep slope.
-
4 pointsAnd it's not even "talk like a pirate" day.
-
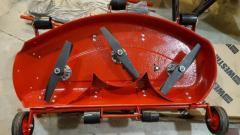
4 pointsI bet Garry can find the manual for this deck. 36" TD (top discharge)
-
4 pointshey farmer , I catch fish that look like that ,....
-
4 pointsNaw... I like ole one eye.
-
3 pointsGood to know - I forgot that gt pumps also have the counter sunken holes this is what I do for the pumps with the #5 ends on the pump (see picture) and had no issues. @BigRedGrizzly if you would like I will send you out another set with the correction ( because it was my fault that I forgot)
-
3 pointsThanks for the update. Just thinking out loud but fully tearing it down to machine the housing sounds like a real PITA. Maybe it would be easier to dremel grind the edges of the fitting so that it clears the countersunk edge. A potential work around to a complete disassembly. Adding Lowell, as a heads up. @wheelhorseman1000
-
3 points'The operators seat' won't be in tonight's instalment, (getting a little ahead of myself) instead we look at fuel tank, battery and linking the subframe to the tractor frame. with the the new extended tractor frame bolted up to drive axle, steering laid in and working, engine back on, its fuel tank time. The tractor had a good one so I wanted to use it, couple of issues here however. 1/ It could not be mounted square on the frame because the fuel line would be directly inline with the steering rod underneath. 2/ It had to be offset on the frame to allow clearance for the transmission belt to pass. Luckily, by moving it a few cm's to the right both problems were solved, the fuel line now passes between steering rod and right hand frame rail, and belt clearance is good. Standard size battery sits 'east west' on the frame where the cables can be hooked up as before. This picture shows the appropriate layout. I also planned to use the fuel tanks wire and spring to secure it. Also you can see the need to lengthen the steering wheel shaft. While on the bench and in this position it's time to take measurements to attach the subframe to the tractors frame. As the distance between the two frames was just short of 200mm my choice of steels was the same 200x50x5mm box as before. Two pieces cut with a nice angle to hopefully make it look less 'boxy'. I then welded caps on them ready to.... ....show them up between the two frames. So remember the measurement was less than 200mm? I cut two slots into these two cross members to allow the subframe to come up. The slots effectively allowing the tractor frame to fit down in the cross members. Four small pieces of angle were clamped to the tractor frame drilled and bolted through. Then the subframe lifted up trapping the cross members into the frame above, where I could weld the angle pieces to the cross members. The excess length of the subframe was cut off, and the ends capped. Leaving me with this as the 'finished product'. Remove four bolts and the two frame can be parted. The picture probably explains what I mean clearer!! Anywho it's time for me hot chocolate.
-
3 pointsHi all, new to the forum! Long time wheel horse owner and collector. Just realized tonight that y'all are here. When and where is the big show? Any advice would be greatly appreciated. Joe
-
3 pointsYes it is Steve when going along the hill you have to shift your weight up the hill on the fender for stability. Easier by the way when younger than older. Bob
-
3 pointsYou could also go on an angle and split the baby. I usually alternate patterns to avoid wheel ruts...
-
3 pointsI agree with Paul. You do not really need that plug. You could probably fiber glass that hole and be OK. Make a dip stick to put through one of those bolt holes with a scratch to know where the level should be. I think you are going to want to take this trans apart any way...just because it would be easier to work on that hole. Is my backyard mechanic showing??
-
3 pointsA combination of spray carb cleaner followed by non-chlorinated brake cleaner does a good job of getting oil out of the casting pores.
-
3 pointsThere isn't much if any stress on that point. Thread in a pipe plug degrease the area build a form with duct tape and fill it with JB Weld They have a putty version that should not flow into the case.
-
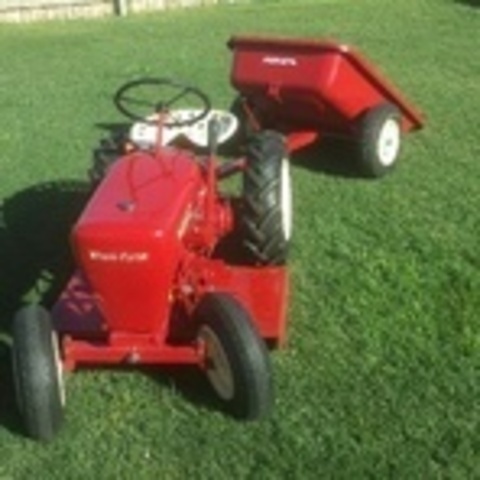
3 pointsI am familiar with the B series tractors but don't know about this one photo'd. Any input ?
-
3 pointsNot sure I would have worded it quite that way Craig.. I'll rephrase it, the operators seat.
-
3 pointsThank you to everyone who has responded! And thank you all for the information, i feel more welcome here than I do at home! I hope to meet some of you at the big show! ~ Thanks again, Joe
-
3 pointsYou're really stuck... on his butt, huh Farmer?
-
3 pointsIt's a 1973 model. Essentially a B-80 but with smaller rear wheels. Mike....
-
2 pointsYesterday we had a nice day so it was time to Put the Horse to Work. Well my ACE PUHEE helped in the first task of De-Thatching, after that he was just like any other kid he had to take off with MA and shuck his chores So I had to finish the Sweeping and Bagging myself. I ended up bagging 5 55 gal bags full of dead grass. The 522XI did me a mighty fine job, and the Cruise Cont. was nice and the Gas Usage was great and better than I expected it would be.
-
2 pointsGot my 1st wheel horse tractor for free ! It's a work horse 1848 & runs & looks good ! Trying to find a manual for it !
-
2 pointsHaven't had to make one yet but I thought I was going have to.The zerk was missing on one of mine and the casting is real thin.There were no threads to put a new one in.I was puzzled until I realized that the zerk on this part is pressed in.Your new part looks great.If your brother is like most machinists, to him it is a simple part, that most will marvel at.Nice work! Luck,JAinVA
-
2 pointsCheck for spark with plug out grounded on the block while cranking it over, if you a vivid blue spark it's most likely not there but if it's light blue to yellow, then check the points gap and adjust accordingly, also the condenser to the coil could have went bad/weak as well as coil, when you pulled the plug after cranking was it wet? if so your getting fuel if not carb issue float valve stuck? Just trying to cover all the bases here, Jeff.
-
2 pointsIt is probably safer to go up and down also. Some of that looks a little steep.
-
2 pointsThat may be the plan, eventually. But first I need another horse, like you guys say you can never have just one. Just too handy to be without for very long. I am hopeful of getting a moldboard plow in time for getting the garden in this year.
-
2 pointsJust went and had a chat with the neighbor. His son works at a weld shop and is going to take a look at it sunday evening if not before. Seems it may work out being far easier to get fixed than I was thinking. Thanks for all the suggestions, you guys have helped me with a lot of problems before I even signed up for this site.
-
2 pointsSo after a week of watching paint dry I have finally wrapped this thing up! I'm pretty pleased with the paint job! I'm not sure if I'm the only one that has this issue but my wing ding thing that holds the lift cable to the slot hitch rubs on the transmission case wearing the paint off during it's operation. So I made up a small riser to fit the end of the cable sleeve that will keep it up just enough to keep my new paint job intact. Here's a closeup of what it looks like and how it eliminates contact between surfaces. Also, to save the new paint, I added 2 teflon washers between the wing ding thing and the slot hitch. Had to make up a new, longer, clevis pin to make room for the washers. I also repainted the slot hitch and the hubs: I repainted the brake drum and brake band as well but don't have any closeups. I do, however, have a couple pics of the blower housing that I repainted. After a little sanding and buffing it came out pretty slick. Here everything is... Assembled, buffed, and all that other jazz. My kind of rear end! Here's a video of me running it through the gears for the first time. Thing are slightly snug... just need to run it around the block and wear it all in. Unfortunately, it's raining so that will have to wait. The whole tractor has been completely restored for the second time and is untouched and unused.. I'm just not emotionally ready for the rain yet! Anyhow. I am certainly pleased with the way it all came out! Only one last question.. the manual calls for 90w gear oil. I'm using 80w-90.. I know this will be fine. But in the interest of prolonging the condition of these old gears should I go a bit heavier? Also, I've always put 3 pints in, but I read in another thread to use 1 quart... suggestions?
-
2 pointsAs much as we love our it seems some people out there think they are gold plated. We tend to be reasonable on pricing with our fellow members to help keep our horses going. You could contact A-Z Tractor, one of the vendors on here, he is very good. aztractor255@gmail.com Good luck and keep us posted.
-
2 pointsOh shoot! I was so upset by it breaking I forgot to post mandatory pics Here's the problem
-
2 pointsYea, I'm looking for a D parts tractor, frame, axles and some sheet metal, no engine or hydro ... maybe I'll get lucky!!
-
2 pointsGood idea. Lol, though the way my luck is going it may give new meaning to splitting the case
-
2 pointsI have had trouble with [no start] tractors of that vintage getting dirt and battery fumes into the little ATC fuse block. Pull the fuses,blow out with air, and use penetrating oil, and re-install. On my tractors, the fuse block is below the battery and just inside the blade clutch control handle, but mine are Onans, so YMMV. Safety switches like the seat switch are also something to check. Good job on bypassing the thing to get your yard mowed. Out on the farm, we did that more than once, but there were also reports occasionally of farmers being hurt or killed by jumping the starter and not checking if the tractor was in gear.. Dad always did his with one of us on the seat, tractor out of gear, and pushing in the clutch
-
2 pointsI have one of those vented decks LOL. I thought at first it was from rust, but when I cleaned it up I realized the gentleman I got it from had hit something and it went through the top of the deck!! It actually has very little rust.
-
2 pointsWe will all be there, rather easy to spot; we will be driving little red tractors!
-
2 pointsIn the clear light of morning, after spending far to long staring at this pigging picture, l've worked it out..... It's an optical illusion,..duh, I could only see the frame clamped horizontally, whereas in reality it's clamped vertically. (couldn't workout how the lengths were different and how the angle iron had turned!!) Getting older is a b#tch sometimes. I find myself mumbling away to no one in particular about nothing in particu........... ........ ... Tonight I think it's gonna be about fuel tanks, batteries and Dennis's butt again.
-
2 pointsThe 520 is the featured tractor this year. there will be a lot of them there...
-
2 pointsFriday is the best day of the "Big Show" and you will be able to be a part of the RedSquare group photo.
-
2 pointsI use to like sending the "Boot" FAs for a bucket of steam. My buddy who was a deckie topside would send them for 1,000 feet of shoreline!
-
2 pointsDon't sell yourself short. Dick and yourself may have one game left to play.
-
2 pointsWelcome to the forum. Here is a start Garry


This leaderboard is set to New York/GMT-04:00